Honey Can Cook

Tag: bulk fermentation

  • Late Lunch

    Late Lunch

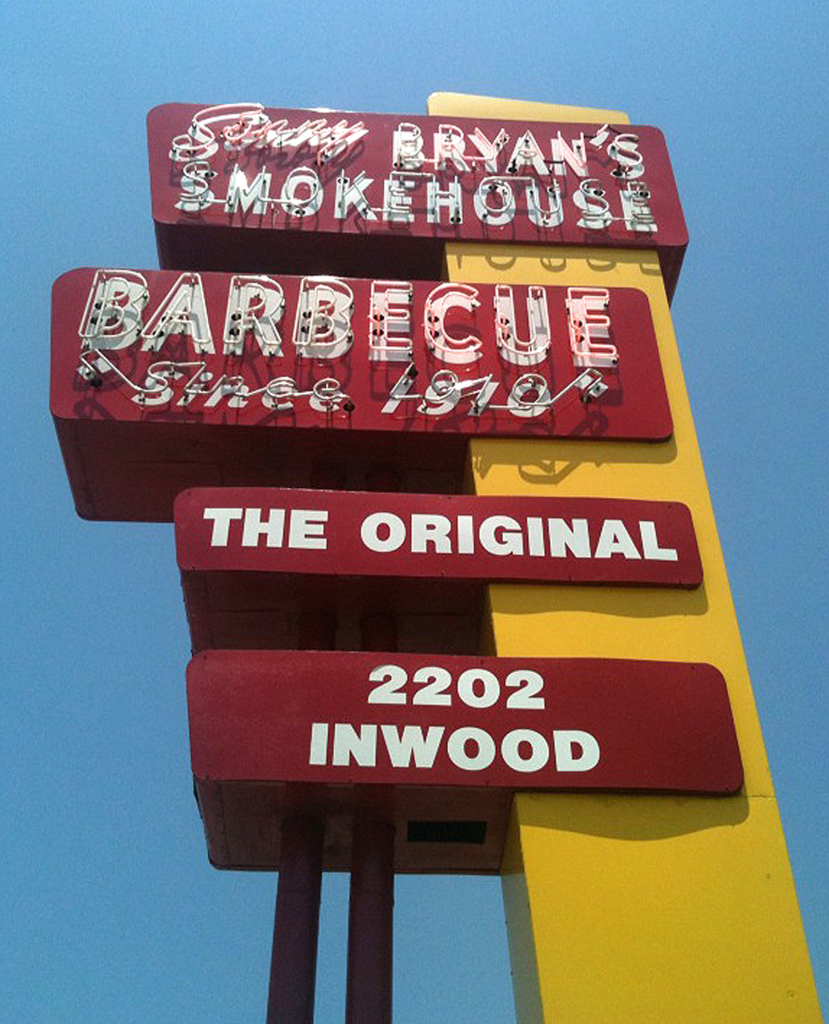
    Today was busy, busy.  My adoring husband and I were both doing chores at home that consumed the majority of our morning and trailed into the afternoon.  When we finally stopped and decided we needed food we settled on BBQ.  We decided to go to Sonny Bryan’s original BBQ joint, a long time establishment in Dallas.  The original site on Inwood Road is the one to visit.

    There was a line, not surprising.  This place is tight, but worth the short wait to order.  A dude in a baseball cap and yellow shirt was taking orders down the line and handing them over to the kitchen.  After every order taken today he shouted, “Go Mavs!”.  We Dallas Maverick fans are pretty pumped about our team playing for the NBA championship and tomorrow night you will find me in front of the television cheering madly from the same seat where I’ve watched games 1-5, wearing the same #2 Mavs shirt I’ve worn for games 1-5, and looking for a game 6 win.

    Back to BBQ – we ordered and found seats.  Seats at this joint are old-time, wooden school desk tops installed along long benches, in a narrow room with windows.  There is no air conditioner moving the air but plenty of rustic charm.  If it’s too tight inside you can find a seat at one of the picnic tables outdoors next to the parking lot.  We chose one indoors today for the ambience that only a vintage BBQ joint can offer.  The smokey fire pits, neon signs, fried pies piled on a counter next to sweet tea, fresh-cut onions, briny pickles, bottles of tangy bbq sauce, and the customers.

    The clientele today was varied.  Unique, average, young, and old, as always at Sonny Bryan’s.  The 30 something group downing cold beer with their chopped beef sandwiches, the business man in his dress slacks, button up chambray and striped tie, chowing down on his sandwich standing at the counter, ladies in sundresses with painted toes and flip-flops, men in baseball caps and khaki’s, a city bus driver, Hawaiian shirts and Keens, and us, sporting jeans and t-shirts today.  There was one thing we all had in common – smiles and bbq sauce on our chins.

    I ordered a pulled pork sandwich plate with sides of beans and potato salad.  Hubby ordered a brisket and sausage sandwich, bag of chips and tea.  His tea plain, mine half and half, half plain-half sweet.  We piled pickles, jalapenos and onions on a sheet of foil, grabbed tons of napkins,  a bottle of warm sauce and dug in.  My sandwich bun filled with tender, tasty pork, was moist and delicious. The brisket and sausage sandwich, smokey sausage and sliced beef, tender and flavorful. It was a great way to spend a few minutes together on a hot, summer afternoon in Texas.  Good food and good company left us feeling satiated and primed for the rest of our day.

    If you ever find yourself down Dallas way be sure and stop in at Sonny Bryan’s – I recommend the original for the best food and experience.  Stay tuned for “Road Food” photos of Sonny Bryan’s coming soon.

    Enjoy!

  • Fruits Of Summer

    Fruits Of Summer

    Fruit: the sweet and fleshy product of a tree or other plant that contains seed and can be eaten as food.  ORIGIN Middle English : from Old French, from Latin fructus‘enjoyment of produce, harvest,’ from frui ‘enjoy.

    The last two days have yielded the first peaches from my two peach trees.  It is always a thrill to pick the first ripe peach of the season and bite into its juicy flesh.  It also always means the beginning of a few weeks of spending much time each day picking, pitting, cutting and putting up peaches.   Last year my bounty exceeded 150#, a record for my two trees.  I don’t expect as many this year as the rains were less and the weather colder than last.  I eat them, freeze them, grill them and make jam with them.  Of course there are cobblers, pies and homemade ice cream too.  It’s a sure sign that summer has arrived.

    Last week I bought my first local cantaloupe at the produce stand and for the first of the season it was juicy and sweet.  In fact it was very sweet and pleasing to the palate.  I’m looking forward to a summer full of sweet melons grown in Texas soil.

    Over Memorial Day weekend we attended a pool party where the hostess had prepared a delightful and beautiful mixed fruit salad topped with fresh mint, grown in her back yard. It was the perfect accompaniment to the burgers, baked beans and potato salad.  The glass bowl  revealed a mixture of kiwi, blueberries, blackberries, raspberries and watermelon.  It reeked of summer!

    I truly relish the fruits of summer.  How about you?  Which is your favorite?  What is your favorite way to enjoy seasonal summer fruits.  Drop me a note and share your thoughts.

    Enjoy!

  • Road Food

    New Road Food that will make your mouth water! Check it out under Road Food – Florida.

  • Strawberry Ugly Cake

    Strawberry Ugly Cake

    First of all, let me say I am so happy sitting at my desk writing a blog post!  Do you ever have those weeks where life just takes over and you have no choice but to put aside the things you love for the things you must?  Last week turned into that kind of week for me.  I’d mentioned with the holiday that I would be quiet for a few days but I didn’t intend for it to turn into a full week.  The best part of the musts that took over my life was a trip down to see LuLu in Austin.  Our state capital city is a beautiful and very hip area of Texas.  The time is always pleasurable when we visit, especially with LuLu, my oldest daughter having taken up residence there.

    She did a wonderful job of feeding us and I will be blogging about her chocolate cake one day soon.  We marveled at how the tables turn in our lives as she whipped up the delicious chocolate cake and homemade frosting, while I perched at the counter with a glass of wine and watched.  When she is at “home”, home meaning the place where she grew up, the tables turn and I make the cakes and frosting while she sits!  This of course being the original way the table was turned.  Interesting how that works, as children grow up and start making their own “home”.  I’m getting a kick out of it!

    So, back to that holiday weekend, Memorial Day.  Seems like it was forever ago.  I was asked to make dessert for a pool party we were attending.  I wanted to try something from Ryan at Ryan Bakes.  She is a beautiful lady turning out some fabulous looking stuff on her blog, www.ryanbakes.com. I decided on her Strawberry Pound Cake with Cream Cheese Glaze.  Her photo was picture perfect and it sounded ideal, as the hosts both love strawberries.

    She agreed to my use of her recipe.  I had most of the ingredients at hand but purchased the fresh strawberries.  I needed to bake this cake and glaze it the day before the party.  I got to work early on Saturday baking, being sure to allow plenty of cooling time so I could glaze and photograph it while the light was good.  Well, Ryan, your cake looked perfect, as I stated above, mine not so!  I decided to slice and add strawberries around the rim of the cake to aid in presentation.  Where my cake failed in presentation it made up for in flavor, texture and deliciousness!  It delivered the most moist, soft crumb, especially as pound cakes go.  The thick glaze begs for a finger to swipe a taste.  The red strawberries peeking out from the cake are a nice contrast to the thick, white glaze.

    My Strawberry Ugly Cake was a hit at the party and the few pieces we carried home lasted only a short time.  A big “thank you” to Ryan for allowing me to try her recipe.  It may not have been the prettiest cake I’ve ever laid eyes on but I declare it a winner, nonetheless.

    It’s time for an update on my bees too.  Flowers are blooming like mad in my back pasture and my bees are making the best of it.  Today it was necessary for me to add supers to three hives, to give the bees plenty of honey making space.  Some of my hives are starting to resemble high rises and this makes me smile.  I also caught a glimpse of Queen Anne today.  She is the city queen whom adoring hubby and I removed and brought to the country.  Her hive is small but growing and flourishing.  The time for honey harvesting is growing close and I am spending any reading time trying to educate myself before the process begins.  Sounds like a sticky situation, but I am up for it 100%.

    It’s good to be back and thanks for stopping by.  Don’t hesitate to drop me a “howdy” before you go.

    Enjoy!

    Ryan’s Strawberry Pound Cake with Cream Cheese Glaze
    aka
    Strawberry Ugly Cake 

    Ingredients:
    2 Sticks unsalted butter, softened
    2 3/4 cups sugar
    6 eggs
    3 cups cake flour
    1/4 tsp. baking soda
    1/4 tsp. salt
    1 cup sour cream
    2 tsp. vanilla
    2 to 2 1/2 cups diced strawberries tossed with 1-2 tbsp. powdered sugar

    Preheat oven to 325* F.  Grease and flour 12 cup bundt pan or spray with Baker’s Joy.

    Cream butter and sugar until light and fluffy (about 3 minutes).  Add eggs, two at a time, beating after each addition.

    In a separate bowl, sift cake flour, baking soda, and salt.  Add this mixture to wet ingredients, alternating with the sour cream.  Add vanilla and beat for 2 minutes or until ingredients are mixed well.  Fold in diced strawberries.

    Pour batter into prepared bundt pan.  Bake until cake leaves sides of the pan, about 45 minutes to 1 hour.  allow cake to cool in pan before removing.  Invert onto a wire rack.  Cool completely before frosting.

    Cream Cheese Glaze

    1 4oz. package cream cheese, softened
    1 tbsp. butter, softened
    2 cups powdered sugar
    1/2 tsp. vanilla extract
    1 tbsp. milk

    Mix all ingredients together until smooth.  Mixture will be thick.  Heat the icing in a microwave for 10-15 seconds to reach drizzling consistency.  Stir icing and drizzle over cake.  The icing will harden slightly after frosting and form a shiny, thick glaze.

  • Peanut Butter on the Brain

    Peanut Butter on the Brain

    For some reason I couldn’t get Peanut Butter Cookies off my brain this week.  I finally succumbed to the thought and baked a batch of PB cookies.  We needed a little something sweet for lunchbox treats this week anyway.  My girls have taken homemade lunches to school from kindergarten all the way through high school.  It is a rare occasion that they eat from the cafeteria.  I know cafeterias are reputed to be working at providing healthier lunches for kids, but mine always prefer mom’s sack lunch.  It’s always fun to have a “cute” or “comical” lunchbox to tote to school too.  School is out for summer next week in my neck of the woods.  Miss T has carried an old-fashioned, metal, Hello Kitty lunch box to school this year.  It could be placed in retirement in lieu of a cooler, cuter, bigger, brighter lunchbox next year, or her affinity for Hello Kitty might keep it in circulation.  She will be a senior so it will be interesting to see what she chooses for that last year of carrying her homemade lunches to school.

    Ok, peanut butter cookies.  Maybe the easiest cookie to throw together.  I used extra crunchy peanut butter as I like that little crunch in the cookie.  They are crunchy, rich, and peanuty and only a few bites per cookie.  This does not guarantee against multiple trips to the cookie jar, but if you’re hankering for a bite of something sweet, these are perfect.  One night I wanted something extra indulgent, here is what I did.  I took two scoops of Blue Bell Homemade Vanilla Bean ice cream, drizzled it with warmed Mrs. Richardson’s Butterscotch Caramel Topping and crumbled 2 PB cookies over the top.  Sheer pleasure at the combo of the cold ice cream, which is delicious alone, the warm caramel oozing with every bite, and the rich crispness of the cookie topping.  Give it a try!

    Before I go just a bit about bees and Beep, our resident Roadrunner.  Beep is becoming so comfortable in our yard that our normal comings and goings as well as those of the dogs don’t seem to faze him anymore.  I’ve been as close as about 25 feet away and he just watches.  The dogs have long given up chasing him.  Yesterday he was lounging on the chairs in the back yard, preening himself, and making the funniest clacking noises with his beak.  I pulled up a rocker on the porch, with camera in hand and took one shot I will post below.  It is interesting how you can see the patches of blue and orange, a sort of peachy orange on the sides of his face. These are not feathers but patches of skin and not usually seen when catching a glimpse of a Roadrunner.  Thought you might admire our handsome Beep!

    The bees are incredibly busy now.  I checked all 5 hives yesterday and was pleased with my findings.  Looks like honey production is beginning to take place and still lots of baby bees baking. They will continue to hatch and replace the older girls as summer progresses.  I got a peek at Queen Heidi, she is my shyest queen but she is doing a great job in her hive.  It’s my biggest with the most bees.  Maybe 25-30,000 bees in her hive. Mind boggling isn’t it?  In my newest hive, where Queen Anne resides, the bees in less than a week have added new comb, wax and secured the natural comb to the frames.  I think they like being country girls!

    This Peanut Butter Cookie recipe is straight from the Joy of Cooking – 75th Anniversary Edition.  In lieu of the upcoming long holiday weekend, I’ll be taking a short break from writing to spend time with my family, party with some friends and hopefully do a little yard work.  Happy Memorial Day weekend to you, my readers.  Have a safe and fantastic holiday.  Thanks for stopping by……

    Enjoy!

    Peanut Butter Cookies

    Ingredients:
    1 1/2 cups flour
    1/2 tsp. baking soda
    1/3 cup unsalted butter, softened (5 1/3 tbsp)
    1/2 cup sugar
    1/2 cup packed brown sugar
    1 large egg
    1 cup peanut butter, smooth or crunchy
    1/2 tsp. vanilla

    Preheat oven to 375*.  Grease or line two cookie sheets.
    Whisk flour and soda together, set aside.  Beat together butter and sugars until well blended.  Beat in egg, peanut butter and vanilla, mix well.  Stir in flour mixture until blended.
    Shape into 1-inch balls and arrange 2″ apart on the cookie sheets. Press flat with a fork. Bake one sheet at a time, about 10-12 minutes.  Let stand briefly, then remove to racks to cool completely.

  • Setting Goals & Eating Carrots

    Setting Goals & Eating Carrots

    In spin class at the gym on Monday the instructor challenged each of us to set a goal for the week and when she sees us again next Monday we’ll see who achieved their personal goal.  The two things I recognize about this challenge, 1-it gave each of us an opportunity to improve on a chosen goal, 2- it might compel us to return to class next week to boast on our accomplishment!

    A few of the chosen goals were; only drink one diet coke a day, drink more water, come to the gym 5 days out of 7, etc…  I thought about my goal while the others shouted out theirs.  I already drink more than the required 8 glasses per day, I make it to the gym regularly and even teach a class on Fridays, I don’t drink diet soda and rarely drink soda at all.  Thinking, thinking, almost my turn….I had recently read an article reminding me that we should eat 5 cups of fruit and veggies every day.  This seems easy except that Miss T and her dad are both a tad picky about vegetables.  They have their “comfort zone” lists of veggies and in comparison to mine they are quite short.  I believe when your list of “likes” is short  it’s easy to get bored with eating veggies as you have too little variety.  After reading that article I’d thought, “I eat lots of fruit and veggies but, do I eat 5 cups a day?”.  I also figured I would simply incorporate more veggies into lunches or snacks, as I am usually on my own at those times.  As my turn came I decided to set that as my personal goal for the week.  I added, to fit cardio in at least three days out of the next seven.  I like my goal and know that it will be a piece of cake to achieve it.

    That afternoon I stopped at the grocery and picked up some organic carrots to roast. Carrots are on my husbands list of “likes” so one out of two family members could enjoy them with me.  They were bright, colorful and of course, my favorite color, so I had to take a photo of them.  There is no “recipe” to accompany this post but I will tell you how I prepared them and maybe you will add more veggies to your plate this next week too.

    In my efforts to meet my goal, last night I served green beans with dinner and ate a leafy green salad for lunch. I’ve also had cantaloupe, the best one yet this season, blueberries, bananas, an apple and tomatoes.  Now, let me say, apples are not in season but this apple came from Chile where it is apple season and it was a honey crisp, not bad for an apple in May.  Bananas don’t grow in Texas but are readily available in our stores.  Melons and blueberries do grown in Texas and both are favorites of mine.  Adoring hubby told me of a local farm stand on the other side of town he noticed late last week.  I plan on making a trip over to see what fresh, local veggies and fruits can be snapped up to help me meet my goal.  Now to head out for a brisk walk, that will meet 2 of the 3 days of cardio I planned for. If I were guessing I’ll be adding some cardio to the routine in my class this Friday.

    Go on…get out there, take a walk, ride your bike around the block or throw the ball with your kids.  And, pile on the veggies and fruits – ’tis the season.

    Enjoy!

    Roasted Carrots

    I scrubbed the carrots and trimmed the tops and ends.  Next I sliced them in half, tossed with olive oil, kosher salt and fresh ground pink peppercorns.  I placed them on a jelly roll pan and roasted with the convection feature at 325* for about 40 minutes.  They were sweet, slightly firm (not mushy!) and tasteeeeee!

  • Summer & American Potato Salad

    Summer & American Potato Salad

    Memorial Day is less than a week away and that means summer is upon us.  What comes to mind when you think of summer?  Sandy beaches, popsicles, picnics in the park, juicy peaches, sitting under a shady tree, cold watermelon, BBQ’s, pool parties, garden fresh tomatoes, cool mountain air, homemade ice cream, long days and evening star-gazing are a few of my summer pleasures.  Give a shout and enlighten me to your favorite summer joys or foods.

    I’m adding a big bowl of potato salad to my list of summer pleasures.  Taking a place at the BBQ buffet, filling a plastic container, pulled from a cooler at the beach, spooned onto brightly colored plates and served poolside, potato salad is a summer staple.  There are as many recipes for potato salad as there are cooks making it.  I have several potato salad recipes, but today I’m showcasing American Potato Salad.  

    Here is the situation with potato salad in my kitchen.  Adoring hubby will not eat hard-boiled eggs.  Miss T, LuLu and I relish them.  Dilemma here!  You will notice in the photo there aren’t any eggs in this bowl of potato salad.  I must have been in a “please others” mood and left them out for my hubby.  There are times when I put them in and he has to pick around and push aside the chunks of egg as he finds them. This is a basic, go with anything, very tasty potato salad for those times when you’re feeling very American!

    Enjoy!

    American Potato Salad

    Ingredients:
    2 pounds waxy potatoes ( I used golds)
    1 celery rib, diced
    3 hard-boiled eggs, chopped
    3/4 cup mayonnaise
    2 tbsp. red wine vinegar
    1 tbsp. coarse grain mustard or yellow mustard (I use coarse grind)
    2 dill pickles, diced
    Salt & pepper to taste

    Boil potatoes in water until tender.  Drain and peel.  Cut into bite size pieces.  Add celery, eggs, pickles and toss.  Whisk together mayo, vinegar, mustard, salt and pepper and pour over salad.  Toss gently until potatoes are coated with dressing.  Cover and refrigerate until ready to serve.


  • City Bees

    City Bees

    Check out the City Bees story under – Bees & Honey – My Bees Have Arrived – City Bees. Stay tuned for tomorrows scrumptious summer potato salad recipe!

  • City Bees

    Yesterday adoring hubby and I had our first solo mission to remove a colony of bees from yet another water meter.  Water meters seem to be a favorite of honey bees for making a home.  We received a call from someone in the city inquiring about bee removal – city bees!  We downed a couple of cups of hot coffee, filled “to go” cups with the same and headed into the city to see what awaited us.  The lady who called said she thought the bees had been there a short time, maybe a couple of days.

    It was a hazy, grey, damp morning.  Bees do not like this weather any better than I do.  This is the kind of weather that gives girls “bad hair” days and dampens the job of foraging for pollen.

    We arrived loaded for bear, as the saying goes.  That was a good thing as these bees had been in residence for some time.  Lifting the lid to the water meter box was a surprise, as we anticipated a few bees and maybe a sheet or two of comb, if we were lucky.  I removed five sheets of comb from the meter box.  This is a good thing for a bee keeper.  The colorful comb is full of pollen.

    My photog hubby was instrumental with the camera and the smoker.  When bees have taken up residence and have brood, honey and a queen to protect they must be smoked prior to their uprooting.  As I removed the comb and placed it in a bucket as well as a hive I was unable to spot the queen.  I scooped bees from the meter box into the hive and noticed that few bees chose to stay in the meter box but marched into the hive.  This was a good sign that the queen was in the hive box but not definite.  We pulled the patience card and hung out for a while giving the girls time to move into the hive, which they did. After sufficient time we closed up the hive, netted the bucket and loaded up to head home.  Below you can see the comb built inside the meter box.

    Many thanks were offered by the city lady who made the call for bee removal. We headed home with the few bees not captured in the hive or the net hanging on for the ride to the country.  Possibly the ride of their lives.

    Miss T had an art show that took the next couple of hours of our day but it was quite enjoyable.  There are some talented kids in our community and viewing their art work with a cookie and cup of punch, made with fizzy ginger ale and sweet pineapple juice is a leisurely way to spend an afternoon.  Next, home to unleash the girls and see if their queen can be found.

    I donned my bee suit yet again and headed out to the bee yard in full preparation to help these city girls set up home in the beautiful countryside. First I cut comb from the bucket and bound it in frames to be placed in their new home.  If you’ve read the blog about my earlier bee removal adventures you know this is my least favorite task as unborn bees are lost in the process. Mr. Floyd says, “lose some or lose all”.  Ugh!  You can see the rubber banded comb placed in the frames.  The bees will quickly bind it all together with more comb.

    Next hubby brought over the hive and as I lifted the top I told him that there would likely be tons of bees on the underside of the top.  I wanted to be sure he had the camera ready… Sure enough there were tons of bees gathered on the underside of the top and all the bees inside the hive were near the top.  Hmmmmm….I had a hunch that the queen was one of the hundreds clustered there.  He shot a quick photo of me holding the top and I began to search for her.  My hunch was correct, I spotted her climbing over the backs of the girls and quickly reached for the jelly jar to capture her.  Success!  She is big and beautiful.  I named her Queen Anne.  Anne, being the name of the city lady who called for our help in removing these uptown girls.

    Queen Anne is the larger bee near the jar emblem

    That makes hive #5.  I never dreamed that in these 3 short months  I would acquire five hives to manage.  It thrills me each time a new hive is added to my bee yard and this one especially so, as it was our first independent removal. Below you’ll see the girls who’ve gone country, the growing bee yard and the new girls doing what bees do…

    I checked on all the hives early this afternoon and I’m pleased to say that the city girls seem to have settled in and are quite pleased with their country home.

  • Banana Chocolate Chip Bread

    Banana Chocolate Chip Bread

    Today is hot, humid, cloudy, windy and every so often the sun peeks through the grey sky causing it to feel sweltering.  Blech!  My least favorite type of weather.  Here’s the good stuff, it is Friday, I baked Banana Chocolate Chip Bread!  A bit of baking time in the kitchen brought a smile to my face on this grey day.

    I chose banana bread because I had 3 bananas speckled with brown, actually 2 of them were more than speckled.  The brown ones are the ones I believe make the best bread, as they are full of natural banana sugars and seem to add more flavor to the bread.  There was a bottle of buttermilk in the frig pleading to be used and I like to throw chocolate chips into my banana bread occasionally because it brings a smile to Miss T.  Chocolate chips in just about anything puts a smile on her sweet face. A large jar of honey sits on the counter and I was curious to see if it would enhance the loaf of bread.  All tasty ingredients by my standards and I think you’ll be pleased with the fragrant loaf when you pull it out of your oven.  It turned a beautiful golden brown and has a lovely split down the center, enough to see the moist bread peeking through.  The whole wheat flour, honey and walnuts give it a natural, earthy flavor, while the chocolate chips add some gooey sweetness.  It begs to be washed down with a cup of steamy coffee or a cold glass of milk.

    Tomorrow adoring hubby and I will make our first solo bee removal.  I’m quite excited! Stay tuned for my account of our adventure, provided it is eventful. The other day I went with Mr. Floyd to remove bees in a water meter and when we opened it there were about 15 bees inside, not much happening in there, but I located the queen easily, captured her and we loaded her majesty, along with her entourage into a hive.  A fellow bee keeper was in need of a queen so we were happy to pass her along.  Hopefully the experience tomorrow will be worthy of a tale.

    Enjoy!

    Banana Chocolate Chip Bread

    Ingredients:
    2 large eggs
    3/4 cup white sugar
    3 ripe bananas
    1/3 cup buttermilk
    1 tbsp. vegetable oil
    1 tbsp. vanilla extract
    1 cup all-purpose flour
    3/4 cup whole wheat flour
    2 tsp. baking powder
    1/2 tsp. baking soda
    1/2 tsp. salt
    2 tbsp. melted butter
    1/4 cup honey
    1/2 cup chopped walnuts
    1/2 cup semi-sweet chocolate chips

    Preheat oven to 325*.  Butter a loaf pan with a small amount of melted butter and lightly dust with flour.  Using the bowl of a Kitchen Aid mixer beat the eggs with the sugar on medium high until thick and light, about 5 minutes.  Add mashed bananas, buttermilk, honey, oil, vanilla, walnuts, remaining butter and chips.  Mix.

    Mix together flours, baking powder, soda and salt.  Add dry mixture to wet ingredients and beat until just combined.  Transfer batter to loaf pan and bake about 1 hour.  Bread is done when a tester inserted in the center comes out clean.  Let bread sit for about 10 minutes; then turn bread out on a rack to finish cooling.
    Banana- Honey Chocolate Chip Bread on Foodista