Honey Can Cook

Tag: chewy

  • Kiss The Moon

    Kiss The Moon

    Did you see the moon on Saturday night?  It was a “Super Moon”.  I’m not calling it a super moon because I thought it looked super.  It was a “Super Moon” because scientists and astronomers refer to it as “Super” due to its being closer to earth and thus appearing brighter and bigger.  It was reasonably bright and a great view with binoculars or a telescope.  I always get a kick out of looking at the moon from down here, it’s pretty cool how you can see the craters and stuff.  Saturday night the moon did seem a little bigger and a little brighter – I hope you were able to catch sight of it.  It reminded me of these Meringue Kisses I made earlier in the day.

    After I made the Brown Sugar – Lemon Tarts I had egg whites left over.  Thinking of those chickens working so hard to lay some nice eggs I just couldn’t pour them down the drain. So I made Meringue Kisses.  

    Don’t you just love the way they sit there all puffy and curly q, each with its own personality, begging to be popped into a mouth and thoroughly savored?   They are a quick taste of gooey sweetness.  They have that meringue crunch when bitten into but melt into a marshmallow-like gooey chewiness.  I could eat a dozen or two easily.  They are going fast around The Orange Bee.

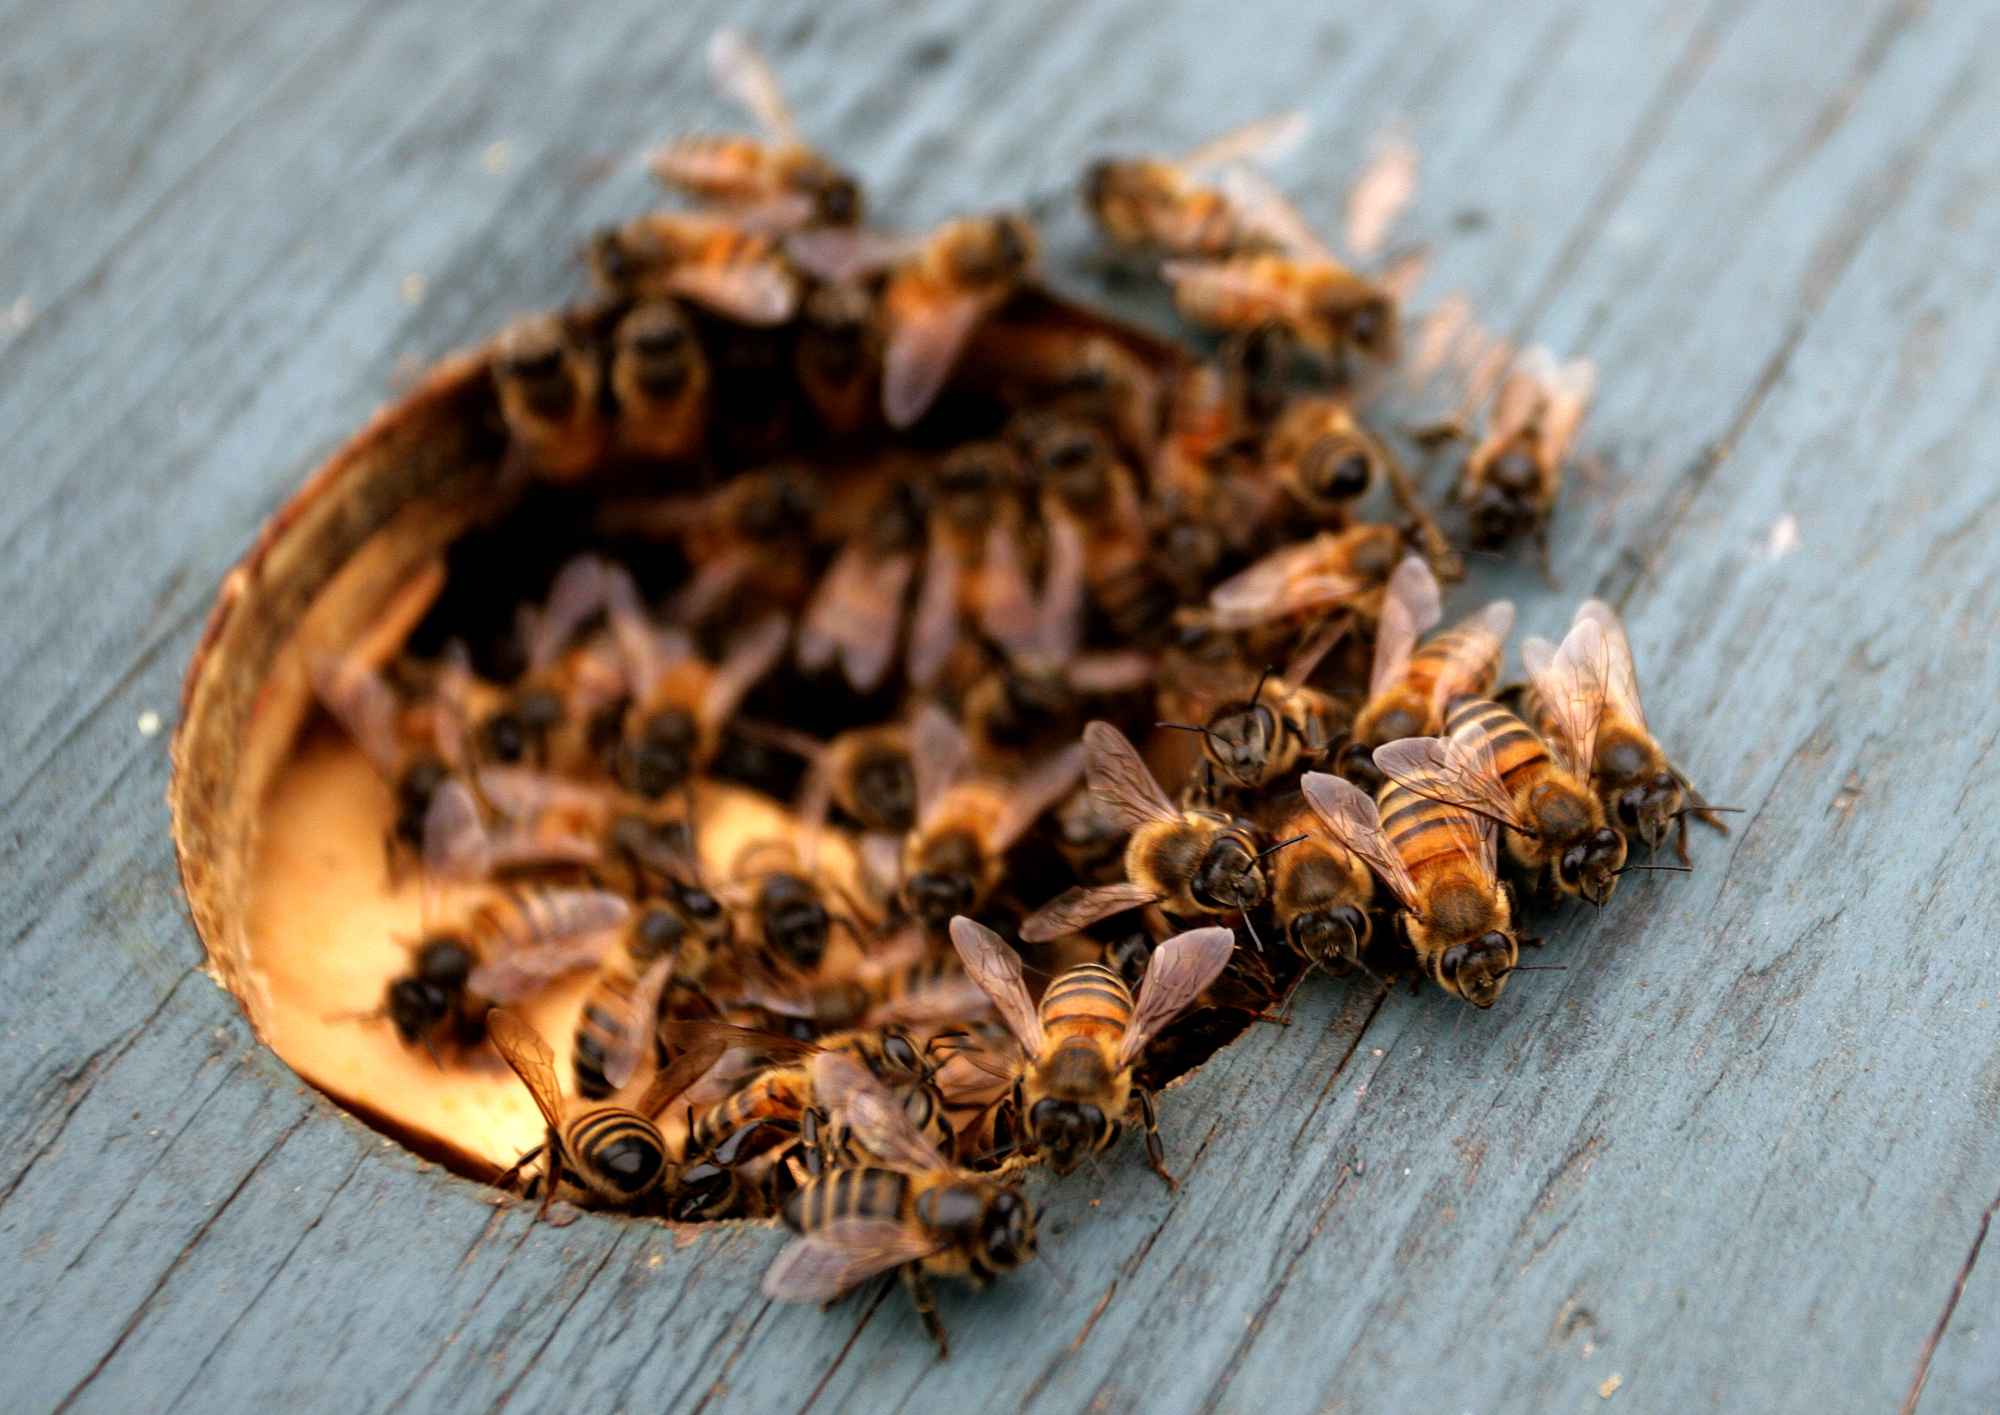
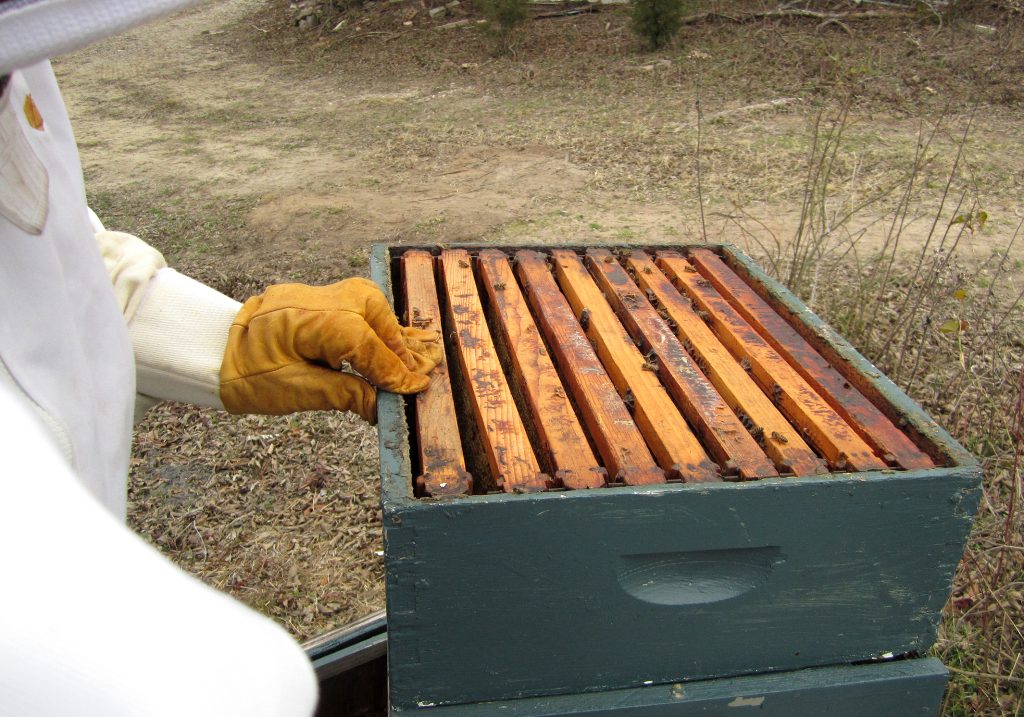
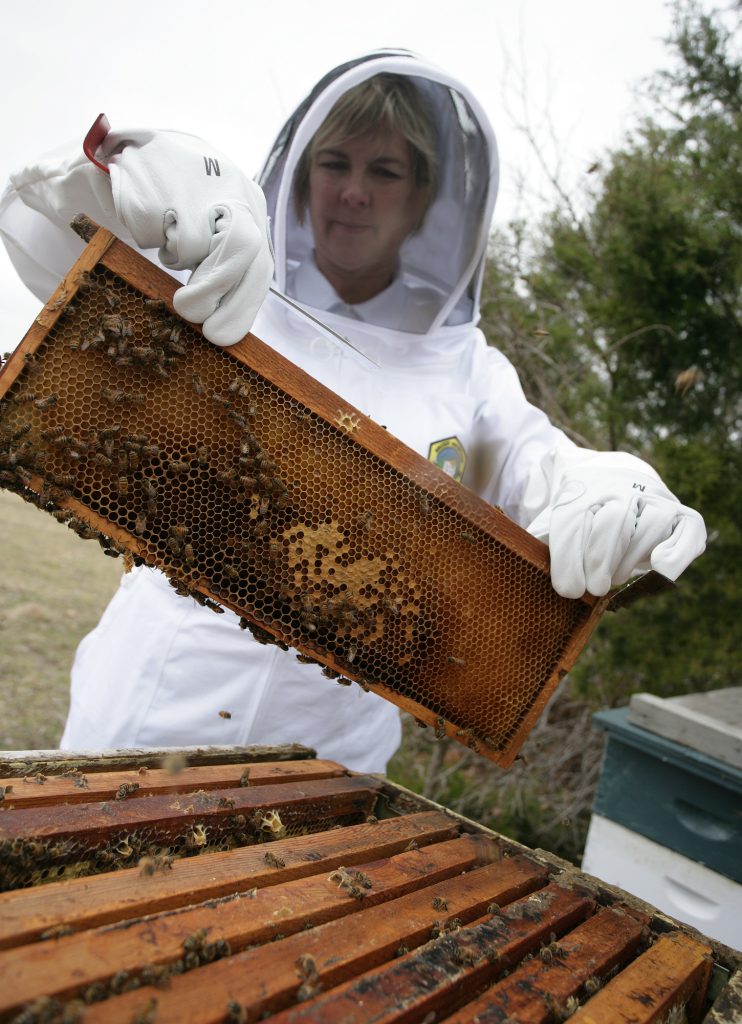
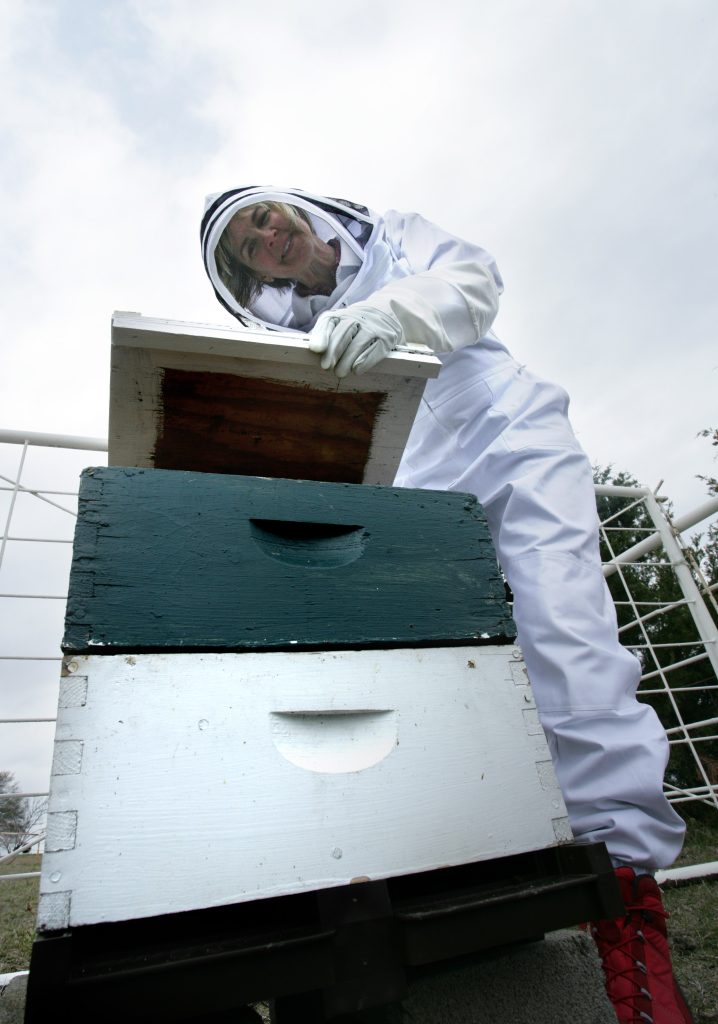
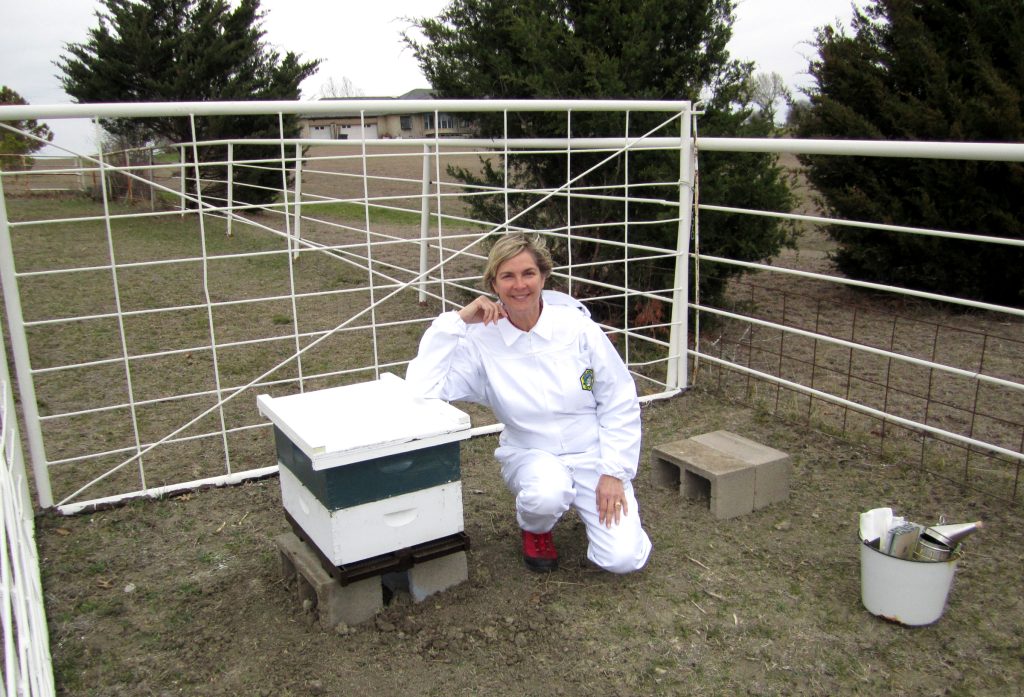
    I cannot leave without filling you in on my bee keeping escapades.  It appears that my queen has been lost or killed.  Possibly,  murderous little creatures.  If this happened, it likely happened when the box of bees from the hospital was brought and integrated with the original  hive.  It isn’t definitive yet, but Mr. F and I will look one more time to be sure we don’t find any signs of her.  Signs would be either seeing her or finding newly laid eggs and larva, which upon inspection today, I did not see either of the two.  Meantime I am mail-ordering two queens.  They will be delivered by the U.S. Postal service or Fed-Ex. Isn’t that wild?  Stay tuned……

    Enjoy!

    Meringue Kisses

    Ingredients:
    3 large egg whites
    1/4 tsp. cream of tartar
    1/8 tsp. salt
    3/4 cup sugar
    3/4 tsp. vanilla

    Preheat oven to 2258.  Line two cookie sheets with parchment paper or leave ungreased.  Beat egg whites, cream of tartar and salt in a medium bowl on low-speed until foamy.  Increase the speed to high and beat until the egg whites just begin to form soft peaks. Gradually add sugar beating until well combined.  Reduce the speed to low and beat in vanilla.

    Beat until the meringue is glossy and  stands in very stiff peaks.  (This is the fun part) Drop heaping teaspoonfuls of meringue onto cookie sheets in peaked mounds.  Bake for 45 minutes rotating the sheets and switching positions half way through baking.  Turn the heat off and let the cookies stand in the oven for 30 minutes, or until cool.

  • Sweet Spring

    Sweet Spring

    Brown Sugar – Lemon Tart

    Spring is near and it feels like it today.  Warm, sunny, clear, slight breeze and nearing the end of spring break.  It has been an interesting week at The Orange Bee between bee adventures, the college search, March madness taking over every television we own and seeking to enjoy spring and the absence of our ordinary schedule.  I think we found an agreeable balance among all mentioned.  At one time or another we were all indulged our choice of “what to do” over the break.

    To hear about my story of bee adventures gone awry go to the “Bees & Honey” page – Bee Thinking – Bee-wildered.  I’ve been told that bees are not easy to understand nor are they totally predictable.  I’m beginning to understand this phenomenon that surrounds the life of a bee.  I love my bees no matter my bewilderment.

    We’ve been eating fairly heathy this week, at least on the days we were at home.  On the days we traveled we didn’t succumb to fast food too much, but we did eat out and I never feel as though our meals are as healthy as when we eat from my kitchen.  I’ve wanted a sweet little something all week so today I made Brown Sugar-Lemon Tarts.  I’ve had this recipe on my desktop for months and today I finally tried it.  I had more than one reason to try this tart recipe.  One reason is, I love lemon anything.  Lemon tarts, lemon cream, lemonade, lemon in tea, lemon meringue pie (that recipe will surface one day), lemon bars, lemon yogurt, lemon sorbet, lemon lip gloss, I like lemon.  Another reason I wanted to make tarts is I wanted to use my cute little wooden dough press.  You’ll see a photo of it later, it’s a handy little gadget that I need to use more often.  Also, this recipe states that it is an old Pennsylvania Dutch recipe and I enjoy most of their foods.  The last reason is, I am ready to move it off of my cluttered desktop and file it in The Orange Bee files.

    The actual recipe refers to this little sweet as Lemon Tarts.  I am re-naming it Brown Sugar-Lemon Tarts, as I taste brown sugar before I taste lemon.  The tart, sweet lemon flavor comes later, after a bite or two.  I made them in mini muffin tins.  You can make them in regular muffin tins if you prefer.  I did make a few in regulation size muffin tins and I notice adoring hubby keeps going for those.  However you might choose to make them I will say they are perfect morsels of sweetness.  They have a homey flavor, reminiscent of Pennsylvania Dutch cooking, pure, simple and delicious.

    Enjoy!

    Brown Sugar – Lemon Tarts

    2 tbsp. unsalted butter
    1 cup brown sugar ( I used a mix of light and dark)
    6 egg yolks
    1 lemon, juice and rind
    pinch salt
    1 Pillsbury pie crust

    Bring pie crust to a workable temperature.  Roll out and cut with a biscuit cutter into rounds.  1 1/2″ for mini tin, 4″ for regular tin.  Line tin with dough and press into cups using dough press.

    Mix filling by creaming together sugar and butter, blend with beaten egg yolks, adding lemon juice and rind and salt.  Fill dough using a spoon or scoop.  Bake in a preheated 350* oven for about 15 minutes for mini tins and about 30 minutes for regular tins, or until filling is set and crust is golden brown.

    Tarts to share

    Recipe submitted by CM @ Cooks.com   Leave a little love and post a comment or cast a vote before you go.

  • St. Paddy’s Day Havoc

    St. Paddy’s Day Havoc

    UGH!  The March winds are rearing their ugly heads today.  The roaring sound is relentless, the phrase wind-blown is in effect, and my hair is tousled, to say the least.   The twenty-seven mile per hour winds are wrecking havoc on my bee adventures and I am not happy about it.  There are bee affairs that need tending to and time is of the essence.  Yesterday I discovered queen cells being built by the girls and Mr. Floyd decided I would start another colony with them.  If you are not into bees this may not mean a thing to you but to a bee keeper this is big stuff!  It means I will instantly acquire a new hive, more bees, and thus the possibility of more honey later this summer. I know some of  you are looking forward to tasting my delicious, sweet, sticky honey and having more bees and hives will hopefully produce more of that glorious nectar.  To accomplish this I will need to open my hive and remove the queen cell frame, placing it in another hive and add a few thousand bees.  If I were to try to pour bees from one box into another on a day like today I’m bettin’ I’d lose a few thousand bees.  This endeavor will require much less wind and will be postponed until a calmer day.  Patience, patience, patience… my mantra for this day.

    So what do I do on a day when I can’t do what I want to do?  Cook!  With spring break winding down I wanted minimal time in the kitchen.  Despite the ridiculous wind speed it is warm and beautiful outdoors.  I relish spending time with a glass of vino and adoring hubby soaking up the warmth provided by the sun and possibly watching a golden sunset. I’m finding myself in the mood for Mexican food, simple, easy, tasty Mexican fare.  My apologies St. Patrick – no Irish fare this year for the Orange Bee!

    Having roasted a whole chicken recently, and finding myself with left-overs, I decided to make chicken quesadillas.  Now, with the warm temps and bright sun shining through my kitchen windows I needed fresh and light fillings to go with the appetizing chicken.  Below is my recipe for Chicken-Papaya Quesadillas.  Quesadillas are what I call a perfect food. Easy to prepare with whatever ingredients you may have on hand, satisfying and liked by most everyone. These quesadillas are so tasty with sweet, juicy bites of papaya, piquant peppers, gooey cheese, tender chicken, fresh cilantro and the wholesomeness of whole wheat tortillas.  Deciding to prepare this “perfect” distraction is making me feel less anxious to play with bees.  Ahhhhh….but maybe I need wine to extend this feeling of calm. Surely a glass of wine and reciting my mantra of the day will keep my feathers unruffled.

    Enjoy!

    Chicken-Papaya Quesadillas

    Chicken – Papaya Quesadillas

    Ingredients:
    2 Whole wheat tortillas
    1/2 cup Papaya, peeled, seeded and diced
    1/2 Red Bell Pepper, peeled, seeded and diced
    1 Anaheim chile, roasted, peeled, seeded and diced
    1 Chicken breast, cooked and diced ( I used roasted chicken but you can use grilled, broiled, boiled, or baked)
    1/3 cup grated Monterrey Jack cheese
    1/3 cup grated Pepper Jack ( if you do not like pepper cheese just increase the plain cheese)
    1/2 cup Cilantro chopped
    Avocado Slices

    Place each tortilla on a medium hot grill or into a skillet over medium heat.  Divide the cheese, papaya, chili, red pepper, chicken and cilantro and sprinkle over each tortilla. When cheese begins to melt and tortilla starts to brown, gently fold tortilla in half. Transfer to a cutting board and cut into 4 slices.  Garnish with sliced avocado and papaya slices.


  • Dreamy Days

    Dreamy Days

    Orange Dreamsicle

    With our warmer weather, windy March days, blossoms bursting out all over the place, birds nesting, and bees buzzing I’ve been dreamin’ of lazy summer days. Not that I wish to pass over spring – I do not!

    Right now Miss T and I are on spring break from school.  It’s just the precursor to summer.  Spring break causes me to commence pondering those lazy summer days, when we stay outdoors until 10, taking delight in watching lightening bugs and being thankful for the coolness nighttime brings.  I reminiscence about days gone by with icy cold watermelon dripping down chins,  glasses of frozen margaritas sipped slowly while rocking in big chairs on the back porch, cool linen tops floating in the air, colorful flip flops showing off brightly painted toes.  The best part is the lazy days part, no alarm clocks jolting me out of bed, no rushing around to fill lunch boxes, no sitting through traffic, and staying up late watching all the movies we never managed to see with an early morning looming.

    In the summer we often pull out the ole’ ice cream freezer and make a batch of homemade ice cream.  Banana nut, peach, plain vanilla, or strawberry.  I’m not quite ready for that just yet but I was in the mood for a frozen concoction.  I decided a smoothie would be a great way to enjoy spring.  Guess what?  Not only does it have honey as an ingredient but it is also an inviting orange color.  To me this sounded right up my alley.

    Smoothies are so simple to throw together.  You can put just about anything in the blender jar with some ice and a little liquid, whir it around and voila a delicious, refreshing smoothie.  The thing I like about this smoothie is that the fruit is frozen therefore sidestepping the addition of ice, yielding plenty of fresh fruity flavors.

    Enjoy!

    Orange Dreamsicle

    Ingredients:
    1/2 cup low fat milk or soy milk
    1 6 oz. carton low fat vanilla yogurt
    1 11 oz. can mandarin oranges with juice
    1/2 cup pineapple chunks
    1-2 tbsp. honey

    Lay oranges and pineapple chunks on baking sheet and freeze for about one hour. Place all ingredients in blender and process until smooth.
    Makes 2 smoothies.

  • Crafty Little Creatures

    If you are interested in my bee adventures check out the “Bees & Honey” page, Bee School 101, Crafty Little Creatures, for a short story of yesterday’s adventure in the bee yard.

    Enjoy!

  • Crafty Little Creatures

    Crafty Little Creatures

    Yesterday was a new adventure for me in the skills of beekeeping.  For the first time I was able to open my hive, without Mr. Floyd’s presence.  He’d said, “you ‘ll need to do it by yourself sometime…”.  What he didn’t know is, I’ve been keen for this opportunity ever since my girls moved in.

    After the installation of the “stranger” bees on Thursday it was necessary to observe their activity and inclination to move in with my bees.  We’d put a sheet of newspaper between the strangers and the existing bees to keep them separate until the strangers picked up the sweet smell of my queen and felt compelled to join her as their own.  The aim was that one group of bees would chew threw the paper, thus allowing everyone to mingle.  My goal was to see if this had taken place.

    I re-read the steps for preparing the smoker and opening the hive.  I felt confident in my capabilities of these two tasks, no prob.  I got geared up, had the smoker puffing away and my hive tool handy.  I headed out to the bee yard with adoring husband, camera in hand, trailing a fair distance behind.  He doesn’t own a bee suit- yet!


    The first thing a beekeeper does without fail is smoke the entrance to the hive followed by lifting the top and smoking inside from the top.  Got it!  The smoke actually confuses the bees for a few minutes keeping them calm.  My bees seem calm and not too concerned by my presence.

    Next I needed to lift off the top super and see if I could spot a hole in the newspaper.  Well, of course the wind was gale force at times yesterday – making my confidence in keeping the newspaper intact, weak.  Adoring hubby went to get a roll of tape to help secure the sheet of newspaper.  This was mighty helpful.


    Bee Check


    Once I had the paper taped down I felt secure in removing the top super and checking for this hole.  I was disappointed to find the paper hole less.  This caused me to wonder what exactly is happening here as there are tons of bees buzzing and working inside their home. What I still didn’t know was if the two colonies have decided to unite.


    Lifting the top super


    In the photo to the right I am about to lift off the super to look for holes.  After discovering that there weren’t any I replaced the super and began to just observe what exactly my bees were up to. Actually I was observing the stranger bees to see if they were carrying out their bee duties.

    While making this observation I noticed that the stranger bees had discovered a small opening between the two supers ( supers look like boxes – mine are green). I watched many bees come and go through the small crevice.  Just to be sure they were indeed getting into the super I ran my hive tool along the crevice and noted that it went all the way in; meaning they were using this as their entrance or exit as opposed to using the front door of the main hive.  Crafty little creatures! Satisfied that they were sticking around I replaced the top and pondered; were the bees using this opening only stranger bees or possibly the entire colony using both the main entrance as well as their secret crevice to enter and exit.  I do not know the answer.  I called Mr. Floyd and he reassured me this was probably good and that later in the week I would need to open the hive again and remove the newspaper.  At that time I can only hope that the stranger bees have fallen in love with the scent of my queen and will carry on their bee duties with great happiness.

    Meantime at the front entrance there is evidence of foraging bees returning with pollen of many colors.  I’ve noticed bright golden-yellow, pale buttery yellow and lovely lemon yellow.  Mmmm mmm…can’t you just taste that sweet, sweet honey?

    Stay tuned…….


    Frames housing many bees


  • What’s Up Doc?

    What’s Up Doc?

    Orange Carrots

    Carrots?  The favorite food of cartoon character Bugs Bunny hardly needs an explanation.  I bet your mother told you that eating carrots would keep your eyesight bright.  She was correct, the beta-carotene in carrots helps protect our vision and antioxidants found in carrots provide protection against macular degeneration.

    Did you know that besides my favorite color; which if you’ve been following my blog you have learned is orange, carrots come in white, yellow, red and purple.  I buy orange carrots as they are the easiest to find locally.  Miss T is too picky to eat carrots but I decided to make some roasted carrots using honey for adoring hubby and myself.  Now that my bees are here I’m looking for ways to use the honey I am anticipating harvesting later this summer.  Meantime Mr. Floyd is doing a quite nice job of keeping me supplied with some wildflower honey from his many hives.

    This is a decidedly simple recipe to follow.  The carrots come out of the oven glazed, caramelized, tender and delicious. I even let a few get a little blackened as adoring hubby likes that part the best.  The orange zest added at the end melds well with the honey and orange flavors already present.

    I can’t leave you without saying that this afternoon I will be opening my bee hive for the first time to investigate and see what has resulted from the newest bees arrival.  I am eager to check it out and am hopeful that all is well in bee land. Adoring hubby will be photographing the process from a distance and I plan to post photos of my experience.

    I’ve also been wanting to say that if you are new to my blog, or have discovered my blog through searches on the internet don’t stop by without leaving a little bit of love by posting a comment.  I welcome comments from friends as well as followers I do not know.

    Enjoy!

    Orange Roasted Carrots

    Ingredients:
    2 1/2 tbsp. best quality olive oil
    12-14 medium size carrots, peeled and cut into 2″ lengths
    2 tbsp. honey
    1/2 tsp. salt
    Freshly grated pepper to taste
    Finely grated zest of one orange

    Preheat oven to 400*.  Oil a baking sheet or jelly roll pan.  Bring a large pot of salted water to boil; add the carrots and cook for 5 minutes. Drain well, and pat dry.  Place carrots in a large bowl and toss with honey, oil, salt and pepper.  Place carrots in a single layer on the prepared baking sheet.  Bake until caramelized, shaking the pan and turning two or three times to prevent sticking.  About 20-30 minutes.  Remove carrots to a bowl and gently stir in orange zest.  Serve immediately.

    Recipe taken from The Silver Palate Cookbook


  • Going Hog Wild

    Braised Pork Chops-Mojo de Ajo

    If you have been following my blog you may recall reading the post about grilled salmon mojo de ajo.  It was titled “Garlic Is Good For You”.   Did you know that garlic contains manganese, Vitamin B1, B6 and Vitamin C ?  These are just a few of garlic’s healthy benefits.  Garlic is wonderful used as seasoning for its taste, aroma and added nutrition.

    I add garlic to many recipes and meals at the Orange Bee.  After having the mojo sauce with the salmon I wanted to use it with another meal as well since mojo de ajo is one of my favorites.  I figure if it was good with the salmon it would be good with other meats or seafood as well.  As usual, I looked in the freezer to see what I could prepare that might go well with all that garlic.  Bingo!  Wild hog pork chops.  Yes, I said, “wild hog”.  The chops were given to me by my bee mentor, Mr. Floyd.  I was not completely sure how it would work since I’d never prepared wild hog chops before.  I was sure willing to give it a try.  One of my main concerns was if the meat would be tender or tough, so I chose to braise the meat, hoping to ensure its tenderness.  The pork chops were falling off the bone and had no wild taste whatsoever.

    The mojo de ajo can be made ahead and refrigerated until you are ready to use it. Another favorite flavor of mine is that which comes from poblano chiles.  They are always easy to find and add a fresh, flavorful taste to foods.  Since the mojo is spanish or mexican in flavor I made chile rellenos on the side.  There is not a recipe for how I make them but I will give instructions below the pork recipe for you to follow if you’d like to try them.

    Before I go, I’ll give you an update about my bees.  Yesterday my hive grew by leaps and bounds.  An entire box of bees moved in.  To hear the rest of the story go to the “Bees & Honey” page at the top of the blog.  Click on “All Hail The Queen”/Movin’ On Up.

    Enjoy!

    Braised Pork with Mojo de Ajo

    Ingredients:
    5 lbs Pork Chops on the bone
    2 14 oz. cans chicken broth (low sodium)
    1 large head of garlic, peeled and chopped
    2 bay leaves
    1 tsp. salt & pepper or to taste
    2 tbsp. olive oil
    1 large onion, sliced

    Preparation:
    Heat oven to  400*.  Combine pork, broth, 1/2 of the chopped garlic, bay leaves, salt and pepper in a large oven proof pot.  Cover and cook for 1 1/2 hours.  Remove from oven, using a mitt!  Transfer pork to a platter and keep warm.

    Place pot on stove top and boil liquid in the pot until reduced to about 1 1/2 cups.  About 30 minutes.  Return pork to pot.

    Heat 2 tbsp. olive oil in a heavy skillet on medium high and add onion and remaining garlic.  Saute until soft and golden. This mixture will be placed on top of the pork chops with the mojo being spooned on top of that.

    Mojo de Ajo Sauce

    Ingredients:
    1 cup olive oil
    3/4 cup lime juice
    1/2 cup chopped cilantro
    8 cloves minced garlic
    1 tbsp. grated orange peel
    1 tbsp. dried oregano
    2 1/2 tsp. ground cumin
    1 1/2 tsp. salt & pepper

    Whisk all ingredients together.

    When ready to serve the pork, place the pork on the plate, place the onion and garlic mixture on top of chops and spoon the mojo on top of all.  This is making my mouth water as I write about it as it is delicious.  Below is a brief explanation of how I made the chile rellenos to accompany the pork.

    Wash poblano chiles and roast over a hot grill.  To do this just get your grill fired up and lay the chiles on the grates turning to burn the skins on all sides.  When peppers are roasted and beginning to blacken place them in a brown paper bag to steam for a few minutes. Remove skin, stem and seeds, being careful not to cut but a slit in the pepper.  I stuffed them with sharp cheddar cheese this time and sprinkled a few chopped green onions on top.  They can be placed  back on the grill to melt the cheese or put them in the oven to melt the cheese.

    Serve with fresh fruit and you’ll have a tasty, flavorful, healthy dinner.

  • I Say Tomato You Say Tomato

    I Say Tomato You Say Tomato

    Tomato Basil Soup

    Do you say tomato or toe-mah-toe?  I say tomato and with that said,  I’ve been pondering the change of seasons.  It is upon us, spring that is.  I’m feeling the need to move forward as the clocks will be moving forward this weekend, a true sign of the season change.  Not to mention dandelions, peach blossoms, redbud trees popping out all over, Bradford pear trees posing as if in the snow, March winds howling through my yard and the migration of many beautiful birds.

    Adoring hubby mentioned the other day that he didn’t feel that we had eaten enough soups and winter’s hearty bowls of steaming soup would soon be a thing of the past.  Yep, he was correct in that assumption, hearty, heavy stews and soups will soon take a back seat to lighter fare and fewer bowls of soup on the dinner table.

    To satisfy his desire for one more bowl of soup I made a pot of tomato-basil soup. Everyone here at the Orange Bee loves tomato soup.  We especially love it with a grilled cheese sandwich or after a bout of the crud.  It’s the next best thing to chicken soup to cure what ever ails ya’.

    This version tastes fresh, healthy and satisfying.  The topping of fried okra sets it off just perfectly.  I am not too keen on frying foods or eating fried foods.  For one thing I detest the mess it creates on my stove top.  The other reason I try to stay away from fried food is that greasy, knot in your stomach feeling you get when you eat fried food.  I make a few exceptions to this rule, like if I’m having a weak moment, or while traveling, or in the case of okra.  I like okra prepared various ways but fried is the best.  So I fried up just enough to top the soup and it was the perfect accompaniment.

    Before you stow away the soup pot make a batch of this delightful, change of seasons soup.  You won’t be sorry.

    Enjoy!

    Tomato Basil Soup

    Ingredients:
    1 medium onion, chopped
    1 tablespoon olive oil
    2 large cans of whole tomatoes
    3 cups chicken broth (reduced sodium is my choice)
    6 sprigs of basil, chopped
    2-3 garlic cloves, minced
    2 teaspoons balsamic vinegar
    salt & pepper to taste
    Frozen fried okra

    Heat the olive oil in your soup pot and add the onion, sauté until soft and golden; add garlic and continue sautéing until garlic is soft.  Add tomatoes, basil, broth salt and pepper.  Bring to a boil, then reduce heat and simmer until tomatoes are soft.  Stir in balsamic vinegar and continue to simmer over low heat for about 20 minutes.

    Remove pot from heat source and with a hand-held blender purée the soup leaving a few solid pieces of tomato.  If you don’t own an immersion blender; cool the soup and purée in batches in a blender, returning the soup to the pot and keep warm.

    Before serving the soup follow directions on the package of frozen okra and fry enough to top all servings.  Be sure to drain the okra on paper towels and blot to remove excess grease.

    All in all this soup is tastes fresh and healthy even with the addition of “fried” okra.

  • Peach Honey

    Peach Honey

    Here I am, day 2 of my new adventure.  This morning was drizzly, cool and windy, again not the most favorable weather for my bees.  I didn’t even walk out to the bee yard to check on them.  As a matter of fact they don’t need to be checked on everyday.

    This afternoon however, the sun came out, it warmed up into the mid 70’s and the wind was still blowing.  I left school as quickly as possible and hurried home to go see what they were up to.  I’d noticed yesterday that the peach trees are blooming and I was curious to see if the bees had come out and found them.

    You can imagine how pleased I was to find bees happily buzzing all around the peach trees in my yard as well as a tree in a neighbor’s yard.  I calmly watched as the worker bees dove head first into flower after flower, packing pollen into the sacks on their tiny back legs.  After observing this amazing task for a few minutes I walked out to the hive and was even more pleased to see bees loaded with pollen coming back to the hive as well as bees leaving the hive to forage and return with more pollen.  It is akin to watching planes take off and land at a busy airport.

    Ahhhh, I can’t quit smiling.  My bees seem to have already gotten comfortable and know exactly where the hive and their queen reside.  So far so good!  I’m crossing my fingers for honey that tastes like peaches – it’s totally possible and if I am so lucky it is most delectable.

    Unfortunately not long after I’d observed and photographed my bees a storm blew through.  I’ve read that bees can sense a storm brewing and will head back to the hive pronto.  Can you imagine a tiny bee being struck by a big raindrop?  It could be lethal and that would be sad but I know my girls all made it back safely and will be hitting the skies again tomorrow to stock up on more peach nectar for their sisters and queen.

    Enjoy these photos of my girls !

    Bee gathering pollen.

    Note the golden sack on her back legs near her body – it's full of pollen!

    Busy busy bee