Say NO to plastic. Now that I am on a kick to remove as much plastic as possible from my home the list seems to be endless. I say challenging at best. Freakin’ plastic is everywhere in our homes. Shampoo bottles in the shower, body wash bottles, and cosmetics pop out at me daily!
Photo courtesy of Recycle Magazine
I did resolve the shampoo dilemma by purchasing a bar of shampoo. It leaves my hair clean and I like it a lot. My hair feels and looks great after. No conditioner needed – so far. It is so odd that the ingredients are all oils of one type or another. Saponified olive oil, coconut oil, castor oil, argan oil, vitamin E and fragrance free! It comes wrapped in post-consumer recycled paper and uses no preservatives, no animal products and it actually lathers up nicely! It is also the perfect travel shampoo because it is not liquid.
A different “flavor” this is the brand I am using.
No more body wash for this house. After we finish what we have we will use locally made bars of soap. I’ve found a few local shops that carry this kind of soap and it isn’t wrapped in anything – just soap.
Another obstacle I overcame is how to dispose of scoops of cat litter. I previously used the plastic bags from the grocery store – so many bags…… It bothers me that I’ve been doing that for so long but not any more. I buy recycled paper lunch sacks to use for this chore. Below you see what cats do while I clean their potty!
My husband who is completely onboard with this project picked up a couple of cheap stainless utensils at the thrift shop so that he no longer carries plastic utensils in his lunch. He also doesn’t risk loosing any of my good ones. Surprisingly he must have read the last post I wrote on ridding our home of plastic.
Say No to plastic has become a mantra around here and it feels good. I realize I can’t make an enormous impact but I can do my part and so can you! I am open to any suggestions or ideas you have found to help clear plastic from your home. I’m thinking laundry – I use fragrance free pods but they come in plastic bags! How about dish soap – it comes in a plastic bottle – any ideas? Share with me! What are you doing to make less of an imprint on our planet? Where is your focus on the impact of plastic waste? Let’s do this together!
I’m excited to introduce you to my newest queen bee and her colony today. It is always compelling to install a new queen and her hive. This is precisely what I did just over a week ago at the Greensboro Science Center. I picked up a NUC – a nucleus of bees with a queen, at the bee supplier early on a drab and chilly day. Not the weather a beekeeper hopes for when installing bees. I had no choice but to fetch the girls on that day. Believe me I kept my fingers crossed all the way to the GSC that the sun would peek out and the temps would rise just a few degrees.
Before installing the new hive my assistants at the GSC relocated the blocks the hive sits on back a bit from where the previous hive was set. The hive needed to be repositioned as I feel like moisture was the reason why this colony disappeared. A hive should always tilt forward ever so slightly to allow moisture to run out and not sit in the hive. As this was being completed the sun peeked out a bit but more importantly the temperature rose enough for me to relax about opening up the NUC and moving the bees around.
Installing a NUC is super simple. It consists of 5 frames with bees, brood and a queen. All that is required is to remove the existing frames from the hive body and replace them with the new ones. When I pull out each frame I inspect it to see if I find the queen and to know in general what’s going on. Upon my examination of the third frame I quickly saw my new queen. Not only is she beautiful but she posed for a few photos. You will see she is tended by several ladies who are always looking out for her. They groom, feed and protect her at all times. It is very endearing to me!
Now that everyone is safely in the hive I happily close it up and exert my patience. The hive should not be opened until at least a week has passed. I will be inspecting this week and feel confident that all is well. When I look I should see eggs, larvae and brood along with nectar and pollen in the comb. If I am really lucky I’ll see my newest Queen too!
In the photo below you can see the NUC in the background. Only a few bees are outside the hive doing their own inspection and becoming acclimated to their new surroundings. Bees are really good at this. Now to name the new queen……..
Here is a post from the first inspection of 2019 – when I discovered we would need to find and install a new colony. Spring 2019 Bee Report
Are you doing your part to help bees? Plant bee/pollinator friendly flowers and veggies. DO NOT USE PESTICIDE!!! DO NOT spray for mosquitos – you must know if it kills the mosquitos it absolutely also kills pollinators! PLEASE help save the bees! Thank you, and you can thank me later when there are still plenty of fruits and veggies for you to eat!
Recently I had the privilege of meeting Amie, owner of Francesca’s Dawn Farm in Halifax, Va. Let me tell you if you live in the Triad of North Carolina and aren’t ordering your meat, poultry, etc from Amie you are missing out. Engaging in ethical, transparent and local beliefs Amie and her family are excited to be farming and sharing healthy food.
Francesca’s Dawn Farm chose heritage breed livestock, animals never selected for production in Confined Animal Feeding Operations (CAFOs). That’s what I’m talking about!! It truly matters where our food comes from. I don’t know about you, but I prefer the method Francesca’s Dawn uses. Even so it’s not a topic I can expend too much thought on or I would easily become a vegetarian.
Selecting from the extensive online store is easy peasy. If you live in the Triad, Amie delivers to GSO on the third Saturday of every month, with a smile! Check out her website, sign yourself up and order some fresh food!
Francesca’s Dawn offers bacon like you’ve never tasted store bought, pork and lamb chops, a variety of beef cuts, chicken, farm fresh eggs, hot dogs, bulk bargains, smoked meats and honey. I have prepared beef short ribs, smoked bacon, chicken quarters and a delicious tenderloin.
All of Francesca’s Dawn products are processed and immediately frozen for maximum freshness. I thawed the bacon in the fridge and fried some up for a Sunday morning breakfast. Thick but not too thick, smoky and meaty, this bacon is what makes us all say “BAAAAAACONNNNNN !
Amie apologized for the size of the tenderloin, as it was on the small side, but perfect for my man, Dan and me. The secret to this tender, juicy piece of beef is to season it with a pinch of salt and a generous helping of fresh ground whiskey barrel smoked pepper. Sear it over hot coals or high heat on both sides before moving it to indirect heat until it reaches your desired doneness. Check the internal temperature with a thermometer for optimal results. Allow the meat to rest for about 5-7 minutes for a perfectly juicy piece of meat.
Rare – 120-125*F
Medium Rare – 130-135*F
Medium – 140-145*F
If you like yours well done, well, I leave you on your own to remove it when you please. In the photo below you see half of the tenderloin we shared. It was the exact right size for a mid-week dinner. That being said, my man, Dan made a comment about how luxurious it felt to be dining on tenderloin on a Wednesday evening! Yeah, kind of!
I stepped away from tradition for our Easter dinner and braised some of the beef short ribs. What I didn’t stray away from is my tradition of serving deviled eggs and lemon meringue pie though! I’m going to share the recipe for the short ribs below and I encourage you to take a look at Francesca’s Dawn website and get your order placed in time for Amie’s delivery this month!
If you don’t live in range for ordering from this farm I urge you to seek out one similar in your neck of the woods! Ethical, sustainable, local, transparent! That’s my jam – how about you?
Francesca’s Dawn Braised Beef Short Ribs
Author: Linda Walbridge
This recipe can be served 2 ways – with or without strained sauce. I served it unstrained over mashed potatoes. If you don’t care for the bits of cooked veggies strain it before serving with your ribs.
Ingredients
1- 1/2 pounds beef short ribs
Salt & pepper
2 cups chopped onion
1/2 cup celery, chopped
1/2 cup carrot, chopped
3 tablespoons chopped garlic
2 teaspoons fresh thyme, oregano and rosemary
2 bay leaves
1 cup dry red wine
2 teaspoons espresso powder
3 cups no salt beef broth
2 tablespoons olive oil
Instructions
Preheat oven to 350*F.
Generously salt and pepper the ribs.
Heat oil in a dutch oven over medium-high heat.
Sear ribs in batches until browned on all sides, being careful not to crowd them.
Transfer ribs to a plate.
If needed add a bit more oil or remove all but 1 tablespoon if necessary and add chopped onion, celery and carrot to dutch oven.
When vegetables have softened, add chopped garlic and continue to brown for about 45 seconds – don’t burn the garlic.
Add herbs – you can use any combination of herbs that appeal to you – I happened to have thyme, oregano and rosemary fresh in my garden.
Stir to incorporate herbs with vegetables and cook for about 1 minute until herbs are fragrant.
Add wine, and espresso powder and stir to incorporate.
Place ribs and any accumulated juices back into dutch oven and cover with broth.
Bring to a boil and then reduce heat and simmer for about 25 minutes.
Cover and transfer to preheated oven.
Cook until ribs are tender, about 2-2 1/2 hours.
Remove ribs to a platter.
Here you can either strain the sauce and serve or serve with unstrained sauce – your choice.
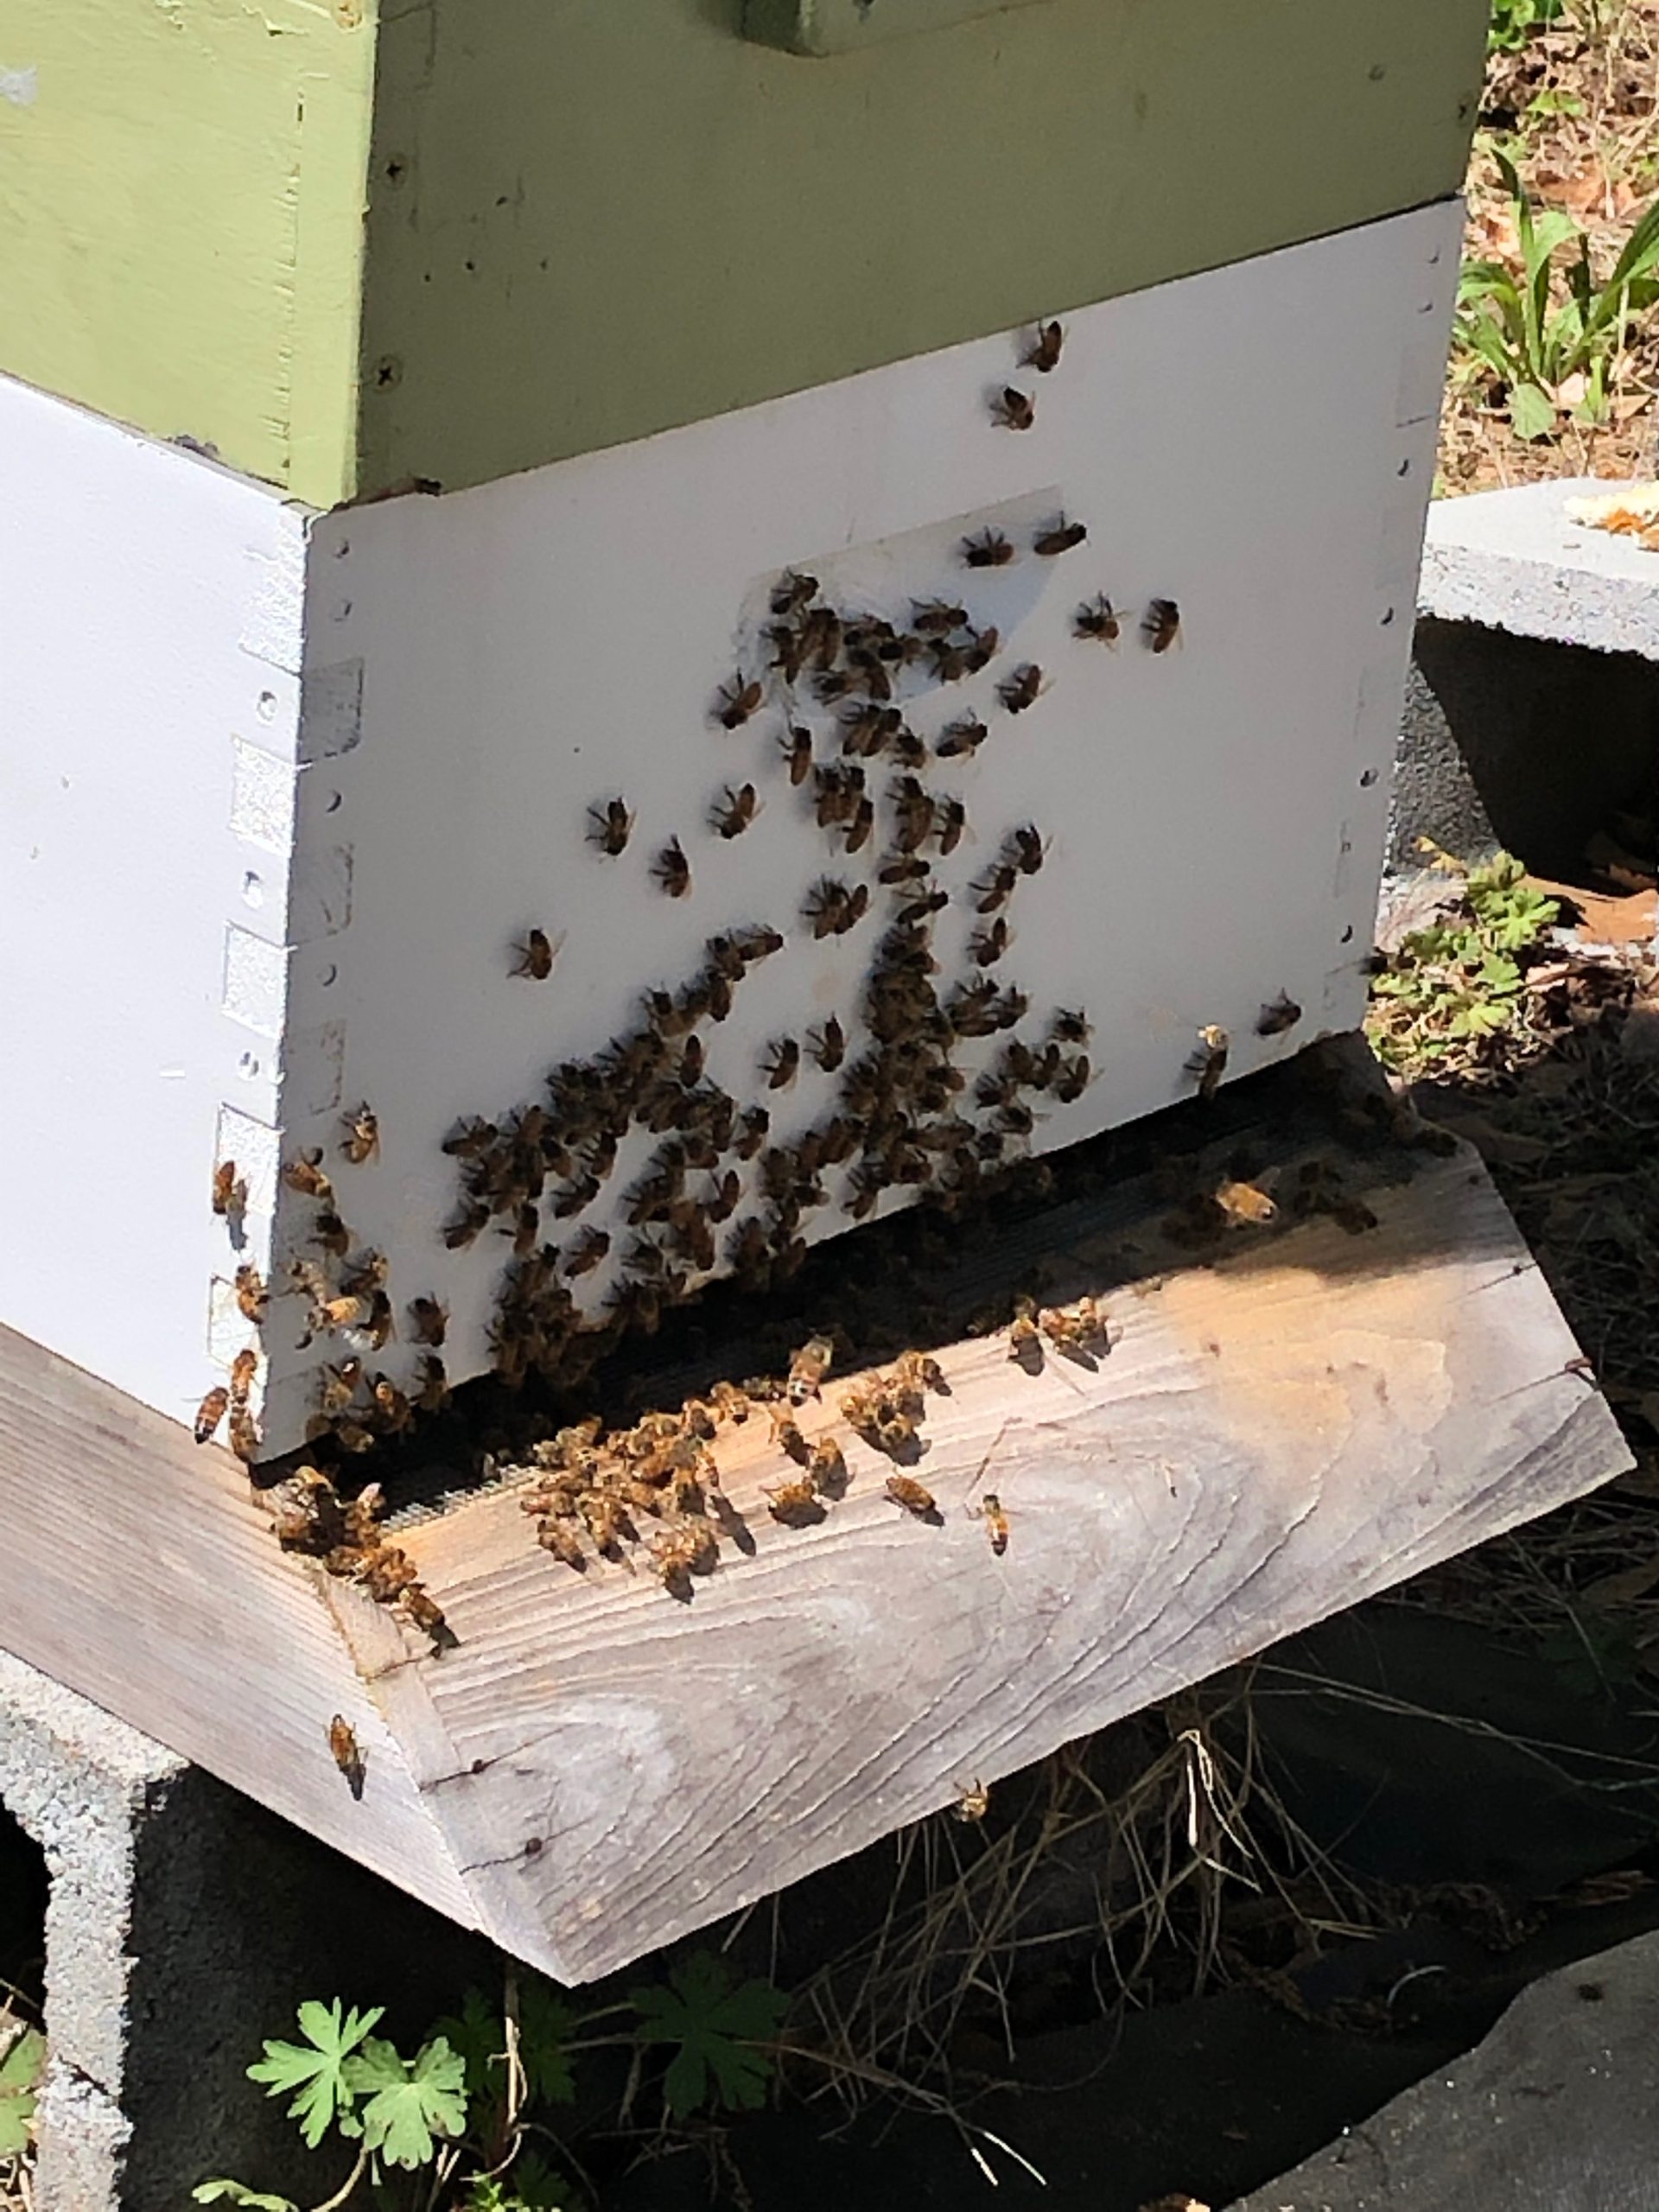
Spring is definitely here even though last night our temps dropped into the 30’s once again. I began checking on my bees on a warm day in February – a rare warm day. It was warm enough to open the hives and investigate. I didn’t want to keep the hive open for long, so made a quick check. I discovered one hive gone and the other going gangbusters!
This year unlike the two previous years one hive survived, thankfully. The last two years both hives were lost due to 2 different diseases. In 2017 it was varroa mites and last year the loss was due to nosema. You can read about it here and here. Yes, for two years in a row I saw the demise of both hives at the Greensboro Science Center upon my first spring inspection. It was devastating! That is actually putting it mildly – my heart breaks every time this happens. I feel irresponsible, question my beekeeping ability, you know, experience self doubt!
In 2018 when they were lost due to nosema, a parasite that affects the digestive system, the resident vet at GSC determined the form of nosema my bees had contracted was one with no “signs” until the bees are just gone. An Asian strain. Needless to say we have treated for both mites and nosema and this year I’m happy to report one hive survived and is going strong. I am afraid the other didn’t survive as it seems there may have been too much moisture in that hive. As this is my belief we have just obtained brand new supers to replace my older ones, which should guarantee a moisture free hive.
You can see in the photo above the lavender hive has no activity but the green one has plenty of girls hanging around the front of the hive – a normal behavior.
As I write, the new supers are being given a couple of coats of paint to prolong their life on the hive. Once they are dry and my man Dan installs the frame brackets I will place the new supers on my existing hive. I will also start another hive with a new queen and colony later this month or next month.
The strong hive that remains is full of honey and brood. I haven’t seen my queen on the last two inspections but have seen signs of brood and new larve, an indicator that she is indeed inside. Looking forward to seeing her when I replace the old supers with new. I’ll accomplish this by removing the existing supers then one by one replacing each with a new one and then filling it with the existing frames inside. This will give me a look all the way down to the white hive body. It will be a bit of a disturbance for the bees but should insure a warm, dry, safe hive for them. Once I put it all back together they will settle in quickly as all of the insides will be the same.
I am looking forward to giving my girls and their queen a new home. Beekeeping always offers a challenge of some type. Problem solving is a major part of keeping bees. If you are interested in becoming a beekeeper – DO IT! It is a satisfying and fun hobby! However, get advice and education from someone who has been keeping bees for a while – learn the basics. There are definitely beekeeping basics but after each bee keeper learns those, I think it’s up to the individual as to how they go about the task. There are beekeeping groups everywhere. Google it for your area or call your local extension service and ask for the names of the beekeeper organizations in your area. If you’re luck you’ll find someone like my Mr. F who was the best mentor a girl could ask for.
Here are some photos from the first time Mr. F came to remove a small colony and their queen from inside a camper we were selling. This took place when we lived in Texas. It was a super hot July day and he came down round 7 p.m. when the heat had calmed a bit to capture the queen and move the bees to his apiary. This is where it all started. After he’d captured the bees he told me I’d make a good beekeeper. That comment got me to thinking and a year later I began my adventure as a beekeeper. I’m so glad I did!
Texas BeesBees were using a scrub pad to attach their comb – silly girls!Queen bee inside a jar – before Mr. F used a queen catcher.
Setting the jarred queen inside a hive body.
Once the queen is placed in a box the others follow! All Hail the Queen!Waiting for all the bees to enter the hive.Listen and learn! Little did I know that this little adventure would turn me into a beekeeper!
Follow-Up posts will be up as Beekeeping 2019 continues!
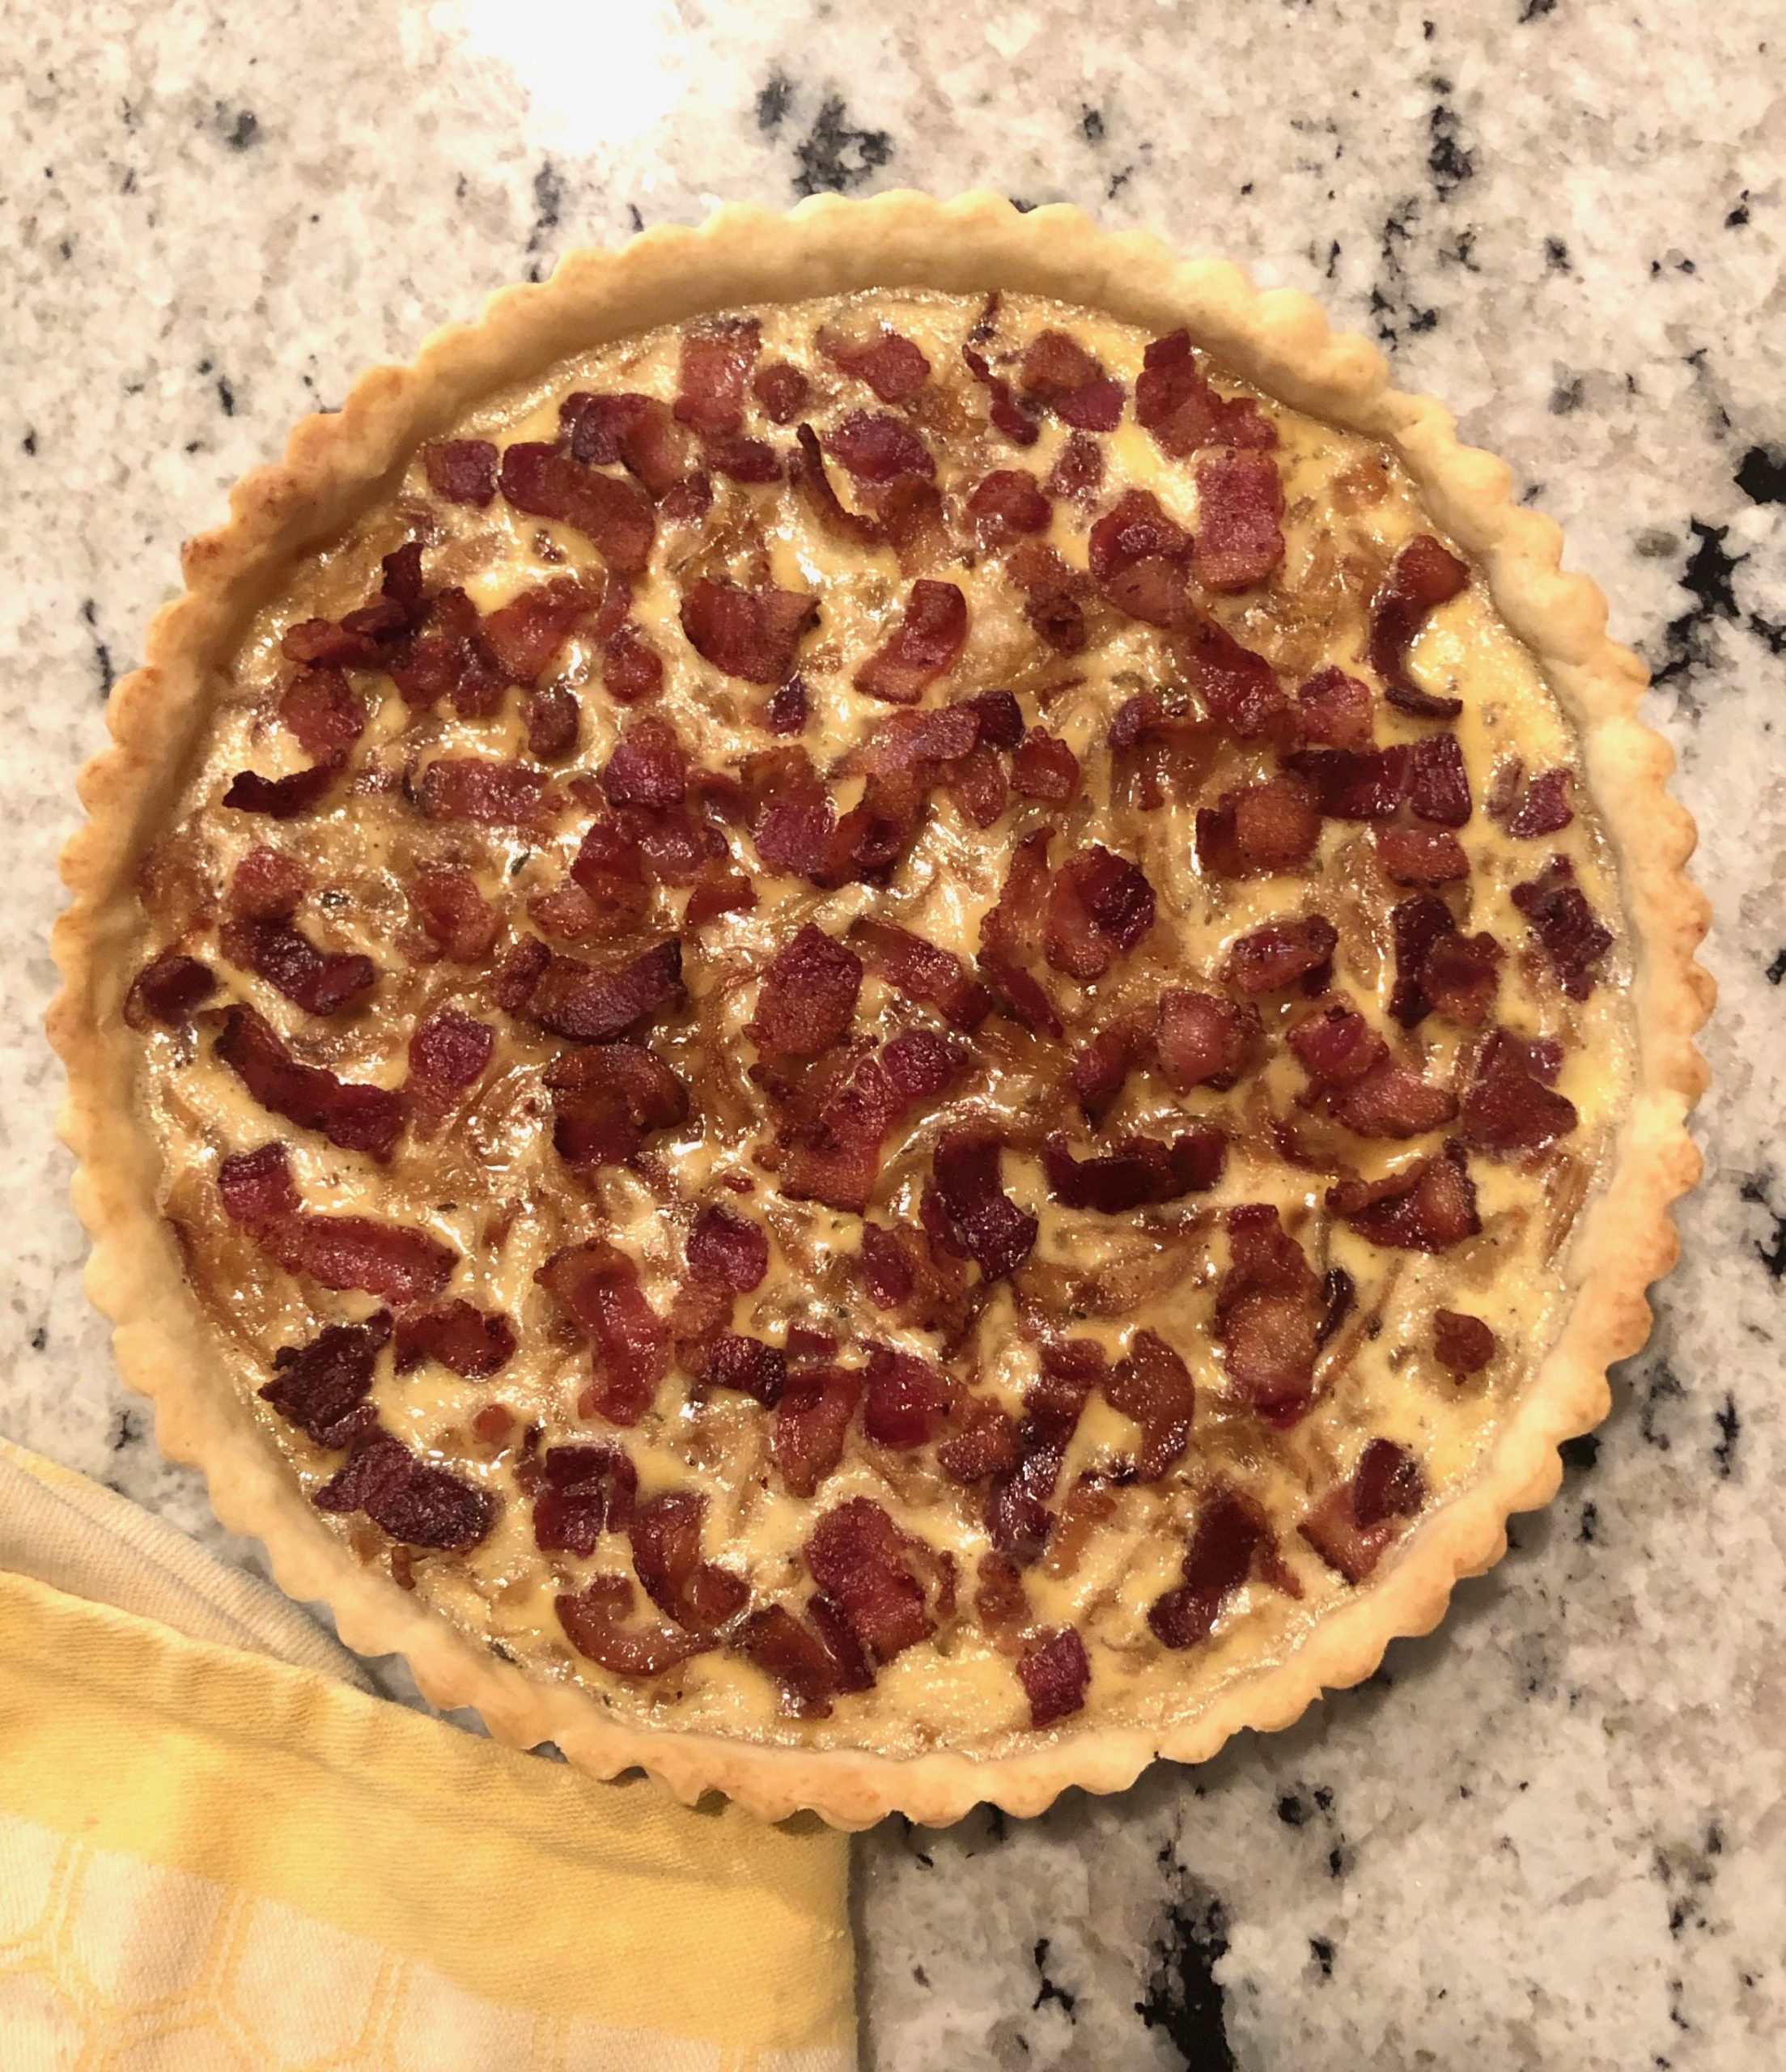
Oh my goodness this French Onion and Bacon Tart is ahhhhh-mazing! Since I made the decision to bake my way through the Cook’s Illustrated Baking Book it quickly became crystal clear that I’d need to bake some of the savory recipes not always the sweet, sugary items. But those are my favorites! By the way, I am not being compensated by CI for any of my posts as I work my way through their book – maybe I should look into that!
So far I’ve shared several recipes like these Banana Walnut Muffins, yummy Peanut Butter Chocolate Chip Cookies, Cranberry Nut Quick Bread which is a great way to use up any cranberries you froze after the holidays, and most recently a recipe for the BEST Sugar Cookies, EVER!! As you can see these are all sweet treats. Did you try any of them? I think the sugar cookies and cranberry nut bread were my personal favorites.
Even though sweets are my weakness this French Onion and Bacon Tart is outstanding and I will make it again. For starters I’ve never made a tart crust from scratch but found it easy to execute. Now if I can nail a basic pie crust all will be right with the world. I actually had to pop into my local kitchen store to pick up a 9″ tart pan which I’m certain is a good investment. Here’s the deal with the crust; all butter and made in a food processor, it’s firm enough to press into the pan, eliminating the need to roll and fit the dough into the pan.
There are several “tips’ that accompany this recipe. Regarding the dough; it is recommended to sprinkle walnut sized clumps of dough over the tart pan before pressing it evenly out to the edges and up the sides of the tart pan. Work outward from the center pressing into an even layer making sure to seal any cracks.
Since the onions must caramelize before being added into the custard CI has instructions to cut the onions crosswise as this allows the onions to soften and break down more readily than slicing them through the root end. The second suggestion is to cover them as they cook which enables them to cook in half the time. Saving time while preparing this gourmet tart? Yes please!
Now for WHY THIS RECIPE WORKS. The French elevate a common vegetable to the status of foie gras by gently simmering it in butter, enriching it with custard, and baking it in a buttery crust. The tart is similar to a quiche but delivers a more refined slice of pie, with more onions than custard. Trying to make an onion tart at home can produce a tough crust, hardly worth the time of carefully cooking onions and making custard. We needed to simplify the crust and shorten the overall preparation time.
The final “tip” stay away from sweet Vidalia onions which will make the tart watery.
I promised to share a recipe for Quick Cinnamon Buns but that my friends is for a lazy weekend and those have been few and far between lately. I still have it bookmarked though and it will be coming. I’ve also got my eye on a chocolate tart – of course I do! Are you a fan of Cook’s Illustrated? Do you own the baking book? If so, what have been your fav recipes? I’m all ears!
French Onion and Bacon Tart
Ingredients
CRUST:
1 1/4 cups all-purpose flour
1 tablespoon sugar
1/2 teaspoon salt
8 tablespoons unsalted butter, cut into 1/2 cubes and chilled
2/3 tablespoons ice water
FILLING:
4 slices bacon, cut into 1/4 inch pieces
Vegetable oil, if needed
1 1/2 pounds onions, halved through root end and cut crosswise into 1/4 inch slices
3/4 teaspoon salt
1 sprig fresh thyme
2 large eggs
1/2 cup half-and-half
1/4 teaspoon pepper
Instructions
FOR THE CRUST:
Spray 9-inch tart pan with removable bottom with vegetable oil spray.
Pulse flour, sugar and salt in food processor until combined, about 4 pulses.
Scatter butter pieces over flour mixture; pulse until mixture resembles coarse sand, about 15 pulses.
Add 2 tablespoons ice water and process until large clumps form and no powdery bits remain, about 5 seconds, adding up to 1 tablespoon more water if dough will not form clumps.
Transfer dough to prepared tart pan; pat dough into pan, pressing dough up sides and into fluted edges.
Lay plastic wrap over dough and smooth out any bumps or shallow areas.
Place tart shell on plate and freeze for 30 minutes.
Adjust oven rack to middle position and heat oven to 375*F.
Place frozen shell on baking sheet.
Spray an extra-wide- heavy-duty aluminum foil with vegetable spray and gently press against dough and over edges of tart pan.
Fill with pie weights and bake until top edge just starts to color and surface of dough no longer looks wet about 30 minutes.
Remove from oven and remove foil and weights.
Return sheet with tart shell to oven and bake until golden brown, 5-10 minutes.
Set sheet with tart shell on wire rack.
Do not turn off oven.
FOR THE FILLING:
Meanwhile, cook bacon in a non stick skillet over medium heat until crisp, 5 to 7 minutes.
Using slotted spoon, transfer bacon to paper towel-lined plate.
Pour off all but 2 tablespoons fat from skillet or add vegetable to make this amount.
Add onions, salt, and thyme to skillet.
Cover and cook until onions release liquid and start to wilt, about 10 minutes.
Reduce heat to low and continue to cook, covered, until onions are very soft, about 20 minutes, stirring once or twice (if after 15 minutes onions look wet, remove lid and continue to cook another 5 minutes).
Remove pan from heat and let onions cool for 5 minutes.
Whisk eggs, half-and-half, and pepper together in large bowl.
Remove and discard thyme sprig from onions.
Stir onions into egg mixture until just incorporated.
Spread onion mixture over tart shell and sprinkle bacon evenly on top.
Bake tart on sheet until center of tart feels firm to touch, 20 to 25 minutes.
Let cool on wire rack at least 10 minutes.
Remove outer metal ring of tart pan, slide thin metal spatula between tart and tart pan bottom, and carefully slide tart onto serving platter or cutting board.
Do you want to know the secret to the best sugar cookies? I knew you would! I have to give credit to the Cook’s Illustrated Baking Book. As you know I’m baking my way though the CI baking book- with no restrictions or time lines.
I sometimes crave a simple and plain cookie, like a sugar cookie. While a basic sugar cookie made with granulated sugar is a yummy thing this recipe elevates the sugar cookie to downright deliciousness. Full of toffee, butterscotch and nutty flavors, with a crisp outside and chewy inside. Pretty much the perfect cookie!
I made a batch of these cookies and after we’d been enjoying them for a couple of days my man, Dan declared them to be the best sugar cookie I’d ever made. He said, “sugar cookies are not my favorite, but these are absolutely the best sugar cookies you’ve ever made. They’re really good.” When he uses the word “really” he means honestly, undoubtedly, and unquestionably! I was honored to hear this even though I can’t claim responsibility for inventing the recipe.
Oh – did you want to know the secret to the best sugar cookies? There are two! Browned butter and brown sugar are the stars in this cookie. Not overly sweet but bursting with flavor that tops a sugar cookie made with only melted butter and granulated sugar.
Cook’s Illustrated – Why This Recipe Works – We wanted to turn up the volume on the sugar cookie by switching out the granulated sugar in favor of brown sugar. We had a clear vision of this cookie. It would be oversized, with a crackling crisp exterior and a chewy interior. And it’s flavor would scream “brown sugar”.
For a super easy, one bowl recipe for regular sugar cookies click here. This one bowl recipe has been a favorite of mine due to its lack of mess and it is a yummy cookie. Now go bake some cookies!
Brown Sugar Cookies
Ingredients
14 tablespoons unsalted butter
1 3/4 cups packed dark brown sugar, plus 1/4 cup for rolling
1/4 cup granulated sugar
2 cups plus 2 tablespoons all-purpose flour
1/4 teaspoon baking powder
1/2 teaspoon baking soda
1/2 teaspoon salt
1 large egg, plus 1 large yolk
1 tablespoon vanilla extract
Instructions
Melt 10 tablespoons butter in a 10 inch skillet over medium heat.
Continue cooking, swirling pan constantly, until butter is a dark golden brown and has a nutty aroma, 1-3 minutes.
Transfer browned butter to a large heatproof bowl.
Add remaining 4 tablespoons butter and stir until completely melted; set aside for 15 minutes.
Meanwhile adjust oven rack to middle portion and heat oven to 350*F
Line 2 baking sheets with parchment paper.
In a shallow dish mix 1/4 cup brown and granulated sugars until well combined; set aside.
Whisk flour, baking soda, and baking powder together in a medium bowl; set aside.
Add remaining 1 3/4 cups brown sugar and salt to the bowl with cooled butter, mix until no lumps remain, about 30 seconds.
Scrape down bowl; add egg and yolk, and vanilla and mix until fully incorporated, about 30 seconds.
Scrape down bowl.
Add flour mixture and mix until just combined, about 1 minute.
Give dough a fill stir to ensure that no flour pockets remain.
Working with 2 tablespoons dough at a time, roll into balls.
Roll half of dough balls in sugar mixture to coat.
Space dough balls 2 inches apart on prepared sheet; repeat with remaining dough balls.
Bake 1 sheet at a time until cookies are browned and still puffy and edges have begun to set but centers are still soft (cookies will look raw between cracks and seem underdone)12-14 minutes, rotating sheet halfway through baking.
Let cookies cool on baking sheet for 5 minutes; transfer cookies to wire rack and let cool to room temperature before serving.
Now that I am on a mission to clear out plastic – I’m finding it’s NOT easy – I see evidence daily of plastic in my home. I’m seeing it in places where I’ve not observed before. I thought I’d share a couple of new ideas for keeping plastic out of our environment. Have you started the process yet?
Here’s one – Q-Tips. Did you notice this one? I guess I did but didn’t realize that little blue or pink strip between the cotton ends is PLASTIC my friends! How can we still clean our ears and un-smudge our mascara? Purchase the Q-Tips with the paper center – recyclable! You can also find bamboo ear spoons if this is the main reason you buy Q-Tips. Don’t forget using swabs in our ears can be dangerous – so please do not be sticking anything down into your ear canal.
As I was reorganizing my cupboard I noticed that rice, beans, pasta, nuts, etc…all come wrapped or bagged in plastic. An area where it could be more difficult to stay away from plastic. Then I had a thought – buy these products in bulk when possible! In the stores where I shop they offer paper bags in which to carry your bulk purchases. Bingo!
If buying those products in bulk is not an option I’ll buy them in cardboard boxes if possible and forgo the plastic. Items like nuts, cereals, granola, grains , flour, nut butters, rice and beans can usually be found in bulk though and my next goal is to begin to buy said items this way. It will also cut down on waste since I can select only what I need for two people.
I will be traveling in the near future and I promise you I won’t buy a plastic bottle of water when I get through security at the airport. No, No, No – I will carry my own stainless steel water bottle and fill it up on the other side. Now you may say, “all airports don’t have the filling station for that bottle”. And you are right not all airports offer this service but it sure is handy when they do! Here is how I get around that obstacle. I take my bottle, go up to the bartender at the nearest bar (these are not hard to find in the airport) and nicely request him or her to fill my bottle with water. I have never been turned down!
If you are a brown bagger, you know taking your lunch instead of eating out while at work, there is no need for plastic cutlery. We all have non-plastic utensils at home. If you are concerned that your good utensils won’t make it back home pick up a set or two of cheap ones at a rummage or yard sale and either carry them with or leave them in your desk. You’ll never be without a fork, spoon or knife this way.
And my last tip for today. Plastic toothbrushes. YUCK! Bamboo is the answer. A bamboo toothbrush will need to be replaced regularly as does a plastic one. The difference? The handle of a bamboo toothbrush will biodegrade back into the environment in about 6 months whereas a plastic one will NEVER biodegrade back into our environment. Nope, it will live on forever. So sad…..
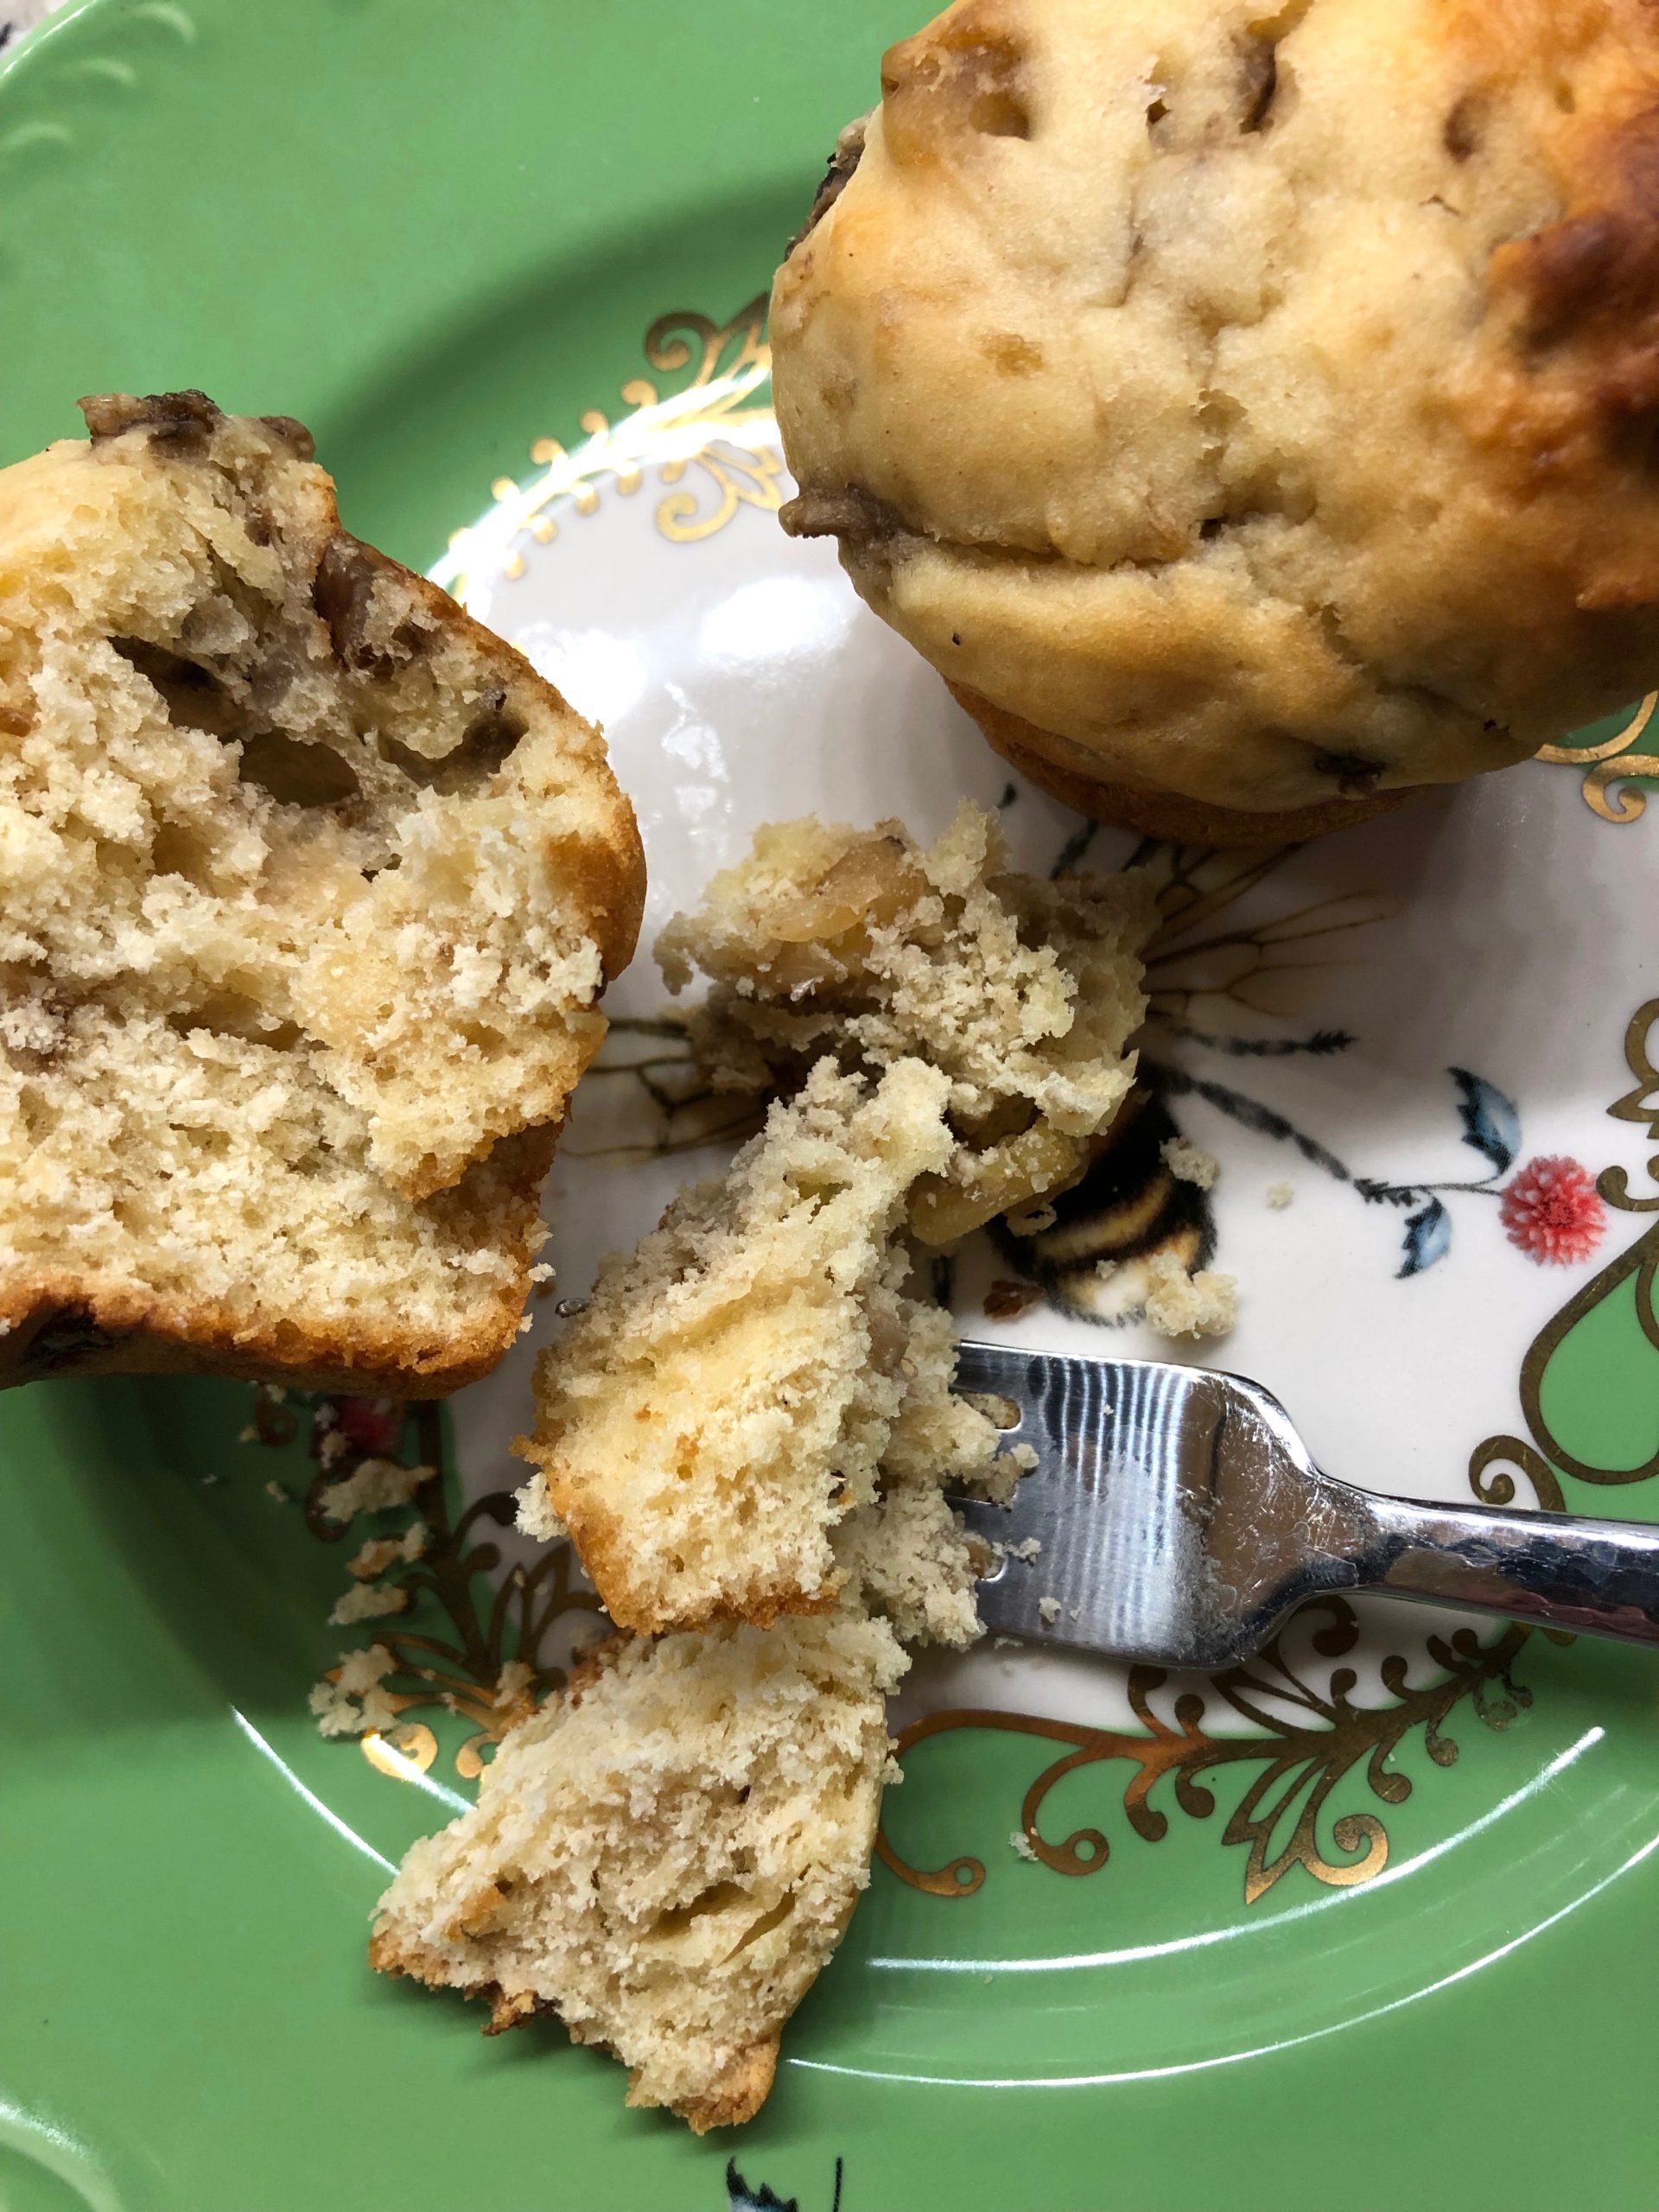
Baking a loaf of Cranberry-Nut bread is an excellent way to use up any leftover or frozen cranberries you have from the Christmas holidays. I froze a couple of bags since these tart berries seem to be harder to find after the holidays. I like to keep a loaf of some type of quick or breakfast bread to enjoy with my morning yogurt or for an afternoon snack with a hot cup of tea. My man, Dan grabs a slice for his commute to work in the mornings. Which is your favorite? Cranberry-Nut, Banana, Zucchini? I like all of those!
This cranberry-nut loaf is made extra delicious by the addition of grated orange zest and a little juice too. Fresh or frozen berries both work in this recipe. It’s convenient to whip up this loaf as you simply combine the liquid and dry ingredients separately, then stir them together.
I’m appreciating Cook’s Illustrated’s notes that are scattered throughout my new baking book. Are you a fan of Cook’s Illustrated? My only issue here is that I love to bake sweet treats and this book is full of them. I’ve been perusing the recipes to choose a savory one but I also am thinking hard about their version of Quick Cinnamon buns – heck what’s another walk around the neighborhood or an extra few minutes on the elliptical?
So here’s what CI says about this quick bread recipe.
WHY THIS RECIPE WORKS This simple bread is often subpar; too heavy, or so overly sweetened that the contrast between the tart berries and what should be a slightly sweet, cake like bread is lost. We were looking for a crust that was golden brown and evenly thin all the way around and an interior texture that was somewhere between a dense breakfast bread and a light, airy cake. Taming the puckery tart of the cranberries was one route to delivering an above-average loaf.
Cranberry-Nut Quick Bread
If you use a 9 x 5 inch loaf pan stat checking for doneness about 5 minutes sooner. I found that the recipe took a little over an hour to be thoroughly baked.
Ingredients
2/3 cup buttermilk
6 tablespoons unsalted butter, melted and cooled
1 tablespoon grated orange zest plus 1/2 cup juice
1 large egg, lightly beaten
2 cups all-purpose flour
1 cup sugar
1 teaspoon salt
1 teaspoon baking powder
1/4 teaspoon baking soda
1 1/2 cup fresh or frozen, cranberries, chopped coarse
1/2 cup walnuts, toasted and chopped coarse
Instructions
Adjust oven racks to middle position and heat oven to 350*.
Grease an 8 1/2 x 4 1/2 inch loaf pan.
Stir together buttermilk, meted butter, orange juice and zest, and egg in a small bowl.
Whisk together flour, sugar, salt, baking powder, and baking soda in a large bowl.
Stir liquid ingredients into dry ingredients with rubber spatula until just moistened.
Gently stir in cranberries and nuts.
Do NOT overmix.
Scrape batter into loaf pan and spread with rubber spatula into corners of pan.
Bake until golden brown and toothpick inserted in center of loaf comes out clean, 55 minutes to 1 1/4 hours, rotating pan halfway through.
Let loaf cool in pan for 10 minutes, then turn out onto wire rack and let cool for 1 hour before serving.
Peanut Butter Chocolate Chip Cookies are the bomb! I love a peanut butter cookie with some softness and crunch – you? I feel a little silly that I never knew exactly how when I bought a pb cookie from a bakery they had crunch and were soft and chewy at the same time. Duh! I now know the answer thanks to my new Cook’s Illustrated Baking Book.
In my last post I shared the recipe for Banana Walnut Muffins – Bakery Style and mentioned that I plan on baking my way through the book – with no time restraints! I also touched on how some of the recipes seem a bit intimidating but I’m game to try them nonetheless.
This recipe for peanut butter cookies was not at all intimidating and I loved the option of adding chocolate chips. The chips did get in the way of pressing the grooves in with the fork but that didn’t effect the taste at all.
Oh, do you want to know what I did that created the crunch? The answer is NOT using crunchy peanut butter! The recipe calls for adding some salted dry-roasted peanuts, pulsed in a food processor to resemble bread crumbs. For me this was the perfect pb cookie – with or without chips I’m sure it’s my new fav recipe.
WHY THIS RECIPE WORKS Cook’s Illustrated relates this news at the beginning of each recipe. Recipes for peanut butter cookies tend to fall into one of two categories; sweet and chewy with a mild peanut flavor or sandy and crumbly with a strong peanut flavor. What we wanted, of course, was the best of both worlds- that is, cookies that were crisp on the edges and chewy in the center, with lots of peanut flavor.
They nailed it! Here’s the recipe – enjoy! Next up is a CI recipe for Cranberry-Nut Bread – a great way to use up any leftover cranberries from the holidays!
Peanut Butter Chocolate Chip Cookies
Serves: 36 Cookies
Ingredients
2 1/2 cups all-purpose flour
1/2 teaspoon baking soda
1/2 teaspoon baking powder
1/2 teaspoon salt
16 tablespoons salted butter, softened
1 cup packed dark brown sugar
1 cup granulated sugar
1 cup extra-crunchy peanut butter, room temperature
2 large egs
2 teaspoons vanilla extract
1 cup salted dry-roasted peanuts, pulsed in a food processor to resemble bread crumbs, about 14 pulses.
Instructions
Adjust oven racks to upper-middle and lower-middle positions and heat oven to 350*.
Line 2 baking sheets with parchment paper.
Whisk flour, baking soda, baking powder, and salt together in a medium bowl; set aside.
Using a stand mixer fitted with paddle attachment, beat butter, brown and white sugar at medium speed until light and fluffy, about 2 minutes, scraping down sides of bowl as needed.
Add peanut butter and mix until fully incorporated, about 30 seconds; add eggs, one at a time, and vanilla and mix until combined, another 30 seconds.
Reduce speed to low and add dry ingredients; mix until combined, about 30 seconds.
Mix in ground peanuts and chocolate chips until just incorporated.
Give dough a final stir to ensure no flour pockets remain and ingredients are very evenly distributed.
One of my Christmas gifts from my man, Dan was the Cook’s Illustrated Baking Book! It was a welcome surprise! Back in the fall when we attended an Octoberfest party the hostess showed me this book and I’m sure I made the comment, “I need this book”. My husband is good at making note of such a comment – so Merry Christmas.
It’s a darn good thing that the Cook’s Illustrated Baking Book has savory as well as sweet recipes because you know, I love my homemade sweets! On a side-note, I like for my jeans to fit too! Quick breads, muffins, biscuits, pizza, cookies, cakes, pastry, yeast rolls and loaves, griddle cakes, waffles, coffee cakes, soufflé’s, pies and tarts, the list goes on and on. I admit some of the recipes are a bit intimidating but with such explicit directions I’m sure to give it a go. In fact I plan on baking my way through this book with no set time limit. That’s a little candy-ass I realize, but I know better than to set myself up for failure.
These muffins are delicious with their light, tender crumb and tiny bites of banana inside too!
The first recipe I baked was for Bakery-Style Muffins, banana-walnut flavor. Each recipe begins with this – WHY THIS RECIPE WORKS. Here’s what it says about these muffins – Jumbo bakery-size muffins should boast a rich, full flavor and a thick, crisp crust protecting their fragile, tender crumb.
I chose this recipe since I had some ripe bananas staring at me from the kitchen counter. I also needed a little something to give as thank you to some friends who’d loaned us a card table during the holidays. This recipe seemed like a perfect place to start.
One of the most unique parts of the recipe was finely chopping the bananas in lieu of mashing up over ripe bananas. This did give the muffins oodles of banana flavor! You may notice the ingredients are increased to ensure enough batter to fill up the muffin cups to the top. Another note given is, using thicker liquid such as buttermilk or yogurt, yields thicker batter and muffins with rounded, textured tops.
My muffins did indeed bake up with crisp tops and tender crumbs inside. I really liked the little bites of banana inside with the crunch of the walnut pieces too. Not overly sweet and delicious for breakfast or with a cup of tea in the afternoon. In case you are on a muffin kick here is a yummy recipe for Spiced Banana Muffins.
The next recipe I’ll be sharing from the Cook’s Illustrated Baking Book is one for Peanut Butter Chocolate Chip cookies that are downright addictive. Are you a peanut butter cookie lover? If so you won’t want to miss the post for that recipe…coming soon!
Banana Walnut Bakery Style Muffins
Serves: 12 muffins
Ingredients
3 cups (15 ounces) all-purpose flour
1 tablespoon baking powder
1/2 teaspoon baking soda
1/2 teaspoon salt
1/2 teaspoon nutmeg
10 tablespoons unsalted butter, softened
1 cup light brown sugar
2 large eggs
1 1/2 cups plain low-fat yogurt
Instructions
Adjust oven rack to lower-middle position and heat oven to 375 degrees.
Spray 12 cup muffin tin with vegetable oil spray.
Mix flour, baking powder, baking soda, salt and nutmeg in a medium bowl and set aside.
Using a stand mixer with paddle attachment, beat butter and sugar on medium-high speed until pale and fluffy, about 3 minutes.
Add eggs, one at a time, and beat until combined.
Reduce speed to low and add dry ingredients in 3 additions, alternating with yogurt in 2 additions, scraping down bowl as needed.
Give batter a final stir by hand.
Using an ice cram scoop or large spoon, divine batter evenly among prepared muffin cups.
Bake until muffins are golden brown and toothpick inserted in center of muffin comes out with few crumbs attached, 25-30 minutes, rotating muffin tin halfway through baking.
Let muffins cool in tine for 5 minutes, then transfer to a wire rack and let cool for 5 minutes before serving.