On Saturday morning my man Dan and I went to investigate a bee call I received. These bees were in the walls of a storage building, in a back yard, on a hot day, where tall grass grew, brown recluse spiders may have lurked, snakes may have been lying low and we did not want to venture! I held my laugh when the lady in residence informed me that she had put out “snake b-gone”. Tall boots, bee suits and smokers aside, we declined to begin the process of ripping out walls, wading through storage room boxes and Lord knows what else, to remove these bees. I inquired if she might have someone clear a path to allow us to reach the bees, and told her I’d call in the fall. We will see….
So, we were up and out and it was early. Early and cool, we found ourselves with a little extra time on our hands. We stopped by the feed store to load up on hay and feed for Fancy, our mare. While at the feed store, my man Dan spotted some rather expensive looking “eggs” on the counter at the feed store. When he asked why they were so pricey the feed store owner said, “Oh, those are for snakes”. He went on to say that one could build a nest and place these eggs in it, fooling the snakes into thinking they were getting dinner, when in fact they were swallowing a glass egg. I’ll leave the rest to your imagination – not a pretty picture in my mind.
We decided to visit a farmers market a few minutes away to load up on some fresh veggies for the weekend. I made the mistake of leaving my camera at home and so have no photos of the market. We bought fresh tomatoes, yellow ones, corn, green beans and bread. I leave you with a tomato salad – one of our favorites in the summer.
This is one of those recipes that really is not a recipe. It is one of those “it’s in my head” recipes. If you are reading this post you, no doubt, can imagine how to add to this salad and declare it your own. The tomatoes, a summer delight, didn’t need much help to put a smile on my face.
Enjoy! Heirloom Tomato Salad Ingredients:
Assorted Tomatoes, chopped
Pinch of ground black pepper
Feta cheese, cubed
Fresh basil, sliced
A large drizzle of olive oil
A splash of White wine vinegar
Chop tomatoes and cube cheese. Mix remaining ingredients together and pour over tomatoes. Toss gently.
Way back in February on a day when the temperature was 12* outside I baked a batch of these “to die for” bars. I had mentioned at the end of that post that I would like to make them again using a smaller pan to see if I could produce a thicker bar. This week with day time temperatures reaching the likes of 108*, 109*, and hovering at 101* at 10:30 in the evening, I decided to try them again. It is imperative that I find indoor activities to keep me busy as it’s just too dang hot to spend much time outside!
The bees have also required more maintenance than normal, forcing me to spend time outside in the heat. More on that in a minute. I made the bars again, using an 8x 11.5 x2″ pan. I noted a slight difference in the thickness of the bar. Either size pan works fine. The taste remains incredibly delicious. I was so happy about this that I decided to enter them in a holiday recipe contest; using Texas pecans, that I mentioned in the Chocolate Pecan LoafCake post. The deadline for entering recipes is fast approaching and I felt confident submitting this one.
Now, here is the scoop on my bees. They are HOT! Bees keep the temperature in their hives somewhere between 91-95 degrees. In the summer they regulate it by the amount of water they bring in and by fanning their wings like mad to create airflow. It’s their own evaporative cooling system. My man Dan also helped me install tarps across the tops of the bee yard fences to give some much-needed shade for my precious bees. At first, they were a little confused as they have to dodge the tarps and fly over or under to get out of the bee yard or back to the hive. They are accustomed to making direct flights in and out of their yard; but quickly figured out a new flight pattern. When I went to check on them this afternoon, when it was good and hot, I was relieved to hear much less fanning of wings, which is what gives bees their buzz. This tells me they aren’t having to work so hard to cool the hives.
In this heat they are also struggling to find food. I have felt sorry for them as there seems to be no relief in sight from the heat as well as no prediction of rain. The lack of rain has lowered the amount of flowers and plants blooming that they would normally harvest nectar or pollen from. A few weeks ago I started feeding Queen Elena and her hive sugar syrup which seems to have given them stores of nectar in the hive. Yesterday I decided to begin feeding Queen Anne and her hive and I removed a super from it as well as from Queen April’s hive. Removing the supers will prevent them from spending time preparing frames they will not need to fill with honey. Earlier this week I removed supers from Queen Heidi and Queen Miracle’s hives too. I noticed the girls were working hard on building out wax on the frames to fill them with honey – yet there is no resource for gathering nectar to make honey. Remember, bee keeping is nothin’ but problem solving! I’ve also made a decision not to harvest any more honey from my hives this summer. I feel that the bees will need it to help them sustain through the rest of summer as well as winter. Still there is a possibility that I will need to feed all my hives throughout the fall to help them survive the cold winter months. I would like to bottle more of that delectable nectar but it’s more important to keep the bees healthy and alive!
The good news is that all my hives seem free of pests, full of brood and newly laid larva. Crossing my fingers that my decisions pay off and help them survive this dreadful heat wave we are experiencing. Even though this has created more work for me in this awful heat I remain enamored with my bees and bee keeping. Entering the bee yard hearing their constant buzz, as well as simply observing them in their daily lives gives greater meaning to the world around me. I am focused on them alone while there and it gives me significant joy.
Enjoy!
Oooey Gooey Caramel-Chocolate Bars
Crust:
2 cups all-purpose flour
1 cup firmly packed brown sugar
1/2 cup butter
1 cup pecan halves
Topping:
2/3 cup butter
1/2 cup brown sugar
1 cup real semi-sweet chocolate chips
Heat oven to 350*. Combine all crust ingredients except pecans in bowl of a stand mixer, if you do not own a stand mixer put ingredients in large bowl. Beat at medium speed until mixture resembles fine crumbs. Press into bottom of an ungreased 9″ x 13″ or *8 x 11.5 x 2″baking pan. Place pecans evenly over unbaked crust.
Combine remaining butter and brown sugar in 1 quart saucepan. Cook over medium heat, stirring constantly, until the entire surface of the mixture begins to boil. Boil stirring constantly, for 1 minute. Pour mixture evenly over pecans and crust. Bake for 18-22 minutes or until the entire layer of caramel is bubbly. (Do NOT overbake) Remove from oven. Immediately sprinkle with chips; allow to melt slightly. Spread melted chips over bars with an off-set spatula. Cool completely. Cut into bars.
*If you use the smaller pan, be sure and increase the baking time by 1/4.*
A few weeks ago my man Dan and I traveled south-east about 350 miles to attend my high school reunion. It was my 40th – yep, do the math I’ve been out of high school a long time. It was a successful and enjoyable evening albeit, too short.
There isn’t much going on in the town where I grew up and attended school. There are a few beautiful old houses, a lovely museum, a fabulous, restored botanical garden called Shangri La, chemical plants, and some nice people. The best part of growing up in Orange, Texas to me, was that it sits on the water and the gulf coast is close by. It is also the border town between Texas and Louisiana. Situated right on the Sabine river which divides the two states. It is easy, if you’re from that part of Texas to consider yourself Texan with a little coon ass thrown in. Pardon my french!
Taking this little known fact into consideration, you will understand why I love spicy, Cajun, food so much. Oh! and if there is seafood in the mix, all the better. We found time to hit a great Cajun seafood place for dinner before heading over to the country club for my reunion. We filled up on gulf shrimp, bar-b-q crab, fresh red snapper, crawfish and all the trimmings. To me there is not a better shrimp, than one caught in the gulf of Mexico. There is a flavor unique to these shrimp and having grown up eating this particular kind of shrimp, well, it’s just my favorite.
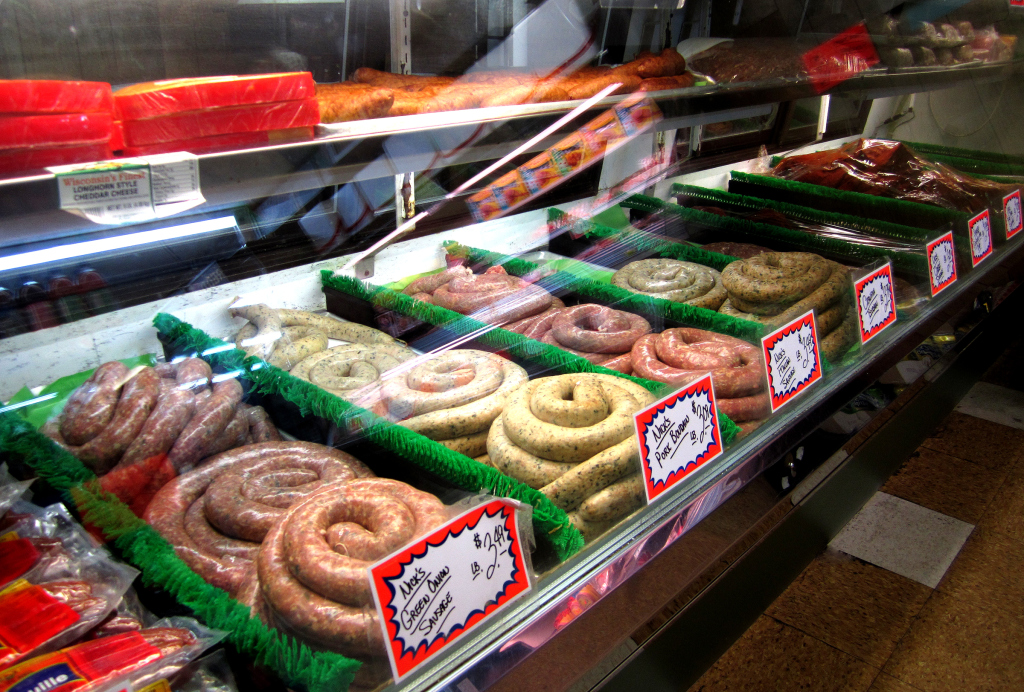
The day after the reunion we headed to Pt. Arthur to visit Nicks Grocery and Market. We can buy boudain and Cajun sausage from places like Central Market or Whole Foods but it’s hard to beat Nick’s. He’s been in business for as long as I can remember and he makes all that Cajun food fresh in his store. No trip to that part of Texas would be complete without a stop by Nick’s to fill up a cooler with green onion sausage, crawfish boudain, pork boudian, stuffed, seasoned Cajun pork chops, and some cajun sausage.
You’ll find Nick’s tucked away in a residential area. Kids ride up on their bikes to buy sodas and candy bars, grown men on motorcycles park out front and fill a small cooler strapped to the rear seat of their bikes, women in their sunday best bring home Sunday supper, and travelers from afar leave with a smile.
The shopping experience at Nick’s is entertaining. Cajun food is known for its spiciness and heat. Wandering around, perusing the shelves proved that shoppers at Nick’s are looking for hot and spicy. Not only is the meat counter filled with hot and spicy goods but the shelves are stocked with hot sauces, dips, and marinades. The main label I noticed was Cajun Power. No matter if you’re cooking sloppy joes, chili, baked beans or making dip you can buy a jar of sauce and cook with Cajun Power! If all you need is a little hot sauce on the side there is a jar of Louisiana Lightening Strike Hot Sauce. We got a kick out of reading the labels but passed on buying any sauces. Our buggy was filled with items from the meat counter.
Cajun Power
Our order was wrapped and labeled by a guy complete with a Cajun accent. Even listening to his dialect made me smile. We filled our basket with all the good stuff and headed to the check out. I couldn’t help but notice the well used stamp lying on the counter, “Hot Boudain”. Is there any other kind?
What other kind is there?
Friday night we threw a roll of the green onion sausage on the grill as an appetizer. We polished it off in no time with cold beers and outdoor fans blowing on high. The green onion bits give the sausage not only a delicious flavor but visual interest as well. The sausage is spicy, tender and meaty. Healthy?, you ask, probably not, but an occasional guilty pleasure is acceptable in my kitchen.
Green Onion Sausage
Grilled Green Onion Sausage
If you’ve never tried boudain; pronounced “boo-dan” (shorten the “n” sound just a tad), go to your local speciality meat market, or if you’re lucky enough to have one, Cajun market and give it a try. We love it with omelets, as a side dish with crawfish pie ( a recipe I will post when the weather is cooler), or as an appetizer. Both boudain and Cajun sausage make a delicious meal with a side salad and loaf of crusty bread. So go on, seek and ye shall find…just be sure to keep a cold brew close at hand.
To quote Lucy Van Pelt in Peanuts by Charles M. Schulz, “All you need is love. But a little chocolate now and then doesn’t hurt.” Today I made a Chocolate Pecan Loaf Cake, I’ve got love, but I needed a little chocolate.
I am considering submitting a few recipes for a holiday recipe contest sponsored by our electric co-op. They are looking for the best pecan recipes-savory and sweet. Texas is a large producer of pecans and the main criteria is that all recipes must include pecans. I’ve got several tried and true recipes using one of my favorite nuts but I also have a new book, given to me by Miss T, and it’s all about chocolate. I decided to try the combination of pecans, chocolate, and my delicious honey in an effort to submit a winning recipe.
One of the benefits to using honey is that it allows the cake to stay moist longer. The flavors are subtle but the sweet chocolate taste stands out fulfilling that “need” for chocolate. The cake is tender and moist with a hint of espresso richness. This loaf style cake will be equally delectable with a cup of mid morning coffee or served as a lovely, simple dessert.
Enjoy! Chocolate Pecan Loaf Cake
Ingredients:
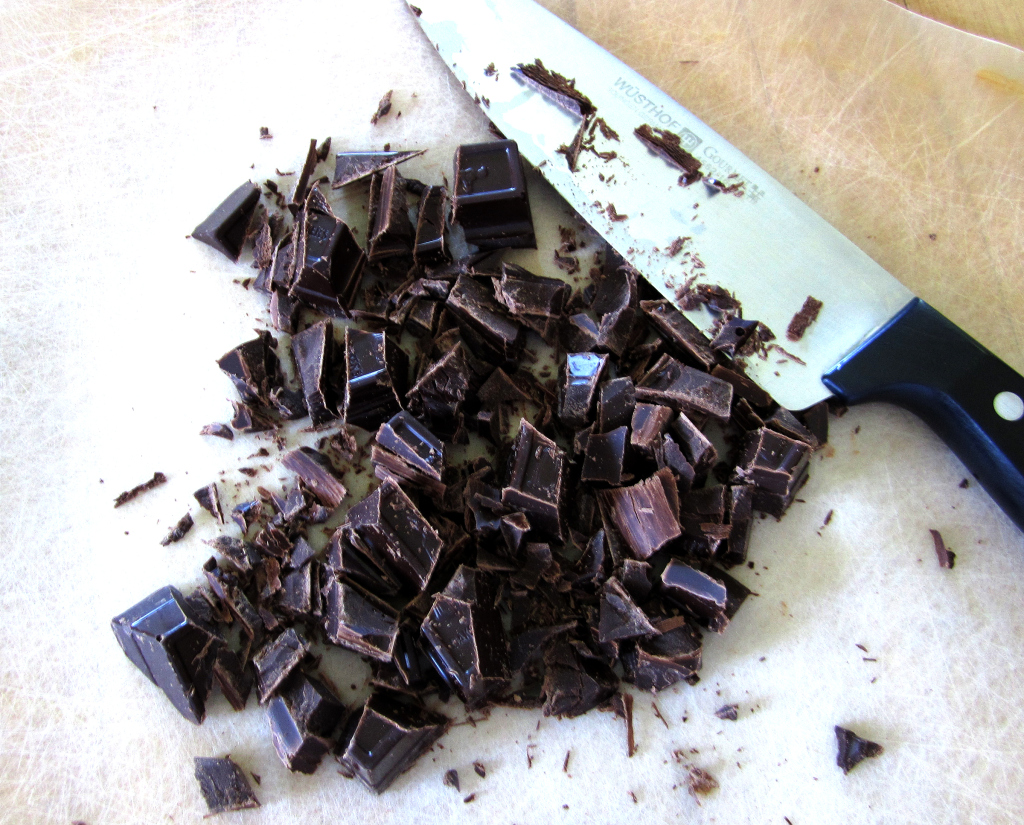
3 ounces semi-sweet chocolate, coarsely chopped
2 tsp. instant espresso powder
1 cup warm water
1/1/2 cups all-purpose flour
2 tsp. baking powder
1/2 tsp. baking soda
1/14 tsp. salt
1/2 cup (1 stick) of butter, softened
1 cup sugar
1/4 cup honey
2 large eggs
1 1/2 tsp. vanilla
1/2 cup coarsely chopped pecans
Preheat oven to 350*. Grease an 8 x 4 x 3″ loaf pan. dust it with flour and tap out any excess.
Melt the chocolate in the top of a double boiler set over simmering water, stirring until melted and smooth. Set aside and allow to cool to lukewarm.
In a small bowl dissolve the espresso in the warm water.
In a medium bowl, whisky together flour, baking powder, baking soda, and salt.
In a large bowl, using an electric mixer, cream together the butter and sugar on high-speed until light and fluffy. Add the eggs, one at a time, beating well after each addition. Add the vanilla. Reduce the speed to low and beat in the cooled chocolate and honey. Alternately beat in the flour mixture and coffee until well blended. Stir in the pecans.
Pour the batter into the prepared pan, tap it on the counter to remove air bubbles. Bake in the center of the oven for 55-60 minutes, or until a toothpick inserted in the center comes out clean.
Set the pan on a wire rack to cool for 10 minutes. Invert cake onto a rack and allow to cool completely. Decorate with whole pecans and sprinkle with powdered sugar if you wish.
Beautiful isn’t it? I can say that because I didn’t make this stuff – my bees did! I am so proud of my first honey harvest. I’d like for you to read more about it and see more photos, taken by my man Dan. Go to the “Bees & Honey” page up top and you’ll see “Honey Harvest” down a few lines, click and enjoy!
A short update on the girls. I am still feeding Queen Elena’s hive but only every other evening. They are consuming one quart every two days. That is ok. Everyone else seems to be doing fine. Monday is the day I set aside to visit the bee yard, smoker in hand and inspect each hive for good or unhealthy conditions. I am always thrilled when I spot a queen but seeing brand new babies, honey, and no pests let’s me know all is well in the apiary.
Tomorrow that is where you will find me. As I inspect I will also be checking for frames full of capped honey. When there are enough, the second honey harvest will take place. Believe me, this is one of the joys of my week. The buzzing is calming to me, their approach to each day encourages me and the fruits of their labor inspire me.
Finally, I have found a moment to write about the first “Orange Bee” honey harvest. It actually took place on July 4th. When I woke that morning, I couldn’t think of a better way to spend the early part of my day. My adoring husband, who I will now refer to as, my man Dan, was eager to help with and photograph the process. We hurriedly drank hot cups of coffee, slipped into our bee suits, fired up the smoker, and headed to the bee yard. Below I will recount a condensed version of our day.
The first step in removing the frames which are full of honey is to brush the bees from the capped comb. Bees are not fond of being separated from their delicious nectar, perfectly understandable as it takes the bees about 50,000 miles of flight time to make one pound of honey. Always cautious not to smush any bees, I slowly remove each full frame and gently brush the bees off into their hive. Now, this works pretty good but it seemed before we could secure the frame in an empty box and cover it a few bees would be back. It felt a little frantic at times, trying to keep them off as we placed the frames in the boxes for transport.
Frame full of capped honey – before brushing bees away.
This task took about an hour. When I’d completed removing all the frames that were full of capped honey we loaded them into the truck for transport to an extractor. There were 9 frames of honey to be harvested and I know that one full super (the yellow box in the photo above, where bees make honey) holds about 2 1/2 gallons of honey. A super holds between 8-10 frames. Mine hold 8, making it easier for little ‘ole me to handle when my man Dan isn’t around.
We headed to the honey house to prepare the combs for extraction. My man Dan carried the full super into the honey house for me. A super with 8-9 frames full of honey weighs about 60-80 pounds. I am thankful for my husbands assistance with this part, otherwise I’d be visiting my chiropractor. The first undertaking is to cut the wax capping away from the comb. A heated knife is used to do this job, easily removing the wax and leaving a comb full of glistening honey. During this part the important thing to remember is to keep your finger tips clear of the hot, sharp, dangerous knife’s edge when nearing the top of the frame.
Removing wax cappings to reveal pure, glistening honey.
The cappings fall into a waiting tub where the honey drains and is later added to the honey bucket. You can catch a glimpse of the stainless steel extractor behind me. After removing the cappings from both sides of each frame I loaded them into the extractor, placed a sanitized bucket underneath the spout, hit the on switch and before we knew it out poured pure, unfiltered honey. Prior to turning on the machine, I placed a strainer of cheesecloth over the top of the bucket. This strainer catches tiny bits of wax or any other debris as the honey flows into the waiting bucket. After several minutes the extraction process was complete. I poured the honey from the cappings catcher into the cloth, put the lid on and loaded up.
When we arrived back at my bee yard I took the capping remnants and laid them out on a table in the bee zone. The girls would spend the next couple of days cleaning out every drop of honey remaining hidden inside the wax and transport it back to their hives. I also placed the empty frames, from which I’d extracted the honey, back into the hives for the bees to clean out. No waste of the honey that they worked so hard to make. They do this in short order – bees are remarkable housekeepers.
Bees cleaning honey out of wax capping remnants.
Now is the waiting part. Later in the afternoon I lifted the cloth up from the bucket and allowed honey to drain from it. Removing the cloth completely, I replaced the lid and began the 24 hour waiting game. Waiting, allows any air bubbles to rise to the surface, and be skimmed off before bottling. Since it was July 4th, I didn’t mind the wait. We had a BBQ, toasted a successful “first harvest”, and watched fireworks until late in the evening.
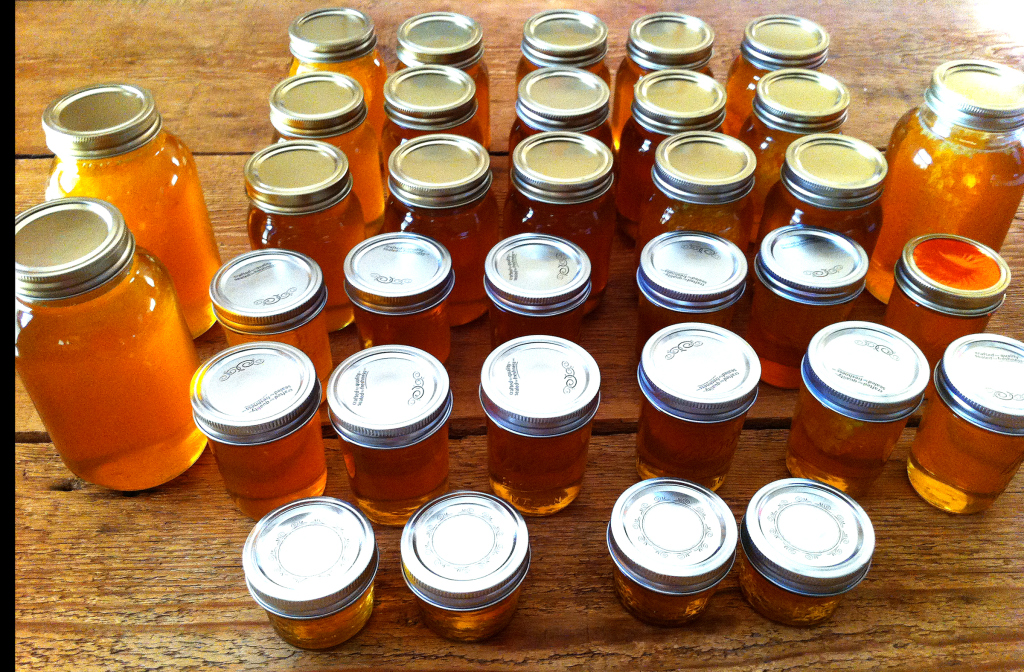
The next day I began the bottling process. It is easy if you are quick to shut the honey gate. The honey gate is a wide- mouthed contraption, fitted at the bottom of the honey bucket. It allows you to open or close the “gate” while filling jars. No mishaps took place. After bottling all of our honey, my man Dan did the math and determined that we were the proud owners of 3 3/4 gallons of honey. This sounds fantastic, however 2011 is a poor honey production year. My hopes are that next year we will have more rain, less heat early on and double the amount of honey. Seeing the liquid gold flow from bucket to jar was one of the most fulfilling moments in my short bee keeping adventure.
Filling a jar with pure, local, wildflower honey.
The last job left for me was to slice some “cut comb” honey to add to a few jars for the true honey enthusiast. Quite a few folks have asked for the comb honey. If you’ve never tried it I would suggest you do so. It is honey in it’s absolute purest, untouched form. Indescribably delicious! I eat a tiny piece almost every day and remain amazed at the wonderful flavor that gushes into my mouth from within the wax cells. It’s better than chewing gum with a burst of liquid flavor but quite similar.
Cut Comb Honey – -Nature's Finest Food
So there you have it. A marginally condensed version of my first honey harvest. To some it may seem trite and uninteresting. I hope this is not the case. If you are a regular reader of The Orange Bee and have followed my adventure from early March you likely have taken an interest in my bees. They are lovely, impressive, voracious, tiny creatures. I believe we, human beings can learn from observing their behavior….talk about team work!
Another harvest is around the corner. I am checking once a week for completion of 7-8 more frames full of honey. The girls are busy with the final step of capping the honey. I assure you, I will not take more than my share. Bees have a way of making more honey than they need to survive the winter. I am being cautious, as a new bee keeper and want to be certain that when cold weather arrives I’ve left them more than they can consume over the cold winter months. Stay tuned and thanks for reading. Don’t hesitate to leave me a comment or little ditty before you go – your comments always make my day.
Every time I opened my refrigerator in the last couple of days, the bowl of remaining figs I’d purchased at the Sulphur Springs farmers market kept beckoning to me. I didn’t want to allow them to go bad but hadn’t decided what to do with them. It was weighing on my mind.
I decided to spend sometime in the air-conditioning perusing a stack of magazines, Southern Living, Cooking Light, Cooks Illustrated, etc. that also were beckoning to me. Piled in a basket, collecting dust, demanding one last glimpse before being hauled off to Half Price Books or the library. As luck would have it in the August 2010 edition of Southern Living, the first magazine I began to look through, I discovered just what I needed. A recipe for Baked Fig Crostini! The only ingredient not in the pantry was a fresh-baked baguette. No problem, I was headed to the grocery for a head of romaine and a carton of milk. I planned on whipping up a Grilled Chicken Caesar Salad for our light and easy Friday night meal. These little appetizers would be the perfect first-course. This made me smile.
The one change I made in the recipe is; I left off the drizzle of honey. I know, it’s almost impossible to think that I would leave out a drizzle of honey. Either way you choose, with or without honey these little gems are fantastic.
Enjoy!
Baked Fig Crostini
Figs on Friday
Preheat oven to 350*. Stir together 4 oz. chopped, cooked bacon or country ham; 4 oz. goat cheese, crumbled & softened; 1 Tbsp. finely chopped toasted pecans; and 1 tsp. chopped fresh thyme. cut 12 fresh figs in half.
Ingredients
Preheat oven to 350*
4 oz. chopped, cooked bacon or country ham
4 oz. goat cheese, crumbled & softened
1 Tbsp. finely chopped toasted pecans
1 tsp. chopped fresh thyme
12 fresh figs
1-2 tablespoons Honey
Baguette – sliced into small rounds
Instructions
Stir together bacon or ham, goat cheese, pecans, and thyme.
Cut figs in half.
With a spoon or your thumb make a small indentation in the figs and stuff with the cheese mixture.
Place on a baking sheet along with the baguette slices and bake for 7 minutes.
Remove baking sheet from oven.
Place one fig half on each bread slice and drizzle with honey.
Seventeen days of temperatures topping 100*. Thank goodness for an air-conditioned home where we can find respite from the intolerable heat. One of our favorite ways to spend the late afternoon or cocktail hour is lounging in our rockers on the back porch, with a commanding view of the surrounding countryside, complete with grazing cattle, buzzing bees, flocks of cattle egret flying overhead, and brilliant orange sunsets. Even with the scorching temperatures, we find ourselves drifting outside around 6 p.m., cold beverage in hand, to enjoy our little piece of heaven on earth.
Such was the case on Saturday evening. We’d spent most of our day in a town named Sulphur Springs, killing time while Miss T attended a workshop. We had the pleasure of stumbling upon a farmers market taking place in downtown Sulphur Springs as we explored the small town. To our surprise there were two booths selling “local” honey, both sharing samples. Of course, we don’t need any honey but we did stop and sample the goods. Both tasty, but we deemed neither to be superior to my Orange Bee Honey. Moving on, we gazed at peas, tomatoes, squash, watermelons, cantaloupes, and figs. Figs! I love figs, fresh picked and warm from the sun. These were fresh picked and believe me they were warm, as the heat was up to around 98* by mid-morning. I asked the young woman behind the table, wearing a faded apron, curly hair framing her face about the figs. “Yes mam, fresh picked. You choose the ones you want and she’ll bag them for you”, she replied as she pointed to her look-alike daughter standing to the side. I chose my bowl of figs, paid the little girl and received a smile, a big “thank you” and a brown bag full of fresh picked figs. We headed back to the car, eager to turn on the air conditioning and continue exploring the town of Sulphur Springs. All I really had on my mind was how I would prepare the figs to accompany our dinner later that night.
Knowing that figs go well with honey and that I would be grilling that evening, I decided to grill a few figs and finish them off with a drizzle of honey. I planned on stuffing chicken breasts with goat cheese, basil and pecans for our evening meal and thought the figs would make a nice addition. After we enjoyed the luminous setting sun we ventured indoors to feast on the chicken and figs. No wonder figs have been referred to as “food of the gods”! Grilling them caused them to caramelize and soften just a bit, resulting in melt in your mouth goodness. The drizzle of honey heightened the lush flavor of the warm figs. As we savored each bite the heat of the day faded, as had the sun, while we counted our blessings once again.
Enjoy! Grilled Figs & Honey
Prepare figs: Wash and trim off stems. Split in half-length wise with a sharp knife.
Grill: Gently place figs over a medium flame on the grill grate, being careful not to let them slip through the cracks. Grill for about 10-12 minutes, flipping once.
Finish: Remove from grill and drizzle with some fresh, pure honey. Allow the figs to sit and soak up the honey before serving.
Funny how kids grow up right before our very eyes. If you are a parent you’ve no doubt discovered this phenomenon to be one that takes place all too quickly as well as rightbefore our very eyes. When our children are young it’s impossible not to dream of how they will emerge as young adults. They dream of their future, share it with us and we in turn dream right along with them into the future. Of course those dreams are subject to change from time to time, as they grow, mature and learn about the world around them. Thoughts and ideas they once thought to be ridiculous or uninteresting evolve into ideas and ways of thinking, no longer laughable or boring. This is a good thing!
As a woman who enjoys the kitchen, a dream I’ve had for both of my daughters is that they too, would enjoy and embrace cooking, baking and preparing meals for their families as they became young adults. LuLu, my 24-year-old, who has set up home in a cool little apartment, in the beautiful and ever popular capital of Texas, I’m proud to say, has arrived. Yes, yes! I am proud to say she is there, in her cute kitchen, complete with red appliances and tons of wooden spoons, donning her vintage apron, whipping up delicious creations almost daily. I usually receive a phone call, late afternoon, as she heads to the grocery for an ingredient or two she’ll need to prepare her dish of the evening. I could not be happier as evidenced by the grin from ear to ear spread across my face.
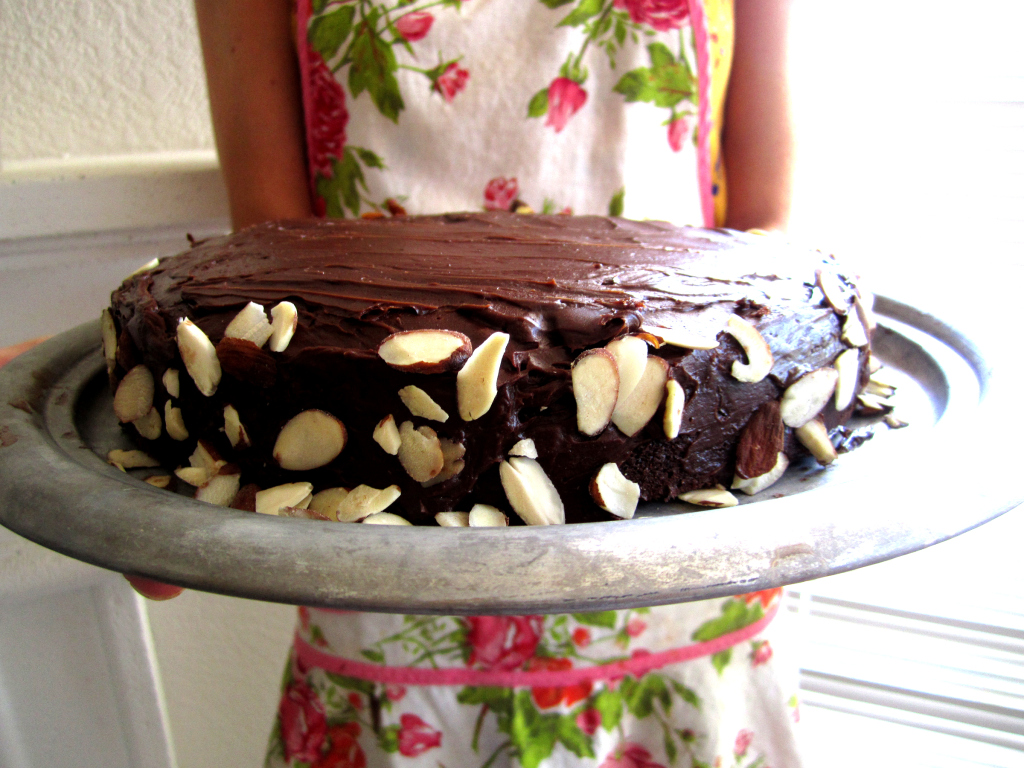
I especially enjoyed this new-found pleasure of hers on a recent visit as the dinner hour approached. The main course, I am sorry to say has slipped my mind, because I was most blown away by the chocolate cake she whipped up, as we sipped on cool chardonnay from stemless glasses and visited across the bar. My daughter threw together “Reine de Saba avec Glacage au Chocolate”, or in english, “Chocolate and Almond Cake with Chocolate Icing”, from Mastering The Art Of French Cooking, Vol.1, by Julia Child. Can you imagine how proud I felt, watching her read the recipe from her iPhone, (actually that part made me giggle) a newfangled way of scanning a recipe, melting chocolate in a double boiler, stirring the ingredients together, and perfecting the icing consistency by stirring it over a bowl of ice. I did not know she could or would do this!
The cake was a scrumptious blend of chocolate and almond flavors and the icing creamy and divine. If you are a mom and have dreams of your kids becoming great chefs or simply learning to embrace cooking and baking, relax, sit back and wait for that magical moment when your dream is fulfilled. It’s worth the wait!
I do plan on sharing a story of the honey harvest soon. Our lives have been hectic this summer with the closing of the business where my adoring hubby has worked for 30 years. Yes, yes it turned our lives upside down but we are finally starting to see an end to the chaos it created. I will tell you, my hunch about hungry bees was correct and they are happily sipping sugar syrup daily and beginning to fill their hive with nectar that will sustain them during the winter months. I can’t say that we are totally in the clear as this hive is small but I do know they aren’t hungry anymore. I feel confident in saying that I saved their lives.
Enjoy!
Julia Child
Chocolate and Almond Cake
This extremely good chocolate cake is baked so that its center remains slightly underdone; overcooked, the cake loses its special creamy quality. It is covered with a chocolate-butter icing, and decorated with almonds. Because of its creamy center it needs no filling. It can be made in the same manner as the preceding cakes, starting out with a beating of egg yolks and sugar, then proceeding with the rest of the ingredients. But because the chocolate and the almonds make a batter so stiff it is difficult to fold in the egg whites, we have chosen another method, that of creaming together the butter and sugar, and then incorporating the remaining items.
1/2cupcake flourscooped and leveled, turned into a sifter
Chocolate-Butter Icing
Equipment
1 Round cake pan, 8" in diameter, 1 1/2" deep
1 3 quart mixing bowl
1 Wooden spoon or Electric beater
1 Rubber spatula
1 Cake Rack
Method
Preheat oven to 350 degrees.Butter and flour the cake pan. Set the chocolate and rum or coffee in a small pan, cover, and place (off heat) in a larger pan of almost simmering water; let melt while you proceed with the recipe. Measure out the rest of the ingredients.
Cream the butter and 2/3 cup of sugar together for several minutes until they form a pale yellow, fluffy mixture. Beat in the egg yolks until well blended.
Beat the egg whites and salt in a separate bowl until soft peaks are formed; sprinkle 1 Tbsp. sugar and beat until stiff peaks are formed.
With a rubber spatula, blend the melted chocolate into the butter and sugar mixture, then stir in the almonds, and almond extract. Immediately stir in one fourth of the beaten egg whites to lighten the batter. Delicately fold in a third of the remaining whites and when partially blended, sift on one third of the flour and continue folding. Alternate rapidly with more egg whites and more flour until all egg whites and flour are incorporated.
Turn the batter into the cake pan, pushing the batter up to its rim with a rubber spatula. Bake in middle level of preheated oven for about 25 minutes. Cake is done when it has puffed, and 2 1/2 to 3 inches around the circumference are set so that a needle plunged into that area comes out clean; the center should move slightly if the pan is shaken, and a needle comes out oily.
Allow cake to cool in the pan for 10 minutes. Run a knife around the edge of the pan, and reverse cake on the rack. Allow it to cool for an hour or two; it must be thoroughly cold if it is to be iced.
Bowl with tray of ice cubes and water to cover them
Small flexible-blade metal spatula or table knife
Method
Place the chocolate and rum or coffee in the small pan, cover and set in the larger pan of almost simmering water. Remove pans from heat and let chocolate melt for 5 minutes or so, until perfectly smooth. Lift chocolate pan out of the hot water, and beat in the butter a tablespoon at a time. Then beat over the ice and water until chocolate mixture has cooled to spreading consistency. At once spread it over your cake with spatula or knife and press almonds into the icing.
After checking my hives on Monday I could not stop thinking about the Queen Elena hive. It is my newest and smallest colony, named after our Russian friend Elena, as the queen in residence is a Russian queen. When I had looked inside earlier in the week I’d perceived something to be amiss but could not put my finger on it. There were plenty of bees, busy doing what bees do but I had a feeling……On that day I did not see Queen Elena, but that is not unusual as queen bees are shy and aren’t always visible upon a hive inspection. Below is a photo of her royal highness – Queen Elena, can you find her?
Queen Elena
After harvesting honey I had taken most of the extracted frames and placed them inside this hive to give them the leftovers. They seemed excited and immediately went to work cleaning out the cells of any remaining honey and or wax they might need. When I looked in on them Monday, they were carrying out this task beautifully, building out the foundations with wax and preparing them for brood or honey storage. Still something seemed wrong. I had 5 remaining hives to inspect; and if you haven’t heard it’s down right hot outside in Texas; I quickly moved on to the other hives, all looked fine, but I couldn’t stop contemplating what was going on in hive #6.
This morning I couldn’t stand it any longer so I suited up and went out for a second assessment. I didn’t even smoke them today, who needs a fire and smoke when the temps are upwards of 100*? They are a calm bunch and as I said earlier, my smallest colony. I opened the top and began to remove frames. The builder bees were busy building out foundations, worker bees cleaning the place up, the climate control crew was busy circulating air in and out to regulate the temps inside the hive, Queen Elena was on display, and some brood was visible. After seeing all of this I realized the one thing missing was the amount or lack of food for my girls! Oh!!! the thought of them starving to death in the middle of summer was more than I could bear.
Mr. F says, “beekeeping is nothing more than problem solving”. This is a problem that must be solved immediately. I quickly closed up the hive and returned to the air-conditioned indoors to look up the recipe for “bee food”. I made a run to the grocery for a 10# bag of sugar and began the process. It’s simple: water boiled, sugar added, remove from heat and stir until dissolved, allow to cool before feeding to bees. Thank heavens I thought, I can handle this and I began to feel competent and happy that I solved the puzzle.
The drought conditions we are experiencing are making it difficult on bees. There is not as much food as they need, so it is up to the beekeeper to help them along. As of now, the other hives are all bigger and have more honey and pollen stored for their food supply but these girls needed help and needed it quick.
I am happy to say, “mission accomplished!”. I made a giant batch of sugar syrup, filled a jar and got them all set up. Tomorrow I will inspect again to see if they’ve taken the syrup and at what rate. Fingers crossed…..I am hoping that my hunch was the right one and that with the extra food I’m giving they will continue to survive and flourish. Stay tuned for the saga of Queen Elena and her hive.
Today I posted a new “Road Food” photo that will make your mouth water. Check it out under Road Food-Texas-Dallas.


 On Saturday morning my man Dan and I went to investigate a bee call I received. These bees were in the walls of a storage building, in a back yard, on a hot day, where tall grass grew, brown recluse spiders may have lurked, snakes may have been lying low and we did not want to venture! I held my laugh when the lady in residence informed me that she had put out “snake b-gone”. Tall boots, bee suits and smokers aside, we declined to begin the process of ripping out walls, wading through storage room boxes and Lord knows what else, to remove these bees. I inquired if she might have someone clear a path to allow us to reach the bees, and told her I’d call in the fall. We will see….
 Heirloom Tomato Salad