Honey Can Cook

Tag: Simple

  • Salt – Are You A User?

    Salt – Are You A User?

    SALT

    Salt – are you a user?  I’m curious to know how many of you use salt on a regular basis?  There was a time when I wouldn’t use salt at all; as what came out of the round blue box, with the little girl and her umbrella on front just didn’t seem to do anything for me.  Not taste-wise or health-wise.  When I came to this conclusion I stopped using salt in cooking, I didn’t place it on the table. There were a couple of exceptions.  If I were baking bread or baking…period, I used salt for optimal results.  I would deviate from my “no salt” policy when my father-in-law would visit as he insisted on salting every meal.

    Fast forward a few years and Miss T comes along.  She was a little salt addict.  We would always catch her with the salt shaker hidden under a restaurant table, sprinkling it onto her palm and then licking it off, discretely, I might add.  She’d also grab for the salt shaker when one was visible and shake as much as she could on her fries, which generally were already salted to death, until one of her parents took it away.  She’s changed quite a bit now.  She still likes salt, but has come around to the natural sea salt side.

    My initial reason for not using salt is that I knew the refined, pure white table salt I grew up with was not good for my health or my family’s health.  Stripped of trace minerals, bleached, and cleaned with chemicals, it can lead to a plethora of physical ailments.  Cellulite, arthritis, gout, kidney and gallbladder stones, constipation, hypertension, heart disease, strokes, asthma, osteoporosis, and accumulations of toxins in intestinal tract.  Yuck!

    Our bodies do need salt, but not that crap.  It took me many years to discover pure, unrefined sea salts.  If I’d only known way back then what I know now.  I suppose better late than never.  When sodium is in its natural (unrefined) form, it helps to regulate body fluid because it’s an electrolyte, improves nerve function, glucose absorption, aids in muscle contraction, and blood regulation.  In other words our bodies recognize this type of salt, natural with no toxins added.

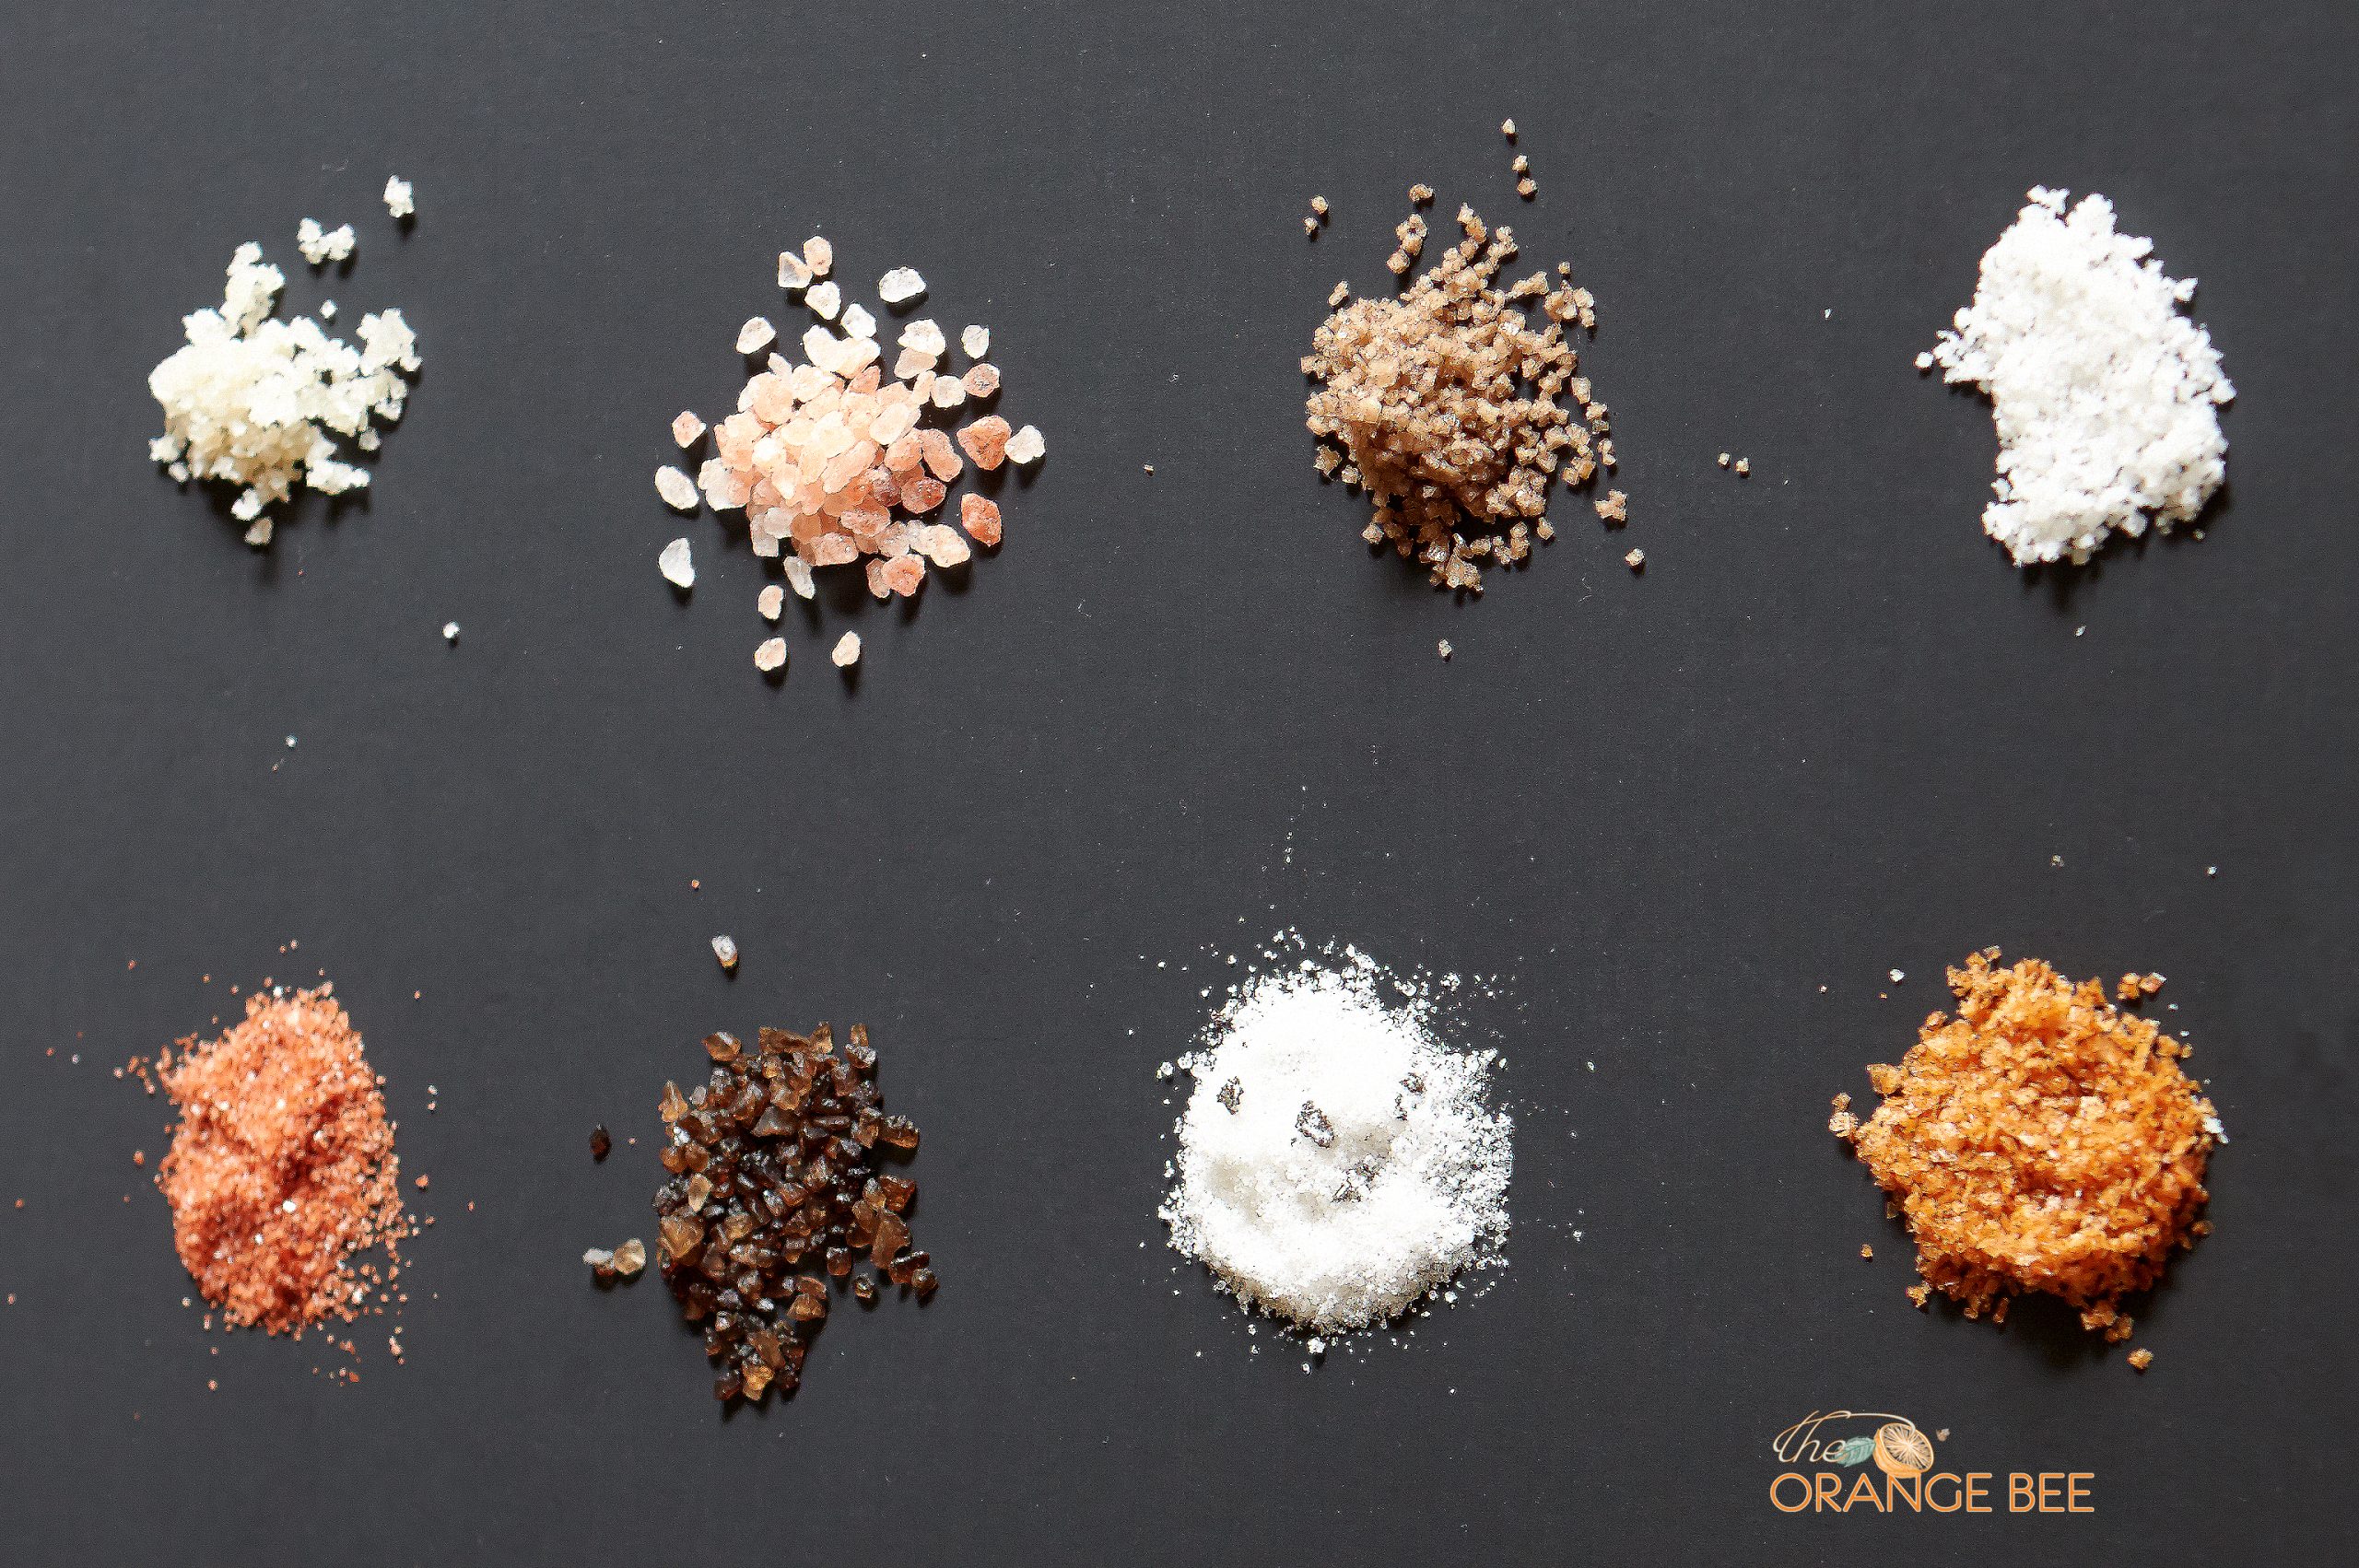
    Working at the Savory Spice Shop has introduced me to even more types of salts.  In the photo above top to bottom, left to right are some salts that I’ve learned to have fun with in the kitchen.

    Sel Marin, Coarse Pink Himilayan, Fumee de Sel, Fleur de Sel
    Red Hawaiian, Alderwood Smoked, Italian Black Truffle, Ghost Pepper

    Let’s talk a bit about these salts and how to incorporate them into your kitchen.  You can become a user – I am!

    First, from the French, Sel Marin is an inexpensive grey sea salt and excellent used in cooking.  High in minerals and full of flavor and a bit on the coarse side.  It is harvested by drying seawater in shallow pools. As the water evaporates the remaining salt is moved around with salt rakes and formed into small pyramids. It is the top of the salt pyramid that dries first and is considered the best.  It is superb sprinkled on meats before grilling or roasting.

    Coarse Pink Himilayan is definitely salty.  It’s full of salt flavor, yet natural in taste.  It boasts 84 trace minerals, including iron and you don’t need much to enjoy it’s full flavor.  Pink Himilayan is thought to be the most ancient of all salts.  Mined from dried up ancient oceans with salt beds hundreds of feet deep, these mineral rich crystals range in color from white and shades of pink to deep red.  It is also easily found in a fine grind and is perfect for keeping in the shaker on your dinner table.

    Fumee de Sel is a fantastic finishing salt.  Hand-raked in France and smoked in small batches with chips from Chardonnay barrels, the moist salt crystals absorb the rich, natural smoked flavors of the oak and the subtle citrus and herb flavors of the chardonnay. You know I like this one!  It is cold smoked by a process where the smoke is funneled through the salt away from the heat of the fire, preserving it’s mineral content.  Delicious sprinkled over eggs, salads, veggies and chicken or fish.

    The flower of the salt, Fleur de Sel is French, harvested by hand in the traditional way.  Seawater is dried in shallow pools. As the water evaporates, bright white crystals will form on the surface.  Fleur de Sel has a delicate taste yet a crunchy texture, therefore it should be used as a finishing salt.  Splendid sprinkled over pasta or eggs.

    Hawaiian Red Sea Salt is all-natural and rich in trace minerals found in seawater. A small amount of harvested red Hawaiian clay enriches the salt with iron oxide.  No additives and nothing artificial Hawaiian Red is the official table salt of Hawaii. Colorful and delicious sprinkled on top of shortbread cookies!

    Smoked over Northwest alder wood, this Pacific sea salt is a true “smoked” salt.  Again no artificial smoke flavor is added, the salt gains it’s appealing color from the smoking process.  Try it sprinkled over a tomato salad, on grilled salmon or grilled or roasted meats. Smoking salt with alder wood is a Northwest American tradition used for hundred of years in smoking salmon and meats.

    Italian Black Truffle salt is popular in many restaurants, sprinkled over french fries or stirred into mashed potatoes.  Wet earth, cocoa, and musk are words used to describe the smell of the truffle in this natural fine grained sea salt. I love the flavor it gives to scrambled eggs or potato salad.  Maybe not for everyone but if you’re a truffle lover it’s a must have in your kitchen spice cabinet.

    Ghost Pepper, exactly what you might be thinking – a fiery blast of chile heat.  I find it is best used in soups, stews, or salsas.  Blended with chocolate extract as a binder, upon first smelling this salt, chocolate is detected, however there is no chocolate flavor distinction when tasting it.  When tasting this salt alone the first flavor noted is salt then the heat hits your tongue but dissipates quickly.  Again this one may not be for everyone but if you’re a heat seeker you should definitely add this to your spice cabinet.

    Keep in mind that you will still see “sea salts” on your grocery store shelves that are bright white. These are no better than the easily recognizable blue carton with the umbrella girl.  Again refined, bleached and stripped of any valuable minerals.  If you are going to be a user, stick to the natural, healthy, pure and unrefined stuff – your tastebuds and your body will thank you.


  • Summer Tomato Appetizer – Caprese Stacks

    Summer Tomato Appetizer – Caprese Stacks

    This shop has been compensated by Collective Bias, Inc. and its advertiser. All opinions are mine alone. #SummerToGo #CollectiveBias
    The following content is intended for readers who are 21 or older.

    Caprese Stacks

    Summer is in full swing here at The Orange Bee.  Summer means; vacation, beach time, late night strolls, bike rides, farm fresh tomatoes, melons, and peaches!  One of my favorite appetizers to make and eat when it’s a hot, hot summer day are these “Oh so cute” Caprese Stacks.  Recently my man Dan and I were invited to a spur of the moment backyard get together and I was asked to bring wine and an appetizer.  In the past I never wanted to be responsible for a starter course but that has changed since I discovered these little tomato stacks.  Wine – oh I”m always happy to bring the wine!

    I decided to make these for the party and also to try box wine!  Yep – I wanted to give it a shot.  I decided on “Black Box” Chardonnay – because well we all know Chardonnay is my “go to” wine and I’ve heard that Black Box has won over 50 Gold Medals!  I was also considering how easy it would be to chill it and carry it to the gathering.  I’d read that Black Box wines are a bit less expensive, 40% less to be exact, than similar quality bottled wines and I needed to provide enough for a large group of people. On the chance not everyone showed up, Black Box wine stays fresh for up to 6 weeks, meaning the host wouldn’t have to toss it. I was thinking easy and portable.  This combo seemed like a win-win for me.

    Black Box Chard

    I’m so excited to share the Caprese Stacks with you.  If you love farm fresh, vine ripe tomatoes as much as I do you’re going to love this simple tomato appetizer. A tray of these little cuties served with mixed nuts, marinated mushrooms, a dish of olives and a bowl of toast rounds makes a perfect summer appetizer spread!  I could easily fill up on the hors d’oeuvres and pass on dinner.

    Follow the steps below to make this recipe – which really isn’t a recipe, so to speak, because once you see how quick and easy it all comes together you will just have it in your head – like a grandma!

    Caprese Stacks
    First slice the stem end off of the tomato.

    Cutting tomatoes

    Sprinkle Italian Herbs (basil, thyme and oregano) over mozzarella balls and drizzle with olive oil .

    Oil Pour

    And Balsamic Vinegar.  Now gently toss the mozz balls with the oil and vinegar.

    Vinegar Pour

    Next tear larger basil leaves into small pieces or use small leaves and place one piece of basil on a tomato followed by a mozzarella ball.

    Building Stacks

    Now spear a toothpick through the entire stack.  Set aside and repeat until all tomatoes are “stacked”.

    Toothpick

    Done!  See how easy it is?  They are delicious and always popular because they are so cute!  If you’d like some more ideas for entertaining be sure to visit the Simple Entertaining Social Hub.  Now we all know how much I like wine and to travel and taste wines!  If you’d like a chance to win a trip to your favorite wine region, so that you too can go wine tasting in California (YES) go here and enter for a chance to win a trip with 2 round trip tickets, hotel, rental car and $1,000.00 spending money!  What?  Yes, you read that right – click here to win all that!  Maybe we’ll bump into each other if you win – and if you do – well you can just go ahead and thank me now.  If you win you should probably let me know because I can give you a few hints about my favorite tasting spots!

    Caprese Stacks

    I’ll be sharing photos and reviews of our latest trip to California in the upcoming days; so until you win this trip and we meet up in Cali for a little wine tour, (because if you click you are gonna win) enjoy your summer, stay cool, drink more water than wine, wear sunscreen and keep life simple and easy!

    Black Box

    Summer Tomato Appetizer – Caprese Stacks
    Recipe Type: Appetizer
    Author: Linda Walbridge
    Ingredients
    • Grape Tomatoes
    • Fresh Basil
    • Mozzarella Balls
    • Olive Oil
    • Balsamic Vinegar
    • 1/2 teaspoon each of dried basil, thyme and oregano
    • Toothpicks
    Instructions
    1. See above tutorial.


  • Sonoma Wine Tour

    Sonoma Wine Tour

    ScribeWineryBarrels copy

    Recently my man Dan and I traveled to California for many reasons.  The #1 reason was to visit our daughter and son-in-law in Napa.  Another reason we made this plan is; a few months back while dining with some great friends in Texas we were exchanging vacation ideas and talked about a trip to northern California. Our friends suggested we all meet in Sonoma, rent a VRBO and do a little couples “wine tasting”.   We loved the idea and began to implement it as soon as we returned to N.C. Don’t worry we spent major amounts of time with the kids and included them in our couples tastings!

    Fast forward to June 2015.  Airline reservations were set, wine tours were appointed, dinner plans made, a gorgeous home booked and an appreciable amount of fun expected.  We met up with our Texas friends at our daughter’s home the day after we arrived in Napa. After exchanging hugs and kisses, and saying, “bye bye” to the kids, the four of us jumped in our rental car and headed for the hills, of Sonoma.  If you recall earlier this year I visited Napa twice and shared my stories and wine tasting experiences with you from that trip, but the one missing factor is that I’d never visited the Sonoma wineries.  This my friends, was about to change!

    We made our first stop on the way to our rental at Scribe Winery.  A 100 year old Mission Revival style Hacienda standing on the property is in the midst of restoration and will house a tasting room and event hall when completed.  At Scribe one is invited to “come fill your cup”.  The day was unseasonably warm and we were in need of some cool water and a sip of wine to begin our vacation adventure.

    Scribe View

    We were seated on a lovely, shady patio and sipped on 2013 Estate Chardonnay and Pinot Noir, and water. At this time, California is experiencing such a dreadful drought that one must request water or it isn’t brought to your table.  We quickly got in the habit of ordering and drinking our water.  The folks at Scribe refer to themselves as scribes of the land.  The land where the winery now sits was started back in the mid nineteenth century by Emil Dresel, the son of a famous champagne producer in Germany.  Soon after he purchased the land 2 miles east of Sonoma Square, he planted vine cuttings he had smuggled on his voyage from Germany to the U.S.  He and his brother known as wine industry leaders, laid out the plan that would, so many years later, continue to be carried out for us to enjoy still today.  I suspect the management has progressed from those early days in the mid 1800’s, with organic management practice in place and bio-dynamic farming used in growing the grapes that make the wines at Scribe.

    Scribe Squash

    I took no notes of the wines we tasted at our first stop but recall them begin delightful to taste.  I will need to return to this quaint vineyard with a gorgeous view of the Sonoma valley and beyond so that I can share some tasting notes in the future.

    Tomorrow I’m headed to NYC for a great blogger conference.  I’m looking forward to being back at my desk next week when I can share more wine tasting stories with you.  Until then, Cheers!

  • Queen Bees Continued

    Queen Bees Continued

    QueenElena

    A few weeks ago I shared a post telling about the mysteries going on in the hive I call Queen Charlotte at the Greensboro Science Center. The hive was weak, few bees, no brood, and no sign of a queen bee.  If you read the previous post you’ll recall there were multiple queen cells and before that inspection was over I’d seen several queens buzzing in and about the hive. Knowing that only one queen can reign I’d closed up the hive and crossed my fingers for the one that survived to be strong and help bring the hive back to normal.  One week later I went back to check and still no signs of a queen.

    I was sad as I assessed the situation but knew that there was still a chance that there was a queen who’d not made herself visible on this day and she hadn’t begun to lay eggs yet.  Still wondering if this small hive had been being robbed of it’s honey stores, I added an entrance reducer to keep the robbing situation under control and added a hive top feeder too.  This type of feeder sits on top of the entire hive and lessens the opportunity for robbers to take over.  Knowing that they have a clean water source a few feet away, food and protection I closed up the hive and once again crossed my fingers that in two weeks when I returned from vacation I’d find a thriving and growing hive, with a queen and eggs and brood, plus pollen and honey being stored.

    Yesterday, after arriving home very late Monday night from our trip to Napa, California, (yes-again) I was up early and went out to visit the hives.  I’d seen so many bees all over Napa Valley, I couldn’t help but continually ponder the situation in Charlotte’s hive.  I had no preconceived idea what I’d find when I opened the lid but judging by the activity at the door of the hive I had a good feeling about it.

    My feelings were right!  This is wonderful news, my friends!  Not only did I find many more bees in the hive but also saw eggs, larvae and capped brood.  I did not see Queen Charlotte herself, but no need, seeing eggs is a sign that the queen has been laying within the last 2-3 days and I saw lots of eggs.  I’ve only recently learned to spot the teeny tiny egg in the bottom of a cell.  Below you can easily see larvae a few days old – this is always a welcome sign for the beekeeper.

    broodandworkers

    The phenomenon of bees never ceases to amaze me.  The worker bees knew there was a problem with the first queen bee. She may have swarmed with half the hive, she could have been killed by the fight that ensued when the hive was trying to protect itself from robbers, or she could have been weak for any number of reasons.  What is incredible is they knew they needed a new queen and so produced several queen cells in order to raise one new queen.  All the while the workers pressed on bringing in pollen, nectar, and water as well as keeping the hive clean, making it ready for a new queen.  They were rewarded and are once again thriving.

    As a beekeeper I really had nothing to do with all of this.  My responsibility is to monitor and access situations and help if I can.  I do my best to make good judgements when I find something to be amiss in a hive.  “Problem solving”!  Mr. Floyd taught me that bee keeping is nothing but problem solving.  So it is – but as I see it the bees resolved this problem all on their own.  I am rewarded by their intelligence and commitment to work together for their bee community – we can all learn from these  beneficial, endearing creatures.  So for now all is well with the GSC bees.  I’ll be making another inspection in about a week or ten days to reassess the hives and add more food for them to store for the upcoming cooler fall and winter months.

    life-cycle-of-a-bee

    Remember – you can help keep bees safe and strong by not using pesticides in your yard, buying plants free of pesticides, planting pollinator friendly flowers, fruits and veggies and don’t spray “Raid” if you find a swarm or hive in an unwanted place.  Call your local extension office, sheriffs department, police station or beekeepers association to get the name of a local beekeeper who ail happily and usually free of charge, remove an unwanted bunch of bees!


  • Queen Bees

    Queen Bees

    Early one morning last week I received a phone call from the horticulturist at the Science Center.  She excitedly explained that something peculiar was going on with the bees in Queen Charlotte hive.  “Lots of bees, acting frantic and buzzing about more than normal”, was what she told me.  She asked if I thought they were swarming?  From her description it sounded more like robbing.  Robbing is where bees from a strong hive will attempt to enter a weaker hive and literally rob them of their hard earned honey stores.  I told her I would quickly gather my gear and head over.

    When I arrived at the hives things had calmed down considerably so I’m uncertain if the hive was being robbed.  I needed to do an inspection in any event, so I prepped the smoker and suited up.  Let me tell you it is hot in a bee suit in June!  I opened Q Charlotte hive to look for signs of larvae, brood and honey and hopefully have a peek at the queen, as she has shown herself on every occasion I’ve opened her hive.  When I first opened the hive I immediately knew something wasn’t right.  There weren’t very many bees in the hive and there was not a sign of larvae, or the queen and only a small amount of honey.  I noticed that down in the cells where there should be nice white larvae there seemed to be dark brown and black gunk.  I have never observed this before. I continued to search through each frame and time after time I found the same results.  Now I began to feel concerned but had no idea yet what was happening.

    I took the entire hive apart while the bees that were in it carried on, sweet as can be.  After I finished putting the hive body back together I took another look at the frames from the top super.  I noticed what seemed to be queen cells.  Queen cells are larger than worker bee or drone cells and look like half of an unshelled peanut.  I noticed about 6-8 of these cells positioned on the frames.  You should be able to see them on the photo below.

    3 Queen Cells

    Not wanting to keep the bees exposed to the heat and sunshine any longer I closed up the hive and moved on to Queen Natty hive.  In this hive there are multitudes of bees, larvae, honey; all in all this hive looked super strong.

    I came home knowing I had some problem solving to do.  Later in the evening I pulled out my books and began to search for answers.  I determined that one cause of the problems Q Charlotte hive was experiencing might be the dreaded American Foul Brood disease or possibly the less fatal European Foul Brood disease.  Having seen the dark area in the bottom of the cells with few bees was the clue.  If a hive contracts AFB disease the entire hive must be burned….at the moment I read that I knew I’d not be able to handle that, but crossed my fingers and hoped if it was a foul brood issue that it was the EFB type which can be medicated and controlled.  That night I couldn’t sleep for thinking of the sweet bees and what their future held.  I tossed and turned and thought during my sleeplessness of what my best plan of action would be the following morning.

    After downing a couple of cups of coffee all the while eyeing the hands on the clock, I waited for 9 o’clock to roll so I could call the man at the bee supply company for some advice.  Turns out that was exactly the right idea as he passed along the name of a state bee inspector to me with advice to call him, mention I suspected foul brood and he’d be over asap!  He was correctomundo!

    Later that afternoon Mr. Hopkins met me at the center and we went out to take a look together.  I’m not sure if you can imagine my dread at the thought of burning an entire hive but I was nervous and worried.  When we got Q Charlotte hive open he began to look at the issue of the dark cells I had described.  He very quickly poked around in a couple of the cells and explained that those were dead larvae but not AFB or EFB.  I jumped for joy at that news.  We then began to try and figure out why there were so many queen cells, no queen in sight and no brood to be found.

    Bee Inspector Mr. Don Hopkins

    Here’s the thing about bees.  We may never know exactly what happened but he suspected that the hive had swarmed early on and the bees were making a new queen.  In the meantime with no queen they have no way to continue to grow the hive.  So their efforts haven’t been normal.  Thus some dead larvae, creating the dark, suspicious looking cells.  In the picture below you can see some dark cells, some with honey and a small amount of capped brood.  Hopefully the capped brood will hatch and add a few more worker bees to the hive.  Some of the queen cells are visible as well.

    Bees on Frame

    There were a few of these queen cells that had been vacated (see pic below) so we wondered where those queens had gone.  They were not to be found in the hive, no sign of larvae…???  We were both a bit stumped and he’s a lot smarter than me about this stuff.

    Newly Emerged Cell

    He decided since there were several queen cells still occupied to pry one open and see if the queen looked healthy.  This my friends is when a miracle happened.  The queen in the cell he opened stuck her beautiful head out and was immediately met by a worker who began to feed her.  This worker bee was joined by a few others right away and they began to welcome and groom her.  She quickly disappeared under the double layer of wax on the frame and we couldn’t believe our eyes. The brief glimpse we got of her showed a strong and healthy queen.  Unfortunately at that moment I was not prepared to photograph the event, and sometimes it’s better to see with your own eyes and not worry about capturing it on a camera.  The following picture will show you what she did look like.  This is not the end of the miracle – read on…

    The Queen

    As we began to place the frames back into the hive we saw a second queen and then another.  One of them took off in flight and Mr. Hopkins reached out and caught her with his bare hands and placed her back into the hive.  Before we could finish closing up the hive we saw no less than 4 queens and two more times we caught them trying to fly and once he plucked one off of my shoulder, each time placing her at the hive entrance.  We went from no queen, not even one, to 4 or more in a matter of minutes.  We were both quite pleased and surprised to say the least.  How did this happen?  We can’t say for sure.  What will happen next? Rules are only one queen per hive.  The queens in hive Charlotte will work it out.  Only one will remain and only one will be queen.  I’m hoping she’s the stronger of the bunch.  She will need to send her sisters off to bee heaven before she can rein but that’s life as a bee.

    I learned an incredible amount of bee “stuff” that day.  I saw some things that many of us never see, even bee keepers.  I’ll never forget this adventure and I’m anxious to check on this hive and see what progress has been made.  I know I need to give them about a week to settle in, crown their new queen and allow her to begin laying eggs.  I’ll be going out at the end of the week and will report back.  Crossing my fingers and you should too that all is well.  I need to see one, and only one queen, eggs, larvae and more honey beginning to be made in this hive.  These are the sweetest bees and I will do all I can to help them grow and thrive!

  • Food Tour – Charlotte

    Food Tour – Charlotte

    Recently I had the pleasure of attending a walking food tour in Charlotte, N.C.  My daughter was visiting from Napa, where we had taken a food tour back in January.  She suggested a local tour in North Carolina and since I thoroughly enjoy these kinds of “tours” I hooked us up with Tour de Food – Charlotte.  We convinced my man Dan to join us – which was not terribly difficult, since he enjoys great food too.

    Known as the queen city, Charlotte is thriving , home to two major financial institutions, with a flourishing arts and cultural scene, the Charlotte Motor Speedway, the Billy Graham Library, and to put it simply, tons of fun activities.  Tour de Food being one that appeals to foodies, tourists and locals alike.  There were 15 in our group, locals and tourists, men and women, young couples, educators, world travelers, and one blogger!

    Charlotte Skyline

    We gathered at the “7th Street Public Market”, where we met our guide for the day, an energetic, amiable young man named Julien.

    Julien copy

    He greeted each of us with enthusiasm and had us introduce ourselves around the table, just to break the ice.  This was one of the most pleasant groups I’ve had the pleasure of food touring with.

    7th Street Public Market Sign

    7th Street Public Market, uptown Charlotte’s food destination is a mix of bars, regional food purveyors, cheese shops, wine stops, a butcher, candy counter, and offers a relaxed yet lively atmosphere.  After we met Julien, we ventured over to “Tanks Tap” while we waited for our tour to begin.  This was not on our food tour agenda but since we were in the market with so many shops to explore we couldn’t help but check out the local beer offerings here.

    Tanks Tap Beer

    I tried the Birdsong Jalapeño Pale Ale and much to my delight it was smooth and icy cold with a hint of jalapeño bite.  After grabbing a cold one we headed back to the table set up near the butcher shop to begin our adventure with Tour de Food.

    Prosecco-Beer

    It began with a pouring of Ca’ Furlan-Cuvee Beatrice a lovely, crisp Prosecco, provided by Assorted Table Wine Shop”which carries a selection of unique International wines.  The Prosecco we tasted is made with “Glera Grapes”, from a protected, designated area in Italy; this Prosecco is light, fizzy and aromatic with a hint of white peaches. We learned that Glera Grapes are the “true” grapes of Prosecco.

    Girls Market

    It was paired with a flavorful appetizer of fig cake topped with Fishing Creek Creamery Goat Cheese and a drizzle of local Cloister honey.  Honey – now you’re talking’- right up my alley! Compliments of “Orman’s Cheese” an artisnal cheese shop in the marketplace. It was explained that this particular goats cheese is only made in spring and summer.  The delicate creaminess of the cheese along with the richness of the fig cake was easily washed down by the mild chilled Prosecco.  Off to a great start!

    FigCake-GoatCheese Ap

    I should mention that 7th Street Public Market is located in an area known as, uptown Charlotte, and is directly across from the lite rail making your trip there quick and easy.  Tour de Food calls this their “Sunday Funday Tour” which meanders through uptown Charlotte.  Taking in the sites we headed out of the market to “Queen City Q”  for another taste of ice cold local beer and BBQ.  Queen City has been open for around 3 1/2 years and pride themselves in making delicious Eastern and Western style BBQ and sauces right on the spot.  We were greeted by Sue Johnston, owner and were seated at the bar.

    Queen City Owner, Sue Johnston

    QBar

    You can see they provide a fully stocked bar for cocktails and on the rocks drinks, but on this day we sampled a local pilsner-like beer, brewed by Olde Mecklenburg Brewery and named Captain James Jack.  This straw colored lager is smooth and a perfect summer refresher.

    QBeerServe copy

    Next up came pulled pork sliders, a very generous serving of tender and moist pulled pork and served with our choice of the house-made sauces.  My favorite of the 5 sauces offered was the Q City Signature Sauce.  It was also the favorite of my daughter and husband.  Tangy yet slightly sweet, smoky and flavorful and more on the thick side, what us Texans are accustomed to.  We aren’t really Texans anymore but for most of our lives have lived there and are simply used to Texas BBQ with it’s thick sauce.  Queen City Q might have turned us into pork loving BBQ fans though!

    Queen City Slider

    Serving Sliders

    Next up – Mimosa Grill an established restaurant where we met Tripp Cagle, proprietor and Thomas Marlow, executive chef.  Located on the street level in a shiny high rise building in the heart of uptown Charlotte.

    MimosaGrillSign

    Consistently named one of Charlotte’s top restaurants since 1995, Mimosa Grill with it’s global cuisine and southern twist, welcomes you with stunning decor, stacked rock walls, tons of floor to ceiling windows and lovely banquettes. Interesting patrons too!

    Mimosa Grill

    They’ve offered “farm to fork” meals since the conception and outsource from many local farmers.  They are well known for their superb Sunday Brunch and offer a variety of cooking classes.  Interested in grilling, they’ve got a class for that.  How about pairing cheese and charcuterie?  Got it! Want to turn out a fantastic Thanksgiving feast this year – call Mimosa Grill they can show you how. Just as our plates were being served Chef Thomas joined us.  While we dug into a delicious dish of poached eggs, ham, sausage and smoked tomato gravy all served on a homemade biscuit, he shared a bit about their “pig program”.  The “pig program” is about outsourcing pork from local farmers and turning it into tasso, andouille, ham and anything else pork that can come out of a kitchen.  Sticking to their mission they support about 30 local purveyors!

    Mimosa Grill

    Chef Thomas Marlow

    Next stop on the tour was IOS Greek Kitchen, one of the newest uptown establishments.  A full service Greek inspired restaurant.  Open and airy with large garage doors bringing the outside in.  We were seated once again, at the bar.  Sitting at the bar is standard for my man Dan and me, so we felt right at home.  With a view of the kitchen and chefs preparing our food, it’s hard to beat a bar seat.

    IOSChef copy

    For starters you can order, of course, Spanakopita, Hummus or a Greek spin on nachos, topped with tomatoes, cucumber, pepperoncini, pickled onions, harissa queso, and feta cheese, with your choice of gyro or chicken.   Also offered, a variety of pitas stuffed with lamb, falafel, grilled chicken or for a twist, a burger pita.  Guests of the foodie tour were served another angle on a traditional comfort food – Greek Mac ‘n Cheese.  Creamy sauce, with a toasty bread crumb topping, roasted red pepper bits, shallots, dill and a pinch of nutmeg and cinnamon.  Delish!

    MacnCheese

    Now we need to walk…we are all chattering about how stuffed we are, yet there are two more stops!  Tour de Food will not send you home hungry!  Our next to last stop was for hand tossed pizza at Libretto’s Pizzeria, an authentic Italian kitchen, with multiple Charlotte locations and one in NYC.  On this clear, sunny day we were seated on the large patio in front of the restaurant, which by the way is attached to a bowling alley!  By now our group was pretty friendly and we all chatted as we waited for the pizza to come out of the ovens.

    MakingPizza

    While we waited I snapped a pic of our pizza being made in the galley style kitchen.  Inside there was a counter full of fresh pizzas for walk-in’s wanting a slice, or for those New York transplants.

    PizzaCase

    When our pizza came out of the oven we were treated to Margherita Pizza and Meat-Lovers Pizza.  There was more than enough for everyone to try both and have seconds too.  The Margherita, topped with yummy tomato sauce, fresh basil and tons of cheese landed in front of LuLu, Dan and me.  We dug in to the delight of our taste buds and then tried the Meat-Lovers, topped with 2 kinds of sausage, pepperoni, and ground beef .  These are the kind of slices you  pick up, fold in half and proceed to shove in your face.

    PizzaMargherita

    Meat Lovers Pizza

    If we thought we needed to walk before the pizza stop – let me tell you the stroll back to 7th Street market was much welcomed by all on the tour.  Ending up back in the public market we found a large table ready for us near the entrance.  Here we treated to our final taste – Nutella Banana Crepes, from Hazelnuts Creperie.  

    Hazelnuts

    Hazelnuts offers several mouthwatering options.  Breakfast crepes, like the Americana, with scrambled egg, cheddar, turkey, avocado, tomato, onion, spinach & chipotle aioli. Savory crepes, such as Curry Chicken Crepe, filled with chicken, mushrooms, red onion, mozzarella, lettuce, curry sauce & mango chutney. They also offer Vegetarian versions, like Southwest Veggie stuffed with black beans, tomato, onion, cheddar, avocado, garlic, chilies & sour cream.  Ours obviously came from the Sweet offerings.  The crepes were tender, sprinkled with powdered sugar and the Nutella banana filling…well what can I say?  Absolutely the perfect and delicious finish to our Tour de Food.

    Crepes

    Sadly, this was the end of our tour.  To tell you the truth I couldn’t have eaten one more bite!  Tour de Food totally delivered on this tour.  We tasted food and beverages from 7 different establishments.  Julien, kept up the pace in a cheerful and leisurely manner.  We never felt rushed but also never lingered too long at any one place.  I highly recommend you spend an afternoon on a food tour with Tour de Food.  They offer 5 different tours in Charlotte alone, as well as Winston-Salem and Davidson, N.C.  Tours last anywhere from 3 to 3.5 hours and cost is $47.00 per person, a very reasonable fee.  Private tours are also available, for more information contact them at:  info@tourdefood.com or give them a call at 336.406.6294.

  • Vanilla Coke

    Vanilla Coke

    This shop has been compensated by Collective Bias, Inc. and its advertiser. All opinions are mine alone. #ShareItForward #CollectiveBias


    Coca Cola

    Who would you like to share a coke with?  A friend?  Your sis or bro?  Sharing a Coke with a superstar could be the highlight of your summer.  How about sharing a Coke with an explorer or an adventure seeker?  Perhaps you’d like to just chillax in your own back yard with friends and family.  I know we will be doing plenty of that this summer and keeping a cooler full of ice cold Cokes on hand is essential.

    Coca Cola

    I’m pretty psyched about these Coca Cola cans with fun words on them – it adds to the merrymaking for kids and adults alike.  Since we are empty nesters most of our summertime gatherings will be adult only.  I’ll have plenty of  beverages on hand but the one I think will stir up a few memories and be the biggest hit will be my  offering of “Vanilla Coke”.

    I have fond memories of being a teen, cruising around with a car full of giggly girlfriends, driving up and down the drag and wheeling into our favorite “drive in”- yep, the one where the car hop comes to the window and takes your order, for a round of frosty “Vanilla Cokes”.  I’m recreating that by putting out a small bottle of pure vanilla extract for my guests to add to their cokes.

    Coca Cola

    One of the things I enjoy most about summer is watching all the birds that come through our yard for a bit of seed or a drink.  The hummingbirds are especially adorable and beautiful, with their iridescent colors and chirping sounds, they are one of my favorites.  My guests will get a kick out of watching them hover at the  feeder my man Dan makes out of a Coca Cola can.  Making these feeders is a great way to pass the time when camping or vacationing as they can be filled and easily hung anywhere.  It’s a fantastic way to “recycle” and the red can attracts the little hummers, wherever it is hung.  I’ll post the instructions at the end – but here’s what it looks like!

    Hummer

    I grabbed a big 32 can case of Coke at Sam’s when we ran in to pick up some outdoor lounge chairs, you know to keep our guests comfy.  Sam’s is sharing some great summer recipes and thoughts for end of the year teacher’s gifts, #ShareItForward photos and ideas galore. Be sure to pop over here to find all the exciting ideas and recipes at Sam’s!  I’d love to know which is your favorite!  Maybe it’s my “Vanilla Coke”!

    CokeinGlass1 copy

    Don’t forget to stock up on these fun cokes and #ShareItForward with your friends, family, co-workers, your delivery guy, postal worker, neighbors, yard man, or just kick back and relax with an icy cold one yourself.  However you do it, “have a coke and a smile” and #ShareItForward!  Now, I’m off to greet my guests and share a cold one – Coca Cola that is with them.  I’m saving the adventurer can for my man Dan – it fits him to a “T”.

    Here are photos and instructions so you can make your own hummingbird feeder.  Go green and recycle your leftover soda cans!

    Coke Hummer Feeder

    Instructions:  Using a box cutter carefully make a slit down the side of a coke can, just below and above the ridge at the top and bottom of the can.  Make another slit exactly the same  about 1 inch away from the first.

    Next make a cut from the first slit to the second at one end – followed by the same cut at the other end.  You should now have a piece of aluminum to be removed.  Move over about 1 inch and repeat this process.  Leaving an open space on either side of a center piece.

    Lastly, make two small holes on either end of the can and run a piece of wire through those holes.  Hang from a tree and wait to be entertained by these sweet little birds.

    Hummer Feeder

    Sam's Club

    Vanilla Coke
    Recipe Type: Beverage
    Author: Linda Walbridge
    Ingredients
    • Pure Vanilla Extract
    • 1 can Coca Cola
    • Ice
    • Limes – sliced
    Instructions
    1. Fill a tall collins glass with ice.
    2. Fill with Coca Cola.
    3. Add a splash of vanilla.
    4. Stir.
    5. Garnish with a lime slice.
    6. Enjoy!
  • Brownies You’ll Drool Over

    Brownies You’ll Drool Over

    Mexican Mocha Brownies

    This morning I was editing old Orange Bee posts and came to this Mexican Mocha Brownie one.  This recipe is one of my all -time favorites.  Brownies with a hint of cinnamon and coffee- seriously y’all they are amazingly delicious.  I wish I could find more, better words to describe them but maybe you should just make a batch and find out for yourself!  Below is the old post – it’s old news but this brownie recipe never gets old!

    As a blogger looking back at “old” posts refreshes our memory as to how far we’ve come as bloggers.  I can definitely see that my old photos are not the quality of my newer ones.  This is a good thing to make note of.  It makes me want to bake a batch of these fabulous brownies and have a reshoot.  AND…I’m off…

    Here they are – deliciousness at it’s best!  There is something about the combination of chocolate, coffee, and cinnamon all mulled together in this brownie. Chocolate, love chocolate.  Coffee, well you know I love coffee and it seems as most of you do too. Cinnamon full of warmth and richness.  The aroma rising out of the oven makes me drool.

    I brought these brownies last year to “River Girl’s Weekend” at my friend Judy’s down on the Guadalupe River in the beautiful Texas hill country.  We didn’t eat just one at a time, we carried the entire pan to the coffee table accompanied by tall glasses of ice cold milk oohing and aahing over every delectable bite, while we watched old movies and John Mayer videos.  I’m planning on bringing them again this year when we meet for Judy’s annual “River Girl’s Weekend”.  We did not need any other “sweets” to keep us happy for three entire days and nights.  By the way, if you are a girl, woman, lady, female person reading this post and you don’t spend time with your girlfriends you are missing out on one of life’s treasures.  Plan a girls weekend or heck, plan an entire girls week. Your sides will hurt from laughing, your skin will feel great and thank you because it’s not necessary to wear ANY make-up, and you will feel refreshed, invigorated and haapeeeeee!

    I want to describe these brownies, besides delicious, rich, and yummy.  The brownie itself is more cake-like than chewy, moist with a nice small crumb.  The icing is smooth, glossy and fudge like, not too thick.  A handy tip is that you can bake, frost, and freeze the bars, tightly wrapped, for up to one month.  Thaw them before serving, for neater squares, cut the brownies while still cold.


    Mexican Mocha Brownies
    Ingredients
    • Brownies
    • 1 cup all-purpose flour
    • 1 cup unsweetened cocoa
    • 1 teaspoon baking powder
    • 1/2 teaspoon ground cinnamon
    • 1/2 teaspoon salt
    • 3/4 cup butter (1 1/2 sticks)
    • 2 cups granulated sugar
    • 5 large eggs
    • 1 tablespoon vanilla (preferably Mexican)
    • Mocha Frosting
    • 1 teaspoon instant coffee
    • 1 teaspoon vanilla extract
    • 1 bar (3.5 oz.) milk chocolate, chopped
    • 1 oz. unsweetened chocolate
    • 2 tablespoons butter or margarine (I use butter)
    • 1/4 teaspoon ground cinnamon
    • Pinch salt
    • 3 tablespoons milk
    • 1 cup confectioner sugar
    Instructions
    1. Preheat oven to 350*
    2. Grease a 9×13 pan, line with foil, extending foil over rim.
    3. Grease the foil.
    4. In a medium bowl, mix flour, cocoa, baking powder, cinnamon, and salt.
    5. Set aside. (Hint: use a whisk to blend the dry ingredients)
    6. In a 3 quart saucepan, melt butter over low heat.
    7. Remove from heat; stir in sugar.
    8. Stir in eggs, one at a time, until well blended; add vanilla and stir to incorporate.
    9. Stir flour mixture into sugar mixture until well blended.
    10. Spread batter into prepared pan.
    11. Bake until a toothpick inserted in the center comes out almost clean, 25-30 minutes.
    12. (It says almost clean) Cool brownie completely in pan on a wire rack.
    13. Mocha Frosting:
    14. In small bowl dissolve coffee with vanilla.
    15. In 1- quart saucepan, combine milk chocolate, unsweetened chocolate, butter, cinnamon, and salt.
    16. Heat on medium- low until chocolates are melted, stirring occasionally.
    17. Remove from heat.
    18. With a wire whisk, stir in coffee mixture and milk, then stir in confectioners’ sugar until well blended and smooth. (This takes a few minutes to incorporate all the sugar – be patient)
    19. With a small, metal off-set spatula, spread the warm frosting evenly over cooled brownie.
    20. Let stand for at least 20 minutes to let frosting set.
    21. When the frosting has set, lift foil with brownie out of pan, peel away foil from sides. (
    22. At this time if you wish to freeze, peel foil off of brownies and wrap the brownies with plastic wrap and clean foil, freeze.)
  • Shrimp Sauce Piquante

    Shrimp Sauce Piquante

    ShrimpSaucePicante copy

    Growing up in southeast Texas right on the Louisiana border  I developed a taste for cajun and creole dishes at an early age .  My Dad could take lots of heat, my mom, not so much and I fall somewhere in the middle, leaning towards the hot side.  Shrimp, preferably gulf shrimp, are one of my most favorite foods to eat.  The combination of these sweet crustaceans with this spicy, flavorful sauce piquant was just what I had a hankering’ for last week.  My man, Dan never complains when I cook cajun or creole foods and he likes spicy!

    I made sure to get locally sourced shrimp and fresh veggies to whip up this delicious Louisiana dish.  Living in North Carolina doesn’t exactly put us close to any cajun or creole food and we miss it.  We also miss Texas BBQ – I know, I know N.C. is also famous for it’s BBQ but it’s just not the same.  The other food we miss terribly is Mexican!  Not only Tex-Mex but gourmet Mexico City Mexican.  We’ve tried multiple Mexican restaurants here in Greensboro only to be pretty much let down every time.  There is something about melting white American cheese over Mexican food that just doesn’t jive!  Thank goodness I can make all of this delicious food right here in the comfort of my own kitchen!

    When my man Dan and I decided to move to N.C. one of the biggest “pros” was the fact that we are now “empty nesters”.  One of the things I’ve found I enjoy about being empty nesters is I can cook small meals that cater only to the two of us.  Dan, has been a picky eater in the past, but now he is enthusiastic about trying new foods which makes it easy to incorporate foods that weren’t possible with kids sitting down at the dinner table.  You know – one kid likes spicy – one kid not so much.  One child will eat broccoli the other refuses…and so it goes.  Until those precious children move out!  Then it’s all about the grown-ups

    This recipe is from my Dad’s cookbook.  It’s titled “My Cookbook” and has his signature underneath the title.  It is housed in a red paper binder.  Plain and simple and special to me, because all of the recipes are my Dad’s with some help from my mom thrown in.  Shrimp Sauce Piquante is one of my favorites.  His spelling according to the dictionary has an added “e” on the end.  That’s alright – if you’re a very good cook you don’t have to be a very good speller too.

    Shrimp Sauce Piquante
    Cuisine: Cajun/Creole
    Author: Lewis Gay
    Serves: 4 servings
    Ingredients
    • 2/3 cup vegetable oil
    • 1/2 cup flour
    • 1 3/4 cup thinly sliced shallots
    • 1/3 cup chopped celery
    • 1 cup chopped yellow onion
    • 1/2 cup chopped bell pepper – I prefer red
    • 4 teaspoons finely minced garlic
    • 3 tablespoons minced parsley
    • 1 One pound can whole peeled tomatoes, drained
    • 1 8 ounce can tomato sauce
    • 1/4 cup dry white wine
    • 4 whole bay leaves
    • 6 whole allspice
    • 2 whole cloves
    • 2 teaspoons salt
    • 3/4 teaspoon fresh ground black pepper
    • 1/2 teaspoon cayenne pepper
    • 1/4 teaspoon chili powder
    • 1/4 teaspoon mace
    • 1/4 teaspoon dried basil
    • 1/2 teaspoon dried thyme
    • 4 teaspoons fresh lemon juice
    • 2 cups water
    • 2 pounds whole fresh shrimp, peeled
    Instructions
    1. In a heavy 6-8 quart pot or kettle heat the oil and gradually add the flour, stirring constantly. Cook over low heat, stirring constantly until a medium brown roux (the color of peanut butter) is formed.
    2. Remove from the heat and add the fresh vegetables and parsley.
    3. Mix well with the roux, then return to heat and cook, stirring constantly, until the vegetables begin to brown.
    4. Mix in the canned tomatoes and tomato sauce, then add the wine, seasonings and lemon juice and mix well.
    5. Raise the heat under the pan and bring to a boil.
    6. Add the water and mix thoroughly; when the mixture boils up again reduce the heat and simmer for 45 minutes.
    7. Add the shrimp and allow to come to a boil again then cover, reduce heat and simmer until shrimp are pink, about 10 minutes.
    8. Remove pot from burner and allow to stand, covered for about 10 more minutes before serving.
    9. Serve over rice.

    I notice while typing up the recipe that my Dad would just throw in the whole allspice and cloves.  If you prefer you can tie them in some cheesecloth before adding to the sauce or use ground spices in place of whole.

  • A Clean Kitchen

    A Clean Kitchen

    This shop has been compensated by Collective Bias, Inc. and its advertiser. All opinions are mine alone. #PalmoliveMultiSurface #CollectiveBias

    Kitchen Mess

    See that mess in the photo above?  That is anything but a clean kitchen.  One of the challenges of being a food blogger is keeping the kitchen clean.  When I am cooking for my family I clean as I go, but when I’m cooking to photograph and share a recipe keeping a clean kitchen never happens until it’s all said and done.  The counters get messy and sticky, the sink fills up with dishes and my leftover coffee, which gets too cold to enjoy, ends up piled with the rest of the mess.

    When it is time to clean up not only do the dishes need to be washed but also the counters, stovetop, and island demand a thorough wipe down.  I also like to disinfect my sink, counters and island each time – I’m just a little wiggy about that.  Dish-soap for dishes and disinfectant wipes for everything else – until I found Palmolive® Multi Surface.  I noticed it while on the “cleaning products” isle in Walmart.  This stuff smells good and it cleans pretty much all of the bacteria on my counter surface and island as well as making my dishes, pots & pans and skillets sparkling clean.  Bingo – using Palmolive® Multi Surface saves me time in the kitchen.  Extra time and a clean kitchen – it’s a win-win!

    HeroSoapyPan

    On the day I made the mess above, I was making a breakfast of pancakes, fresh fruit and ham.  I like to make my pancakes from scratch.  Pancakes are one of the easiest to whip up and I know exactly what ingredients are in them.  I love to toss in some chopped pecans, blueberries or banana and one of my favorite flavors to add is – you might be able to guess…orange extract!  That is exactly what I did on this morning, add orange extract and pecans.  I’ll share the recipe below.

    Orange Pecan Pancakes

    Before I share the pancake recipe, I want to ask how often you clean out your knife drawer, block or caddy?  I didn’t realize how nasty these areas are until I went crazy wanting to clean everything with Palmolive® Multi Surface.  I had a little free time on my hands – obviously, because cleaning is not how I care to spend my leisure time.  I filled up the sink with tons of bubbles and cleaned out my gross knife caddy and all the knives.  I mean, I always hand scrub my knives and air dry them, so I know they are clean; but after taking a look at the caddy I wondered how clean were they – really?  I warn you the next photo may turn your stomach – it is super gross!  It’s downright embarrassing!

    knivesdirty

    Yep – that’s my disgusting knife holder, full of crumbs and coffee grinds or is that pepper…?  Splatters and spills, oh good grief – epic grossness!  Not to embarrass you but I’m predicting that if you go take a close inspection of your knife holder you may find something similar lurking there.  Here’s what Palmolive® Multi Surface can do: “Palmolive® Multi Surface eliminates 99.9% of bacteria (*staphylococcus aureus, Salmonella enterica and E. coli ((157:H7)) from dishes and hard non porous kitchen surfaces.”  Rids your kitchen of all that yucky stuff!

    bottle copy

    Do me a favor – check the state of your knife drawer, block or caddy and tell me what you find!  Want to read more about the new Palmolive® Multi Surface and how it can make your kitchen clean up quick and easy?  Just click on the logo to learn more! Oh and here’s a picture of my new and improved knife drawer!  You’ll notice the difference and I am not embarrassed anymore.

    knivesclean

    Now that my kitchen is spotless I have plenty of leisure time to take a walk and smell the flowers.

    azalea

    These azaleas bloom in our yard and all over Greensboro.  They are breathtaking and make me feel calm and peaceful and happy.  I hope you are taking time to stop and enjoy the spring time flowers.  Don’t spend too much time slaving in your kitchen – it’s one stop cleaning for me, to make a little extra time to enjoy the flowers.

    redaza


    Orange-Pecan Pancakes
    Author: Linda Walbridge
    Ingredients
    • 1 1/2 cups all-purpose flour
    • 3 tablespoons sugar
    • 1 3/4 tablespoons baking powder
    • 1 teaspoon salt
    • 1 1/2 cups milk
    • 3 tablespoons melted butter
    • 2 eggs
    • 1/2 teaspoon orange extract or orange water
    • 1/4 cup chopped pecans
    Instructions
    1. Preheat griddle to 375*F.
    2. Whisk together the first 4 ingredients.
    3. In another bowl combine all the wet ingredients, stirring with a whisk or fork.
    4. Mix the liquid ingredients quickly into the dry ingredients.
    5. Use 1/4 cup pancake batter for each pancake and cook on a griddle until browned on both sides.

    Don’t forget you can find Palmolive® Multi Surface at Walmart.

    picmonkeycrrected