Tonight I am teaching a “honey” cooking class at the Savory Spice Shop in Greensboro. I cannot wait to share this recipe for Honey Lemon Custard. This recipe is one of the easiest and most delectable desserts I can share with the class and you. I love it so much I’d like to take a bath in it! Yes, yes, that could be a bit sticky but oh so sweet.
We will be tasting appetizers, entrees, veggies and this Honey Lemon Custard at tonight’s class. Tonight’s menu: Caribbean Turkey Sliders with Pineapple Honey Chutney, Veggies in Honey & Orange Glaze, Honey Fruit Dip, and Goat Cheese & Fig Crostini with Honey Drizzle ending with this creamy, vanilla bean flecked, citrusy custard. Drool….
There is much preparation for tonight’s class so I won’t linger, but I want to remind you that’s bees are important pollinators for so much of the food we all love and need to nourish our bodies. We will talk about these foods a bit during class while we enjoy all the delicious food made with honey, just another product from our extraordinary honey bees.
If you live in the Greensboro, N.C. area check out the Savory Spice Shop Facebook page for upcoming classes and be sure to sign up for your favorite. If you aren’t signed up for tonights class, I’ll be teaching more honey classes in the future. If you are interested in having me teach a private class in your home – think…”Girls Night Out”, “Couples Cooking”, “Teaching Kids To Cook”, “Birthday Celebration” “Anniversary Party”…please send a message to Linda@theorangebee.com (email icon below) for more information.
Gotta run – my kitchen is waiting…
Honey Lemon Custard with Marinated Summer Fruit
Ingredients
Ingredients
2 cups heavy cream
4 tbsp. honey, divided
3 tbsp. Sugar
1/2 vanilla bean, split lengthwise
3 2″ strips of lemon peel
6 tbsp. fresh lemon juice, divided
1/4 cup rum or alcohol of your choice
1 cup berries
Instructions
Instructions
Place 4-6 ramekins on a rimmed baking sheet.
Heat cream with 2 tbsp. honey and sugar in a small saucepan over medium heat until just beginning to simmer.
Scrape in seeds from vanilla bean; add bean.
Add lemon peel; remove from heat.
Let steep for 5 minutes (cream should register 160* on an instant read thermometer).
Remove vanilla bean and lemon peel.
Gently stir in 5 tbsp. lemon juice.
Whisk remaining 2 tablespoons honey and 1 tablespoon lemon juice with rum in a small bowl.
Stir in berries and allow to sit until juicy, about an hour.
Serve over custard.
Divide custard among ramekins and chill to set for 1 hour.
Can be covered and chilled up to 1 day.
While custard chills, prepare chosen fruit.
Mix together 2 tbsp. honey and 1 tbsp. lemon juice.
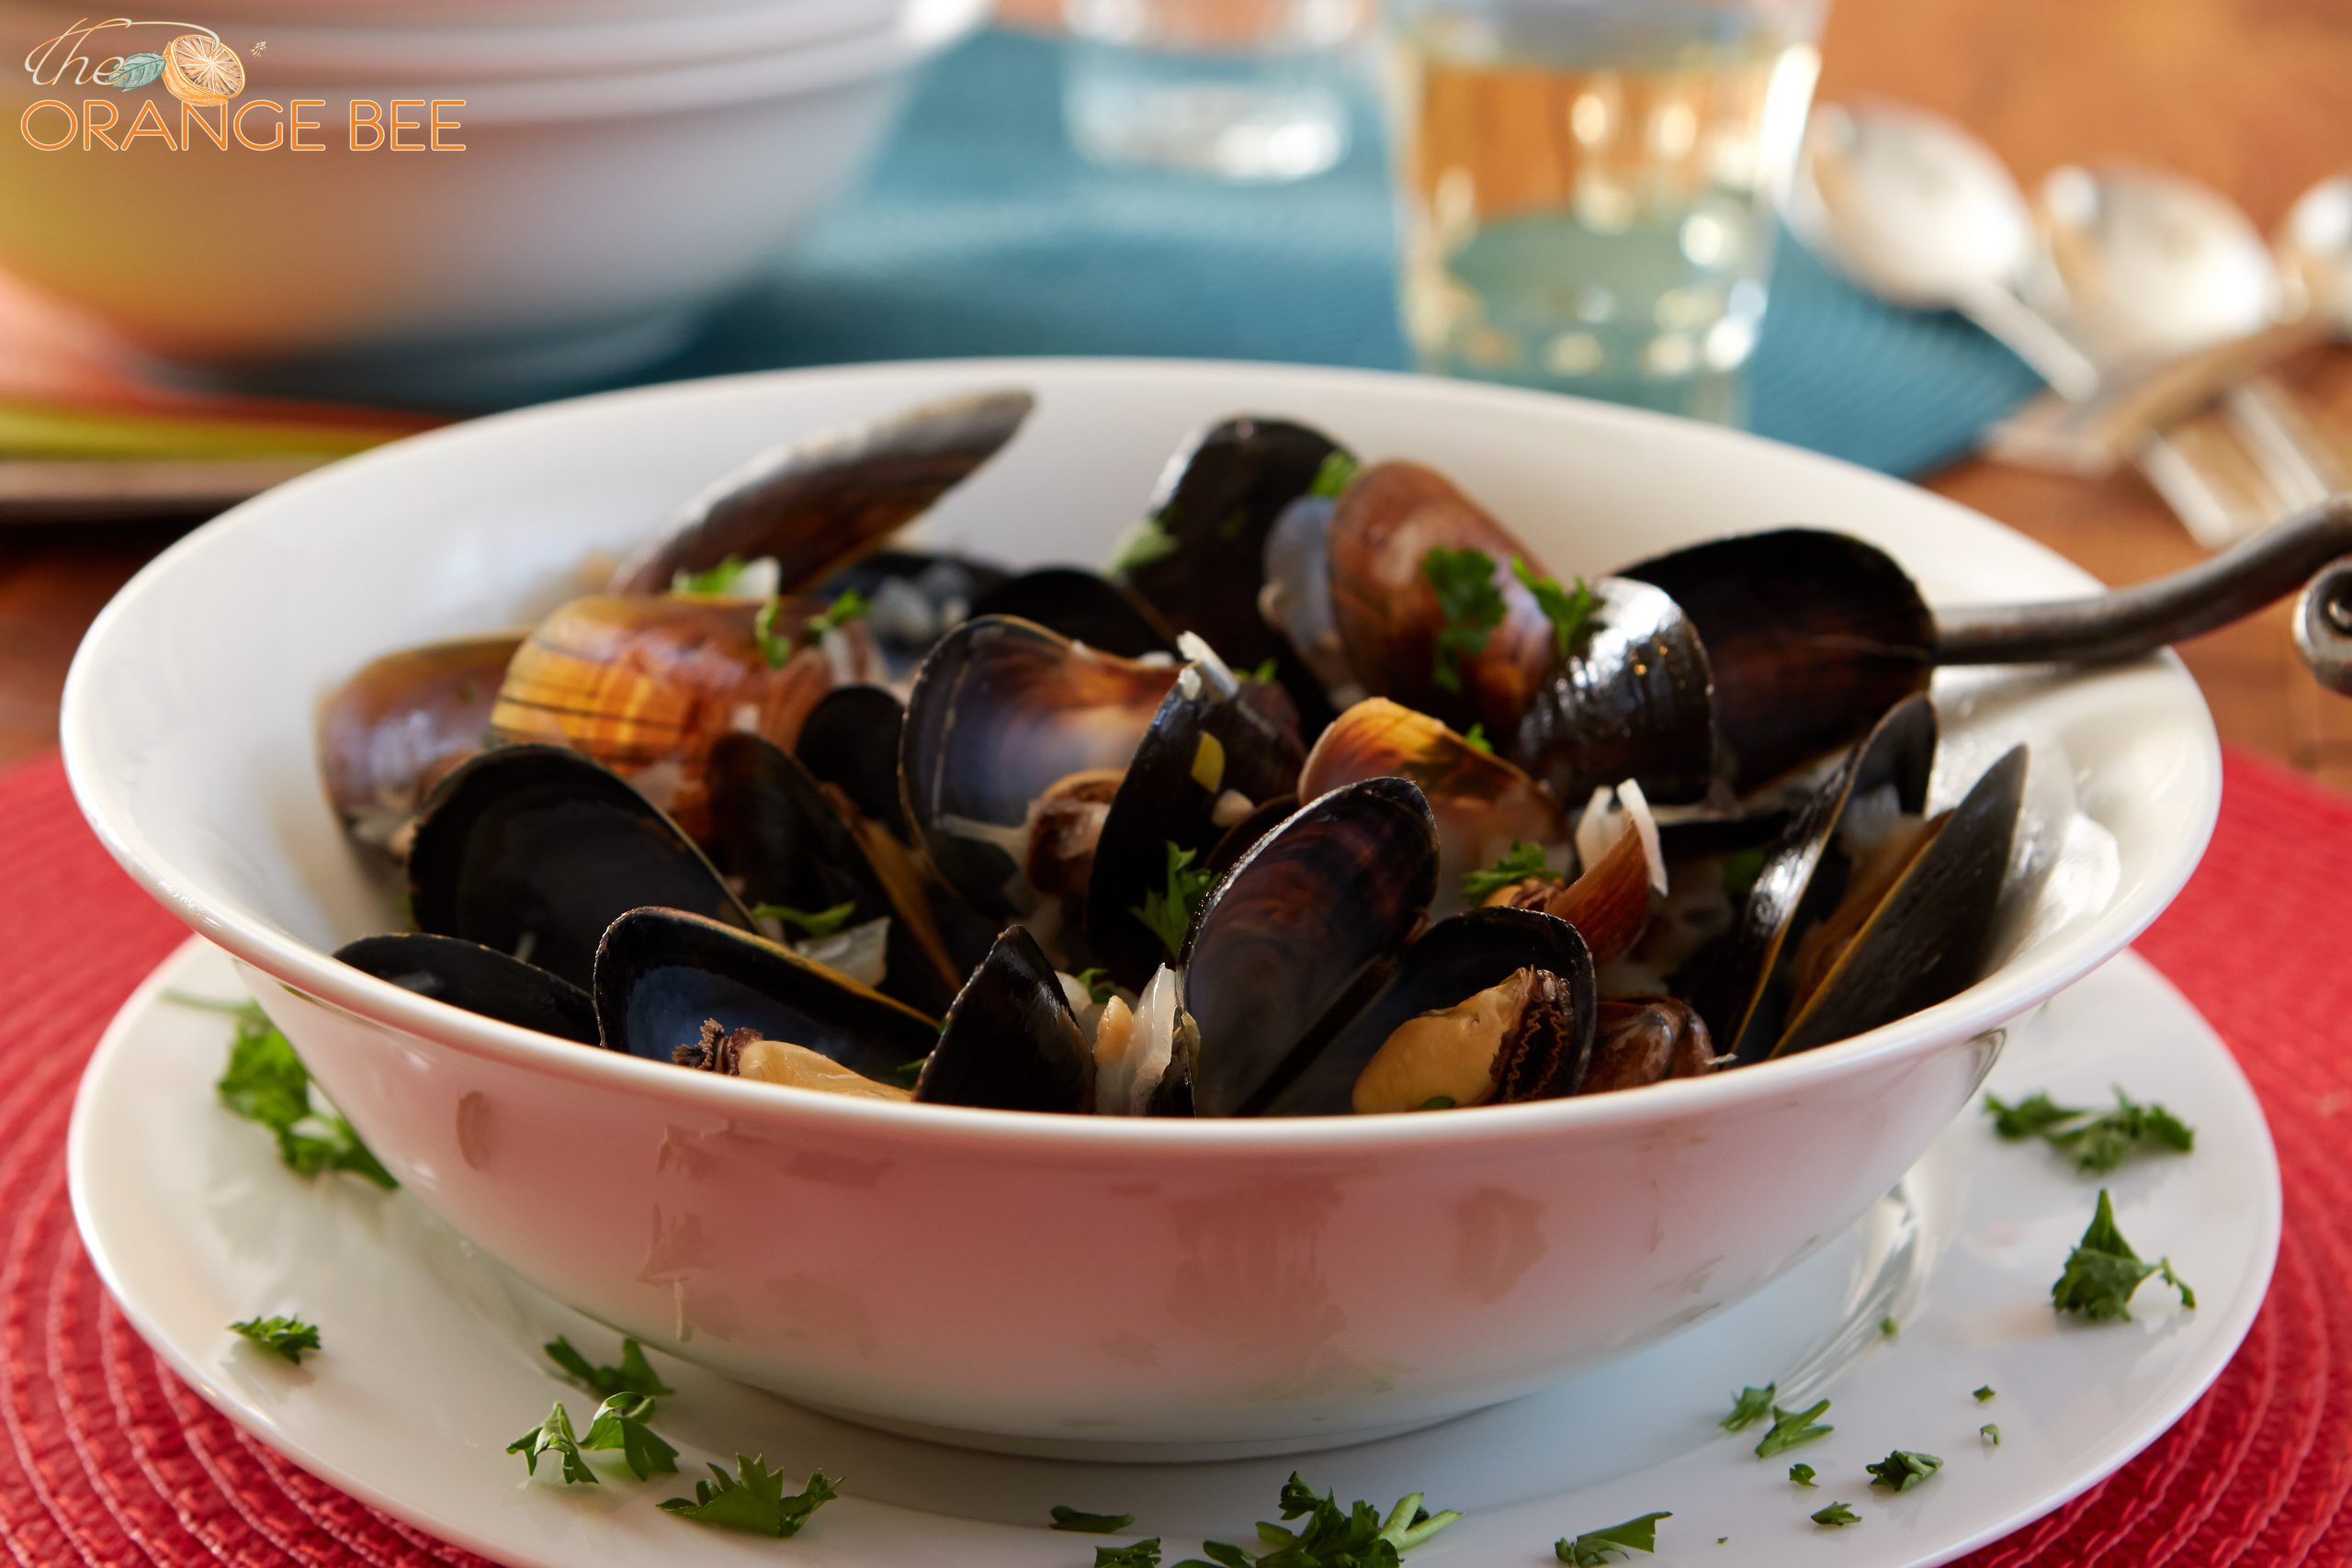
While working on developing a recipe for the Sustainable Seafood Blog Project I visited the seafood department of my local Whole Foods. If you read the SSBP post you know I pay particular attention to where my seafood comes from as well as how it was caught. I found these fresh, east coast mussels had just arrived on one of the days I shopped and knowing how much my man Dan loves mussels I grabbed a bag to steam for dinner that night.
I suppose it could be intimidating to think of cooking mussels in your own kitchen, but don’t go there. It is one of the easiest recipes to prepare at home and much more cost effective than ordering mussels in a restaurant. A bag of mussels from your local seafood monger makes a quick, tasty and easy meal for two or appetizer course for a few diners. Be sure to grab a loaf of fresh, crusty bread for dipping in the wine sauce – that’s the best part. Buy good wine – one that you enjoy because you’ll have plenty left over to pour with dinner.
Mussels In White Wine For Two
Ingredients
1/4 cup olive oil
2 tablespoons minced shallots
1 tablespoon minced garlic
1 cup dry, crisp white wine
3 pounds mussels, scrubbed and debearded
2 tablespoons minced parsley, curly or Italian
Instructions
In a large pot with a tight-fitting lid, warm the olive oil over medium heat.
Add the shallots and garlic.
Saute until soft, making sure they don’t brown, about 2 minutes.
Raise the heat to high, add the white wine and bring it to a boil.
Add the mussels, cover the pot and steam until the shells open, 5-9 minutes, stirring once or twice while cooking.
Do not overcook.
Discard any mussels that haven’t opened.
Add the parsley, stir and ladle the mussels and the broth into serving bowls.
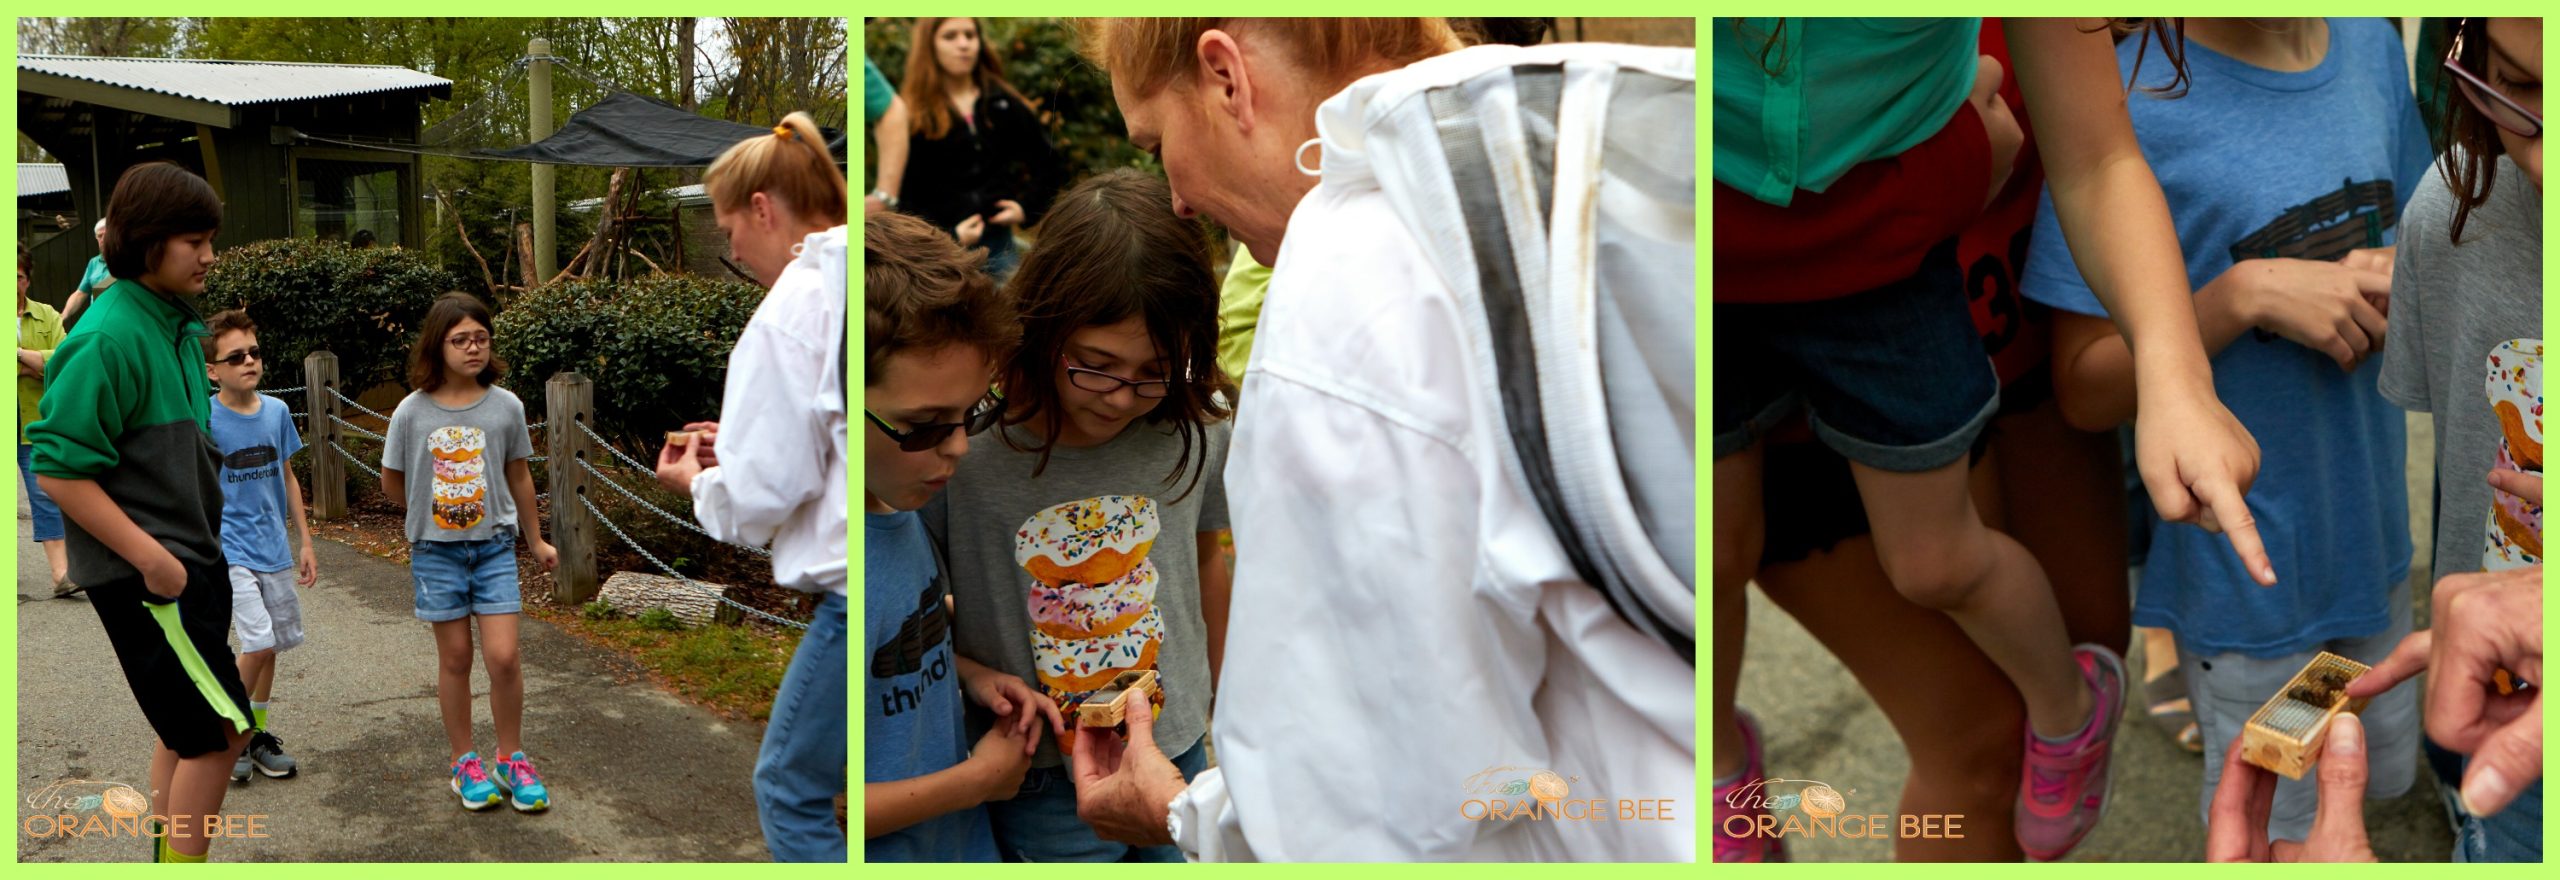
Kids of all ages wanted to get a peek at the Queen!
I would like to introduce you to the Science Center Honey Bees! Because of the role a honey bee plays in producing the food we eat, berries, peaches, almonds, beans, peppers, tomatoes….the list goes on and on, I feel lucky to be at the forefront of educating the kids, parents, teachers, grandparents and care givers that visit the Greensboro Science Center. We had a few reservations about placing the hives out in the open where it’s good for the bees. We decided that signage warning visitors “Active Bee Hive – Do NOT Approach” should do the trick of protecting the bees and the humans.
This was an adventure for me as I’d never “ordered” bees to be installed into hives. I did my homework, read books and watched a video to be as prepared as possible. In the past I’ve always “recovered” bees from water meter boxes, under sheds, etc. or removed swarms to bring to the apiary. Turns out ordering and placing bees in a hive is a much simpler process. When I arrived at Triad Bee Supply to pick up my bees this is what I saw – a tent with “Bee Buses” stacked high, all waiting for their keepers to carry them to their new homes.
Bee Buses
After checking to make sure my queens were alive and well, I loaded them into my car. Not to worry there were no loose bees to buzz about in my enclosed vehicle.
Right about now I was feeling exhilarated and ready to meet my new bees. I drove straight to the science center to unload and place them in their homes. The hives were already set up in the Bird, Butterfly & Bee Zone – near the farm animals and petting zoo. The first two steps were to remove the queen cage and then remove the cork plug on the candy end of the box – In the photo below you can see one end has a large white blob – that is bee candy. By removing the cork on the outside of that end, it allows the bees in the hive to eat through the sugary candy and the bees attending the queen to nibble from the inside until the candy is gone and the queen can walk out into a hive. This allows everyone not attending the queen to pick up the scent of her pheromones and welcome her when she takes her place inside the colonies hive.
Queen Cage
Once I removed the queen cage visitors were beginning to gather and I was able to share her with quite a few interested kids and adults alike. It’s not often anyone other than the beekeeper sees the queen since beekeepers are the only ones looking inside a hive. It made me smile to see how interested everyone was. The bee best visible in the picture beneath is an attendant. To the left of her is a long brown body – that is the queen.
A Queen Bee and her attendants
Not wanting to prolong the process I placed the queen carrier onto the frames in the hive and then it was time to introduce all the other ladies to their new home.
Placing the queen cage inside the hive
Doing this was simply a matter removing a few frames to make room and next, pouring them into the hive. Below you can see I’ve replaced all but 2 frames and the bees are already beginning to rally around their queen in her little cage. Other bees are placing themselves along the top of a frame and the outside – ready to go to work. The tan paper looking slab above the queen is a pollen patty. Food for the girls – lots of protein in a pollen patty. This will supplement them until they find outside pollen sources.
I placed the bee bus outside the hive for the stragglers to make their way in on their own time. By the time I left that day everyone had found their way into the hive to take her place in the community. Do you ever think about the fact that bees live in a community? They all have a job and a purpose and the bees all work together for the benefit of the entire hive. They take on different jobs, guard bees- protect their hive from predators, nurse bees- feed the brood, forager bees- leave the hive and return with water, pollen and nectar, scout bees- take flights to locate said, water, pollen and nectar and return doing a little dance to indicate to the others where to find these resources. Queen attendants- well they pamper the queen! Some bees excrete wax to make the comb, others remove nectar and pollen from the foragers and place it in the comb. Bees are meticulous and a few bees are assigned to keep the hive clean. Much like a family – like your family perhaps.
The last step is to place the inner cover followed by the outer lid and leave the bees to their own devices. After I placed the inner cover you can see below how they want to investigate all their territory – they clamber out of the hive and before I shut the hive completely I gently coax them back inside – taking great care not to squish anyone!
Curious bees
The entire process was repeated on the next hive. I can’t go back to open the hives and check on the queen for a week. Today, the day I am writing and posting this story, was the day, but alas it is cold and rainy. I have no choice but to postpone the next step until tomorrow, when the weather is predicted to be sunny with temps in the 70’s. Much better bee weather. I’ve visited several times and observed plenty of activity around both hives. They are also devouring the sugar syrup, you see in the mason jars on the fronts of the hives, and I’ve refilled multiple times in a week. On one visit we had a visitor in the apiary, a curious and gorgeous peacock.
I am thrilled with this new adventure and pleased that everyone at the science center is excited about the installation of the bees and ready to spread the word. Bees are vital to our food sources, and we all like food – if you don’t, I’d love to hear from you- because I’ve never met anyone who doesn’t love biting into a sweet summer peach, or crunching on roasted almonds, or eating a juicy ‘mater sandwich. Without the conservation of honey bees and other pollinators we are only failing ourselves.
Do your part! Plant flowers, trees, fruit orchards, and herbs that are pollinator friendly. Take caution when purchasing plants to be sure they are free of harmful pesticides and spread the word. You’ve nothing to loose! Click here to get ideas of what to plant. Go here for a link to an article about makes good choices when purchasing your garden plants and flowers. Share a comment and tell me how you are fulfilling the needs for our sweet pollinators. What are you growing? Where have you found the best plants for your own backyard garden, patio, yard or balcony? Inquiring minds want to know!
This shop has been compensated by Collective Bias, Inc. and its advertiser. All opinions are mine alone. #ProPlanPet #CollectiveBias
Meet my dogs, Ziggy, a Border Collie and Beckley, a rescue mutt. Beck is probably part German Shepherd and part Lab, we refer to her as, “the best one”. She is almost always a really sweet natured dog – except for those unpredicted times when she might decide she’d like to eat another dog for lunch. We have a handle on her dubious nature and know how to prevent having any real issues – she’s “the best one”. Isn’t that how rescue dogs are?
Ziggy is a dog we choose even before he was born. We acquired him from a BC breeder in Crawford,, Texas and he comes from Scottish stock. When he was a puppy we went for agility training and learned to work with a clicker for basic obedience training. Unfortunately life got in the way of continuing his agility training but it was a great experience for understanding Borders. The clicker training was a quick and efficient way to teach basic commands like “sit”, “lie down”, “roll over”, etc. One trick I taught him was to open the back door to go out but for some reason he never could get a handle on “close the door”! Ha Ha – we ended up changing out the door handle for a round knob he couldn’t operate, as constantly having to close the door became a real pain for the humans.
Both of my dogs are thrilled to go along on car rides or to visit PetSmart to pick up dog food, chews and of course new toys. On a recent visit to PetSmart I discovered Purina® Pro Plan®dog food. The kittens and puppies looking for adoption at PetSmart always pull on my heartstrings, but with these two dogs and 3 cats already in the family I can’t even go there!
You might notice that the Purina® Pro Plan®I purchased for Ziggy and Beckley is for “weight management”. Ziggy has an issue with hypo-thyroid and is overweight. Being a Border Collie and overweight isn’t a good combination. I am hopeful that along with his meds this special formula, made with real chicken will help him to drop a few pounds and overall stay healthy. One of the cool things about deciding which one of the Purina® Pro Plan® dog foods to purchase is the MYPLAN recommendation page. It offers a short survey about your dog and gives suggestions as to which food will be best for each individual dog in your family, and a coupon for a FREE bag of dog food! Visit the Purina® Pro Plan®MyPLAN website to get your dog’s MyPLAN recommendation and a rebate offer for a free bag of Purina® Pro Plan® Dry Dog Food (4-6lbs, up to $18.99.) Good only in U.S.A. A.P.O’s, F.P.O’s. Void where taxed, prohibited, restricted. Allow 6-8 weeks for shipment. LIMIT ONE REQUEST PER INDIVIDUAL, ADDRESS, or EMAIL ADDRESS. Offer expires 04/30/2015. See full terms.
Both of my dogs like to retrieve, but of course Ziggy is the most unrelenting when it comes to chasing after a ball or his favorite red fire hydrant toy. He will go fetch and bring it back until the cows come home – if we had cows. With his weight gain he tires out quicker than he did in the past, I’m hoping with the Purina® Pro Plan and daily walks he’ll drop a few pounds and gain back some of his energy. You can see in the picture below how focused he is. He follows my command to sit and look into my eyes as he waits for me to pitch the toy as far as I can. I simply have to tell him “look” and he knows that means at me – in the eye! This is the result of using clicker training. If you aren’t familiar with clicker training google it – if you have a new puppy you want to teach a few tricks I think this is the easiest way to do it.
My dogs most favorite activity is going for a walk – anywhere. We can walk around the block, head to a beautiful park, hike into the woods, stroll around the lake, they love all of it. A few weeks back I decided to take them for a quick walk around the neighborhood. It was still February and very cold outside, so I bundled up, grabbed the leashes and off we went. Little did I know what lay in store for me that afternoon.
Half a block from home we started to cross a fairly busy street, no cars were coming, Ziggy stopped right in front of me and I tripped, and tripped and tripped until I fell face first onto the pavement. This was not a pretty sight! Embarrassing, although I don’t think anyone saw my accident, and painful, I quickly got up and turned around to head right back home. I unleashed the dogs into the back yard and realized I was shaking like a leaf and trembling all over.
Feeling like something was wrong – I peeked inside my glove to see that my left hand was busted open. I removed the glove to discover that it was split open – BAD! Feeling light-headed and traumatized I grabbed a towel, stopped the bleeding and sat down! I of course, could not have anticipated THIS. Bottom line was I had to go get 8 stitches and miss our dinner reservations that night.
My hand has healed, although I do have a scar now – which with time will fade. The next day my right arm and shoulder hurt very badly and it continued to do so for over a week. Realizing how lucky I was that my face hadn’t hit the ground, a hip wasn’t broken, I still had all my teeth, and my head had not come into contact with the street, I figured I’d taken quite a spill and would be sore for a while. Fast forward – one month later my right arm was still causing me a good deal of pain and it just wouldn’t move everywhere it should…I went to an orthopedic for an x-ray. Guess what? – my arm is broken. The doc was pleased to inform me that it doesn’t need surgery, but advised not to lift even a milk carton with my right hand – once again I did not expect this! It will heal on it’s own as the bone is broken but not dislodged. Whew – I will recover fully in the next few months and I will walk my dogs still…one at a time for now!
Got a great dog story – share it with my readers in the comments section. If you have pics of your dogs to share please do so on my Facebook page – I’d love to see them and hear your stories!
Traveling is at the top of my “favorites list”. Jetting across the country, seeing the U.S.A by car or flying overseas I have a list of “must haves” and it is imperative I don’t leave home without them! When you travel do you haphazardly pack and throw things together at the last minute or do you calculate each step of the way? I admit and it could be considered a bit screwy, but I am a calculated packer! When I travel the last thing I want to find myself doing is rushing off to the nearest drug or grocery store to locate one of my necessities. I absolutely do not want to find myself having to locate a place to pick up an item I could have easily packed. Are you on board with me?
When I travel I do enjoy engaging with locals whether it be in Paris, Philly or Phoenix. I find that there is much to be gained from talking with local folks with respect to great places to eat, off the beaten path places to visit, local music venues to check out, backroads to venture down…you get it! An unforeseen illness or accident could prompt a visit to the local pharmacy, grocery or department store. There have been occasions where I’ve had to hunt down medicated eye drops, meds for a yeast infection, a skin rash, a sudden bout of Montezuma’s revenge, socks, bandaids, and motion sickness tablets. Traveling with kids certainly means you are more likely to leave home without every item needed – especially on a trip abroad. It’s been a long time since I’ve had to pack for my daughters so this post is in regards to just me and what I consider “travel necessities”. It seems since we’ve become “empty nesters” we are finding many more travel opportunities. This my friends makes me very, very happy!
Here is my list of “must haves”:
Lip Balm – gotta have this stuff for dry, parched lips. Especially when traveling by air as those airplane cabins are so dry. This eos brand is my new fav!
Nail file/emery board – one of the last times we traveled going down the escalator with my bags a rambunctious little girl bumped my bag and in my effort to keep it from tumbling down the escalator I broke a newly manicured nail. Thank goodness I could at least file it neatly while waiting to board the plane.
Water – Again, airplane cabins are so dry and can easily cause us to dehydrate. I drink tons of water and only water, with an occasional ginger ale while flying. I always have a bottle of water in my car too!
Hair clip or elastic – Some days it’s just nice to get those strands out of your face. Also comes in handy if faced with windy days or zooming around on a motorbike or boat!
Socks – For cold airplane cabins, or over air-conditioned car travel, it’s nice to snuggle into a cozy pair of socks. Secondly, when I stay in hotels I wear them to walk around on the icky carpet – there are tons of germs there – you know that – right? These are my favorite socks right now – thick and cottony, comfy and colorful!
Moisturizer – Once more, to help my hands and skin stay hydrated in a dry airplane cabin and because I wash my hands a million times to prevent spreading germs.
Moleskin – If you’ve never carried this with you while traveling you must! It is a total life saver for preventing blisters. It is also great at helping to break in new shoes!
A shawl or large scarf – Not only are these great for polishing an outfit but they come in handy as a cover on chilly planes, in cars or if you’ve gotten a bit too much sun.
My current read – I find this is my best time to plow through numerous chapters and pass the time while traveling. I just finished this book about Josephine Bonaparte – Napoleon’s wife! It held my interest from cover to cover. Full of historical fact and an interesting peek into the royal way in which they lived.
Phone, iPad & Laptop chargers – Obviously! I also like to carry a small portable one in case my phone goes dead when I am not near an outlet for charging.
Pen & small note book – For jotting down names of places we visit, a great wine I stumble across, or brilliant thoughts I come up with when I am on holiday.
Dental floss or toothpicks – Need I tell why I carry these?
Prescription meds & OTC pain relievers, antacids, & bandaids – Self explanatory necessities. I put a variety of OTC pills (Tylenol,Aleve,Advil,Excedrin) in a small container for the occasional headache or achy, tired feet.
Pocket size sewing kit – contains safety pins, a needle and thread and a small button or two – you never know when you’ll pop a button or a have hem fall out. Sewing is one of my least favorite tasks – just ask my adoring husband! But in an emergency I can handle it.
Baseball cap – for bad hair or lazy days. Also great for sun protection and wind control for tossed locks.
Small cross body purse – Great for hands free shopping, digging out the drivers license at TSA security check, keeping my valuables close and safe, and it fits easily into my “second” item when boarding the airplane – leaving me with one carryon and one personal item!
In the photo below you can see my cross body wallet – it doesn’t look great to see that lovely white strap across my body – but it kept my money safe while in Europe and most of the time it was completely under my clothes. This is not the bag I am referring to above but I do recommend one of these while traveling internationally as pick pockets are virtually helpless when trying to get their sticky fingers on my money and or passport. Also; note the orange shawl – I even used it as an umbrella when we were caught in a quick Paris downpour.
All of the items I’ve listed easily fit into my luggage and backpack. Below I’ve condensed the list so you can print one for your next vacation! HAPPY TRAVELS!
I’m so excited today to share a fresh, healthy and savory seafood recipe with you. What I am even more psyched about is my partnership with the Sustainable Seafood Blog Project!
Participating in a conversation about sustainability, especially when it comes to our seafood, justifies my struggle with seeking out and purchasing sustainable seafood. Most of us don’t think of fish as a restricted resource. What we do think, is that the deep blue oceans are vast and endless with an unfading supply of fish. Did you know that ocean species are the last class of animals that we hunt on a titanic scale, and it’s taking its toll on our marine environment?
Concerns about the methods in which fish are caught and farmed is at the top of the list. I buy my seafood from a local fisherman at our farmers market, from Whole Foods and occasionally from my local grocery store, if and when they are able to tell me where it came from and how it got here. I’m not crazy about buying fish that comes from half-way across the world when there is plenty of “local” catch at hand. I admit selecting the best seafood is a daunting task. So many words and facts to absorb. Sustainable, aquaculture, trawl caught, farmed, over fished…
The methods by which fisherman catch their bounty can or cannot be detrimental to the life of our oceans and the creatures residing there. It can be done in a way that is respectful to our waters and what lives in them or it can disrupt the entire underwater ecosystem. Which would you choose? What do you choose? One significant resource to educate ourselves about what is involved in getting seafood from the waters to our dinner tables is the Monterrey Bay Seafood Watch. They have valid advice about the ratings, issues and partners associated with sustainability in seafood.
The Sustainable Seafood Blog Project is also a site where you can read some well-founded advice on the best practices to use when purchasing seafood. I am proud to be associated with SSBP. Below you’ll find links to several other bloggers who’ve also hopped on board and will be sharing some delicious seafood recipes and information for you to benefit from on this critical subject!
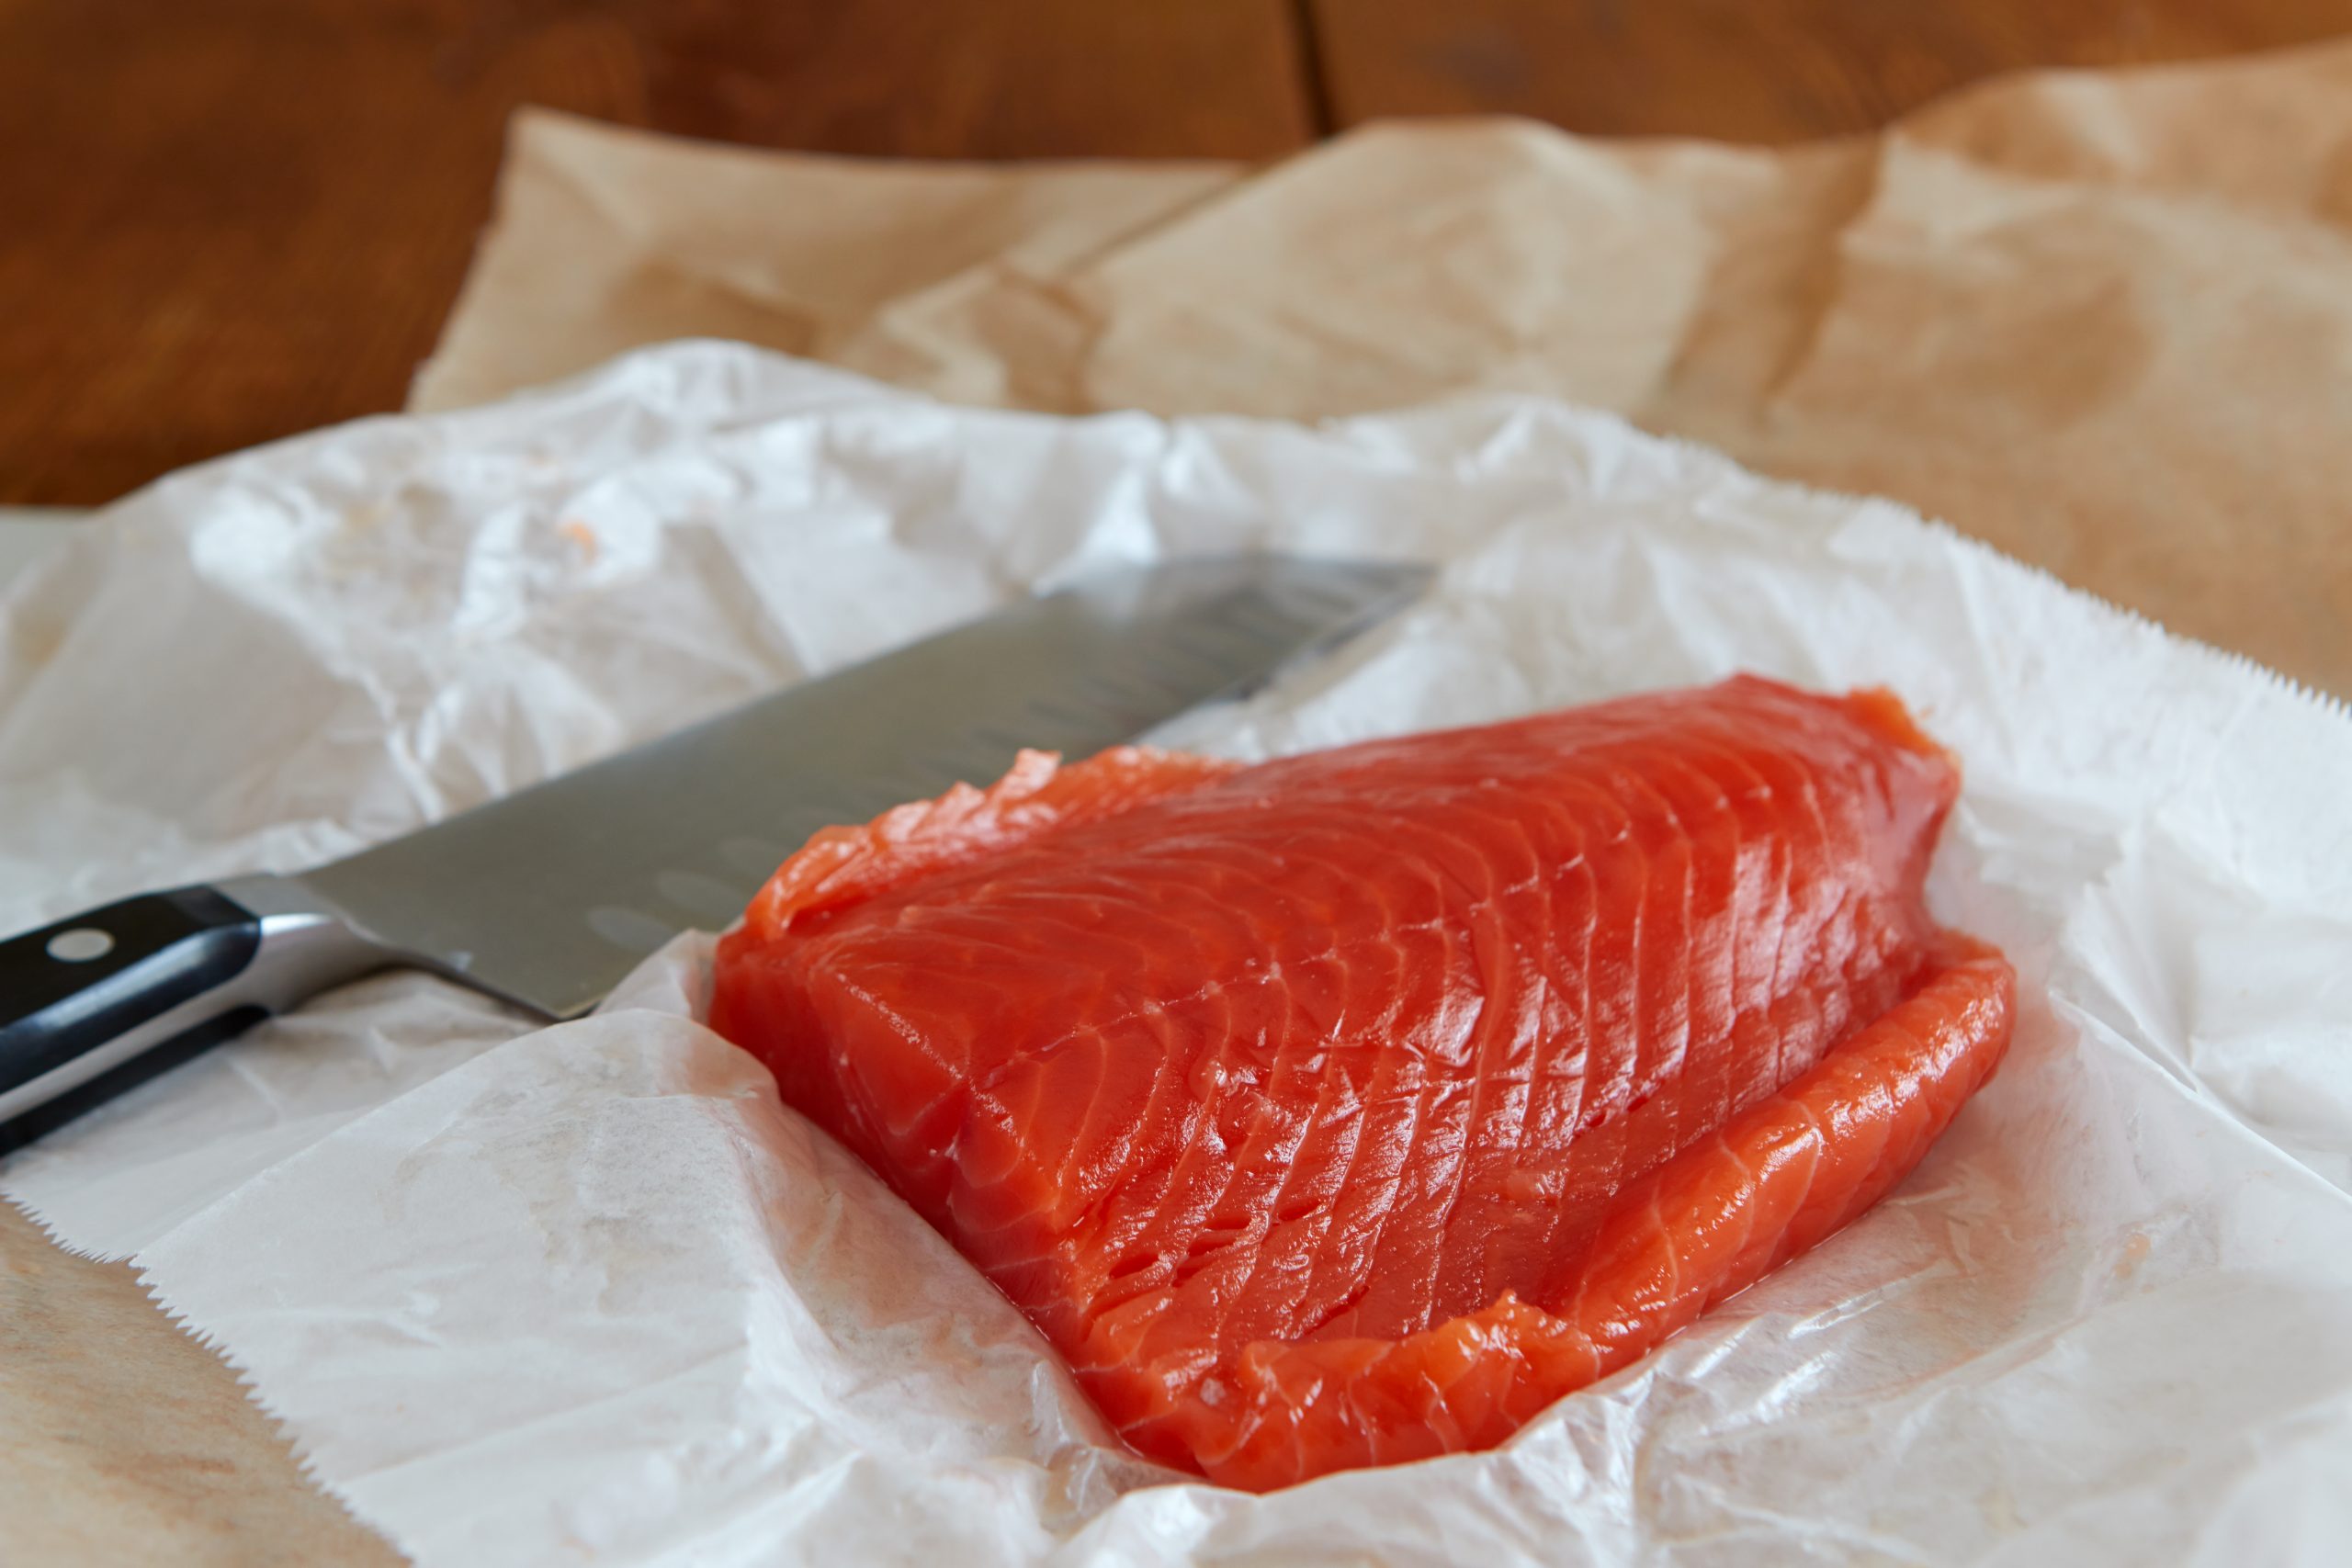
Now let’s talk food! Seafood to be exact. I took a risk and decided to make Salmon Burgers from scratch. I ordered my salmon from the fishmonger at Whole Foods. It was wild caught, Alaskan, fresh and tagged with the green label – meaning “best choice”. Go here to read about how Whole Foods practices sustainability in their seafood department. I asked for it to be skinned with as few bones as possible. I brought home a beautiful filet, with no bones and chopped it up myself. This was easier than I’d anticipated and now I know I’ll never purchase another pre-made salmon patty again! Mixing in some fresh tarragon, dijon, green onion, capers, lemon, and horseradish with a bit of mayo and panko delivered a herby, sweet, juicy, fresh flavored salmon burger with a bit of a kick from the horseradish and dijon, like none I’ever had. Happy, happy me!
Read my recipe below and then be sure to check out the other delightful links for more fantastic seafood recipes.
Preparing to chop fresh salmon.
Chopped and ready to mix with herbs.
Next step add Panko crumbs and shape into patties.
1 tablespoon chopped fresh tarragon + 1 teaspoon for crust
1 teaspoon Dijon mustard
1 teaspoon prepared white horseradish
1/2 teaspoon salt + 1/4 teaspoon for crust
1/2 teaspoon pepper + 1/4 teaspoon for crust
1/2 cup Panko breadcrumbs + 1/2 cup for crust
1 tablespoon butter
1 tablespoon dried shallots
Whole wheat buns
Sliced tomatoes
Leaf lettuce
Instructions
Combine first 9 ingredients in medium bowl.
Add 3 tablespoons mayonnaise and mix well. (Can be prepared 6 hours ahead. Cover and refrigerate.)
Meantime add 1/2 cup Panko breadcrumbs into a shallow bowl, mix in dried shallots, 1/4 teaspoon salt, 1/4 teaspoon pepper and a 1/2 teaspoon of tarragon.
Mix 1/2 cup unseasoned breadcrumbs into salmon mixture.
Form into four 1-inch-thick patties.
Place each pat tie onto the seasoned crumb mixture and pat gently – just to coat the outside.
Flip and repeat on second side, until all patties are coated.
Melt butter in heavy large skillet over medium-high heat.
Add salmon patties; cook until just firm to touch and brown and crusty, about 3 minutes per side.
Build burgers by spreading warmed buns with mayo and dijon to your liking. Add salmon patties, sliced tomato and lettuce.
3.2.2885
Don’t hesitate to check out all the other SSBP partners and their fantastic seafood recipes!
This shop has been compensated by Collective Bias, Inc. and its advertiser. All opinions are mine alone. #WhenImHungry #CollectiveBias
When I get hungry I can be so cranky, weak, tired and often times I just want to go to sleep because I have no energy to take the next step or say the next word! Not at all myself! My family has taken many road trips and on numerous occasions we have found ourselves hungry and without a restaurant in sight or searching for just the right one until …Ooops..there isn’t one. One story in particular that we now laugh about is when we were taking a day trip in the Texas hill country. Here’s what happened….
We woke up to a clear, sunny, warm day to spend driving the back roads of Texas. The hill country area of Texas is well know for it’s beautiful expansive fields of wildflowers. Distinctly bluebonnets, along with painted blankets, Indian paintbrush, and black-eyed Susans. It was spring time, the window of opportunity was wide open for viewing the flowers and stopping along the way to pop in quaint little shops and poke about for treasured Texas artifacts. My husband is patient with the three of us girls when it comes to poking around in shops. He generally takes his camera and wanders around town shooting unique sights. Late in the afternoon, we had had our fill of “shopping” and driving and decided we were all getting hungry and were ready to head back to the “river house”, where we were staying, for some snacks and a little “sittin’ in the river” time.
Texas Bluebonnets
Having seen a satisfying number of colorful wildflower fields, grazing longhorns and rustic old barns my husband set the GPS to take us home on a route less followed. We stuck to the directions which led us to a big open gate, complete with a cattle guard and a dirt road. We questioned the validity of this route but upon checking the GPS for accuracy could see it would lead us to the road we needed to take us back to the house, about 5 minutes away. Nice! As we drove this route we all began to realize how hungry we were. Starving to be exact. The GPS had us 20 minutes from the end of the road, add another 5 to get to the house-it seemed doable. My daughters and I were trying to make the best of what seemed to be an endless road over a rough, rocky path, but the truth was we were hungry. We were cranky and whiny and downright catty about what now seemed to be the never-ending road that we were traveling. No sleeping on this course, it was far to bumpy for that!
We had not one crumb to eat in the car and had long ago, run out of water. I’m confident if my husband could have plugged up his ears he’d have done so because I’m sure the banter amongst my daughters and me, was driving him nuts. He assured us we’d come out at the end of this long trail and be only 5 minutes from home, and food and liquid refreshment. Well, here is what happened; we came to the end of this long, potholed dirt road only to discover that there was another cattle guard and gate, only this time it was LOCKED. Locked tighter than tight and there was no way to open it and pass through, which would have put us 5 minutes from where we wanted to be. The girls and I considered if “dad” could just plow through it, that was laughable however, because it would’ve torn up my car without a doubt. Can you imagine the “tension” in the car now? Oh man, arms were crossed across chests, lips were tight, and nothing nice was being said. We were hungry! We had no choice but to turn the car around and head back to the gate we’d come through and take the “long” way home.
What we also do on “road trips”
I am positive had we not all been famished and thirsty we would’ve easily laughed about this and enjoyed the trek yet again over this rough and rocky road. After this little adventure I got smart and now I carrySNICKERS® bars with me on road trips. Had we had even one SNICKERS® bar to share among us the atmosphere in the car would have been much less strained. However, I haven’t told you the best part of this story! As we headed to the entrance of this rugged road we noticed a black Suburban following us – now mind you, we had not seen another vehicle the entire time we were driving this path. The girls were alarmed and fretful, who could that be? Tinted windows prevented us from seeing who was in the dark, ominous vehicle. I was feeling my mother bear protective side welling up. When we finally arrived at the gate where we had entered this dirt road we found that it too, was LOCKED! Heavy duty chains and a padlock secured it shut. Oh my goodness – now what? Locked in with a mysterious, sinister looking car behind us…Yikes! I can’t even begin to tell you how nervous we all were and all of a sudden we forgot about how hungry, because we wondered if we’d even live to eat another meal. You’ve heard the stigma about Texas, all gun crazy cowboys and shoot ’em ups – right?
SO now we are at a standstill. Can you imagine what was going through all of our minds? To cut to the finish, a guy gets out of the black, scary vehicle, NOT carrying a gun and approaches my husbands window. I decide I’ll be the one to do the talking because I am a better communicator than he, just saying’! The guy, dressed in jeans and a denim shirt and of course a cowboy hat asks, “can I help you?” DUH! I ask, “is this your property?” His response, “Yes mam”. I begin to tell him how the GPS brought us here and that when we turned onto this road the gate was open and there were no “NO Trespassing” signs so we assumed it was a public thoroughfare. He questioned, “this gate was open?”. “Well,” I said, “yes sir, it was – otherwise how would we have gotten in?” To end this story, he was friendly and found it somewhat amusing that the GPS had steered us wrong. It was puzzling to him why the gate had been open in the first place, but he was understanding of our dilemma and opened the gate and turned us loose, without any dispute or gunfire.
The hunger pains had momentarily subsided due to our anxiety of what might have happened. Lucky for us Texans are friendly folks, I did a good job of smiling and talking our way out of any trouble, we were after all completely innocent! Now we headed back down a familiar farm-to-market road to the house on the river. This meant about another 40 minutes in the car sans food or drink but at that point we were just happy to know we’d live to see another day and eat another meal!
Colorful Indian Blankets Bloom Across Texas
I hope you’ll enter the SNICKERS® “Who are you when you’re hungry?” contest by uploading a personal photo or video from your Computer, Facebook, Instagram or use the SNICKERS® Meme Generator to create something new! Voting begins at Noon on 5/11/15 and ends at 11:59:59AM ET on 7/15/15. Click here: #WhenImHungry.
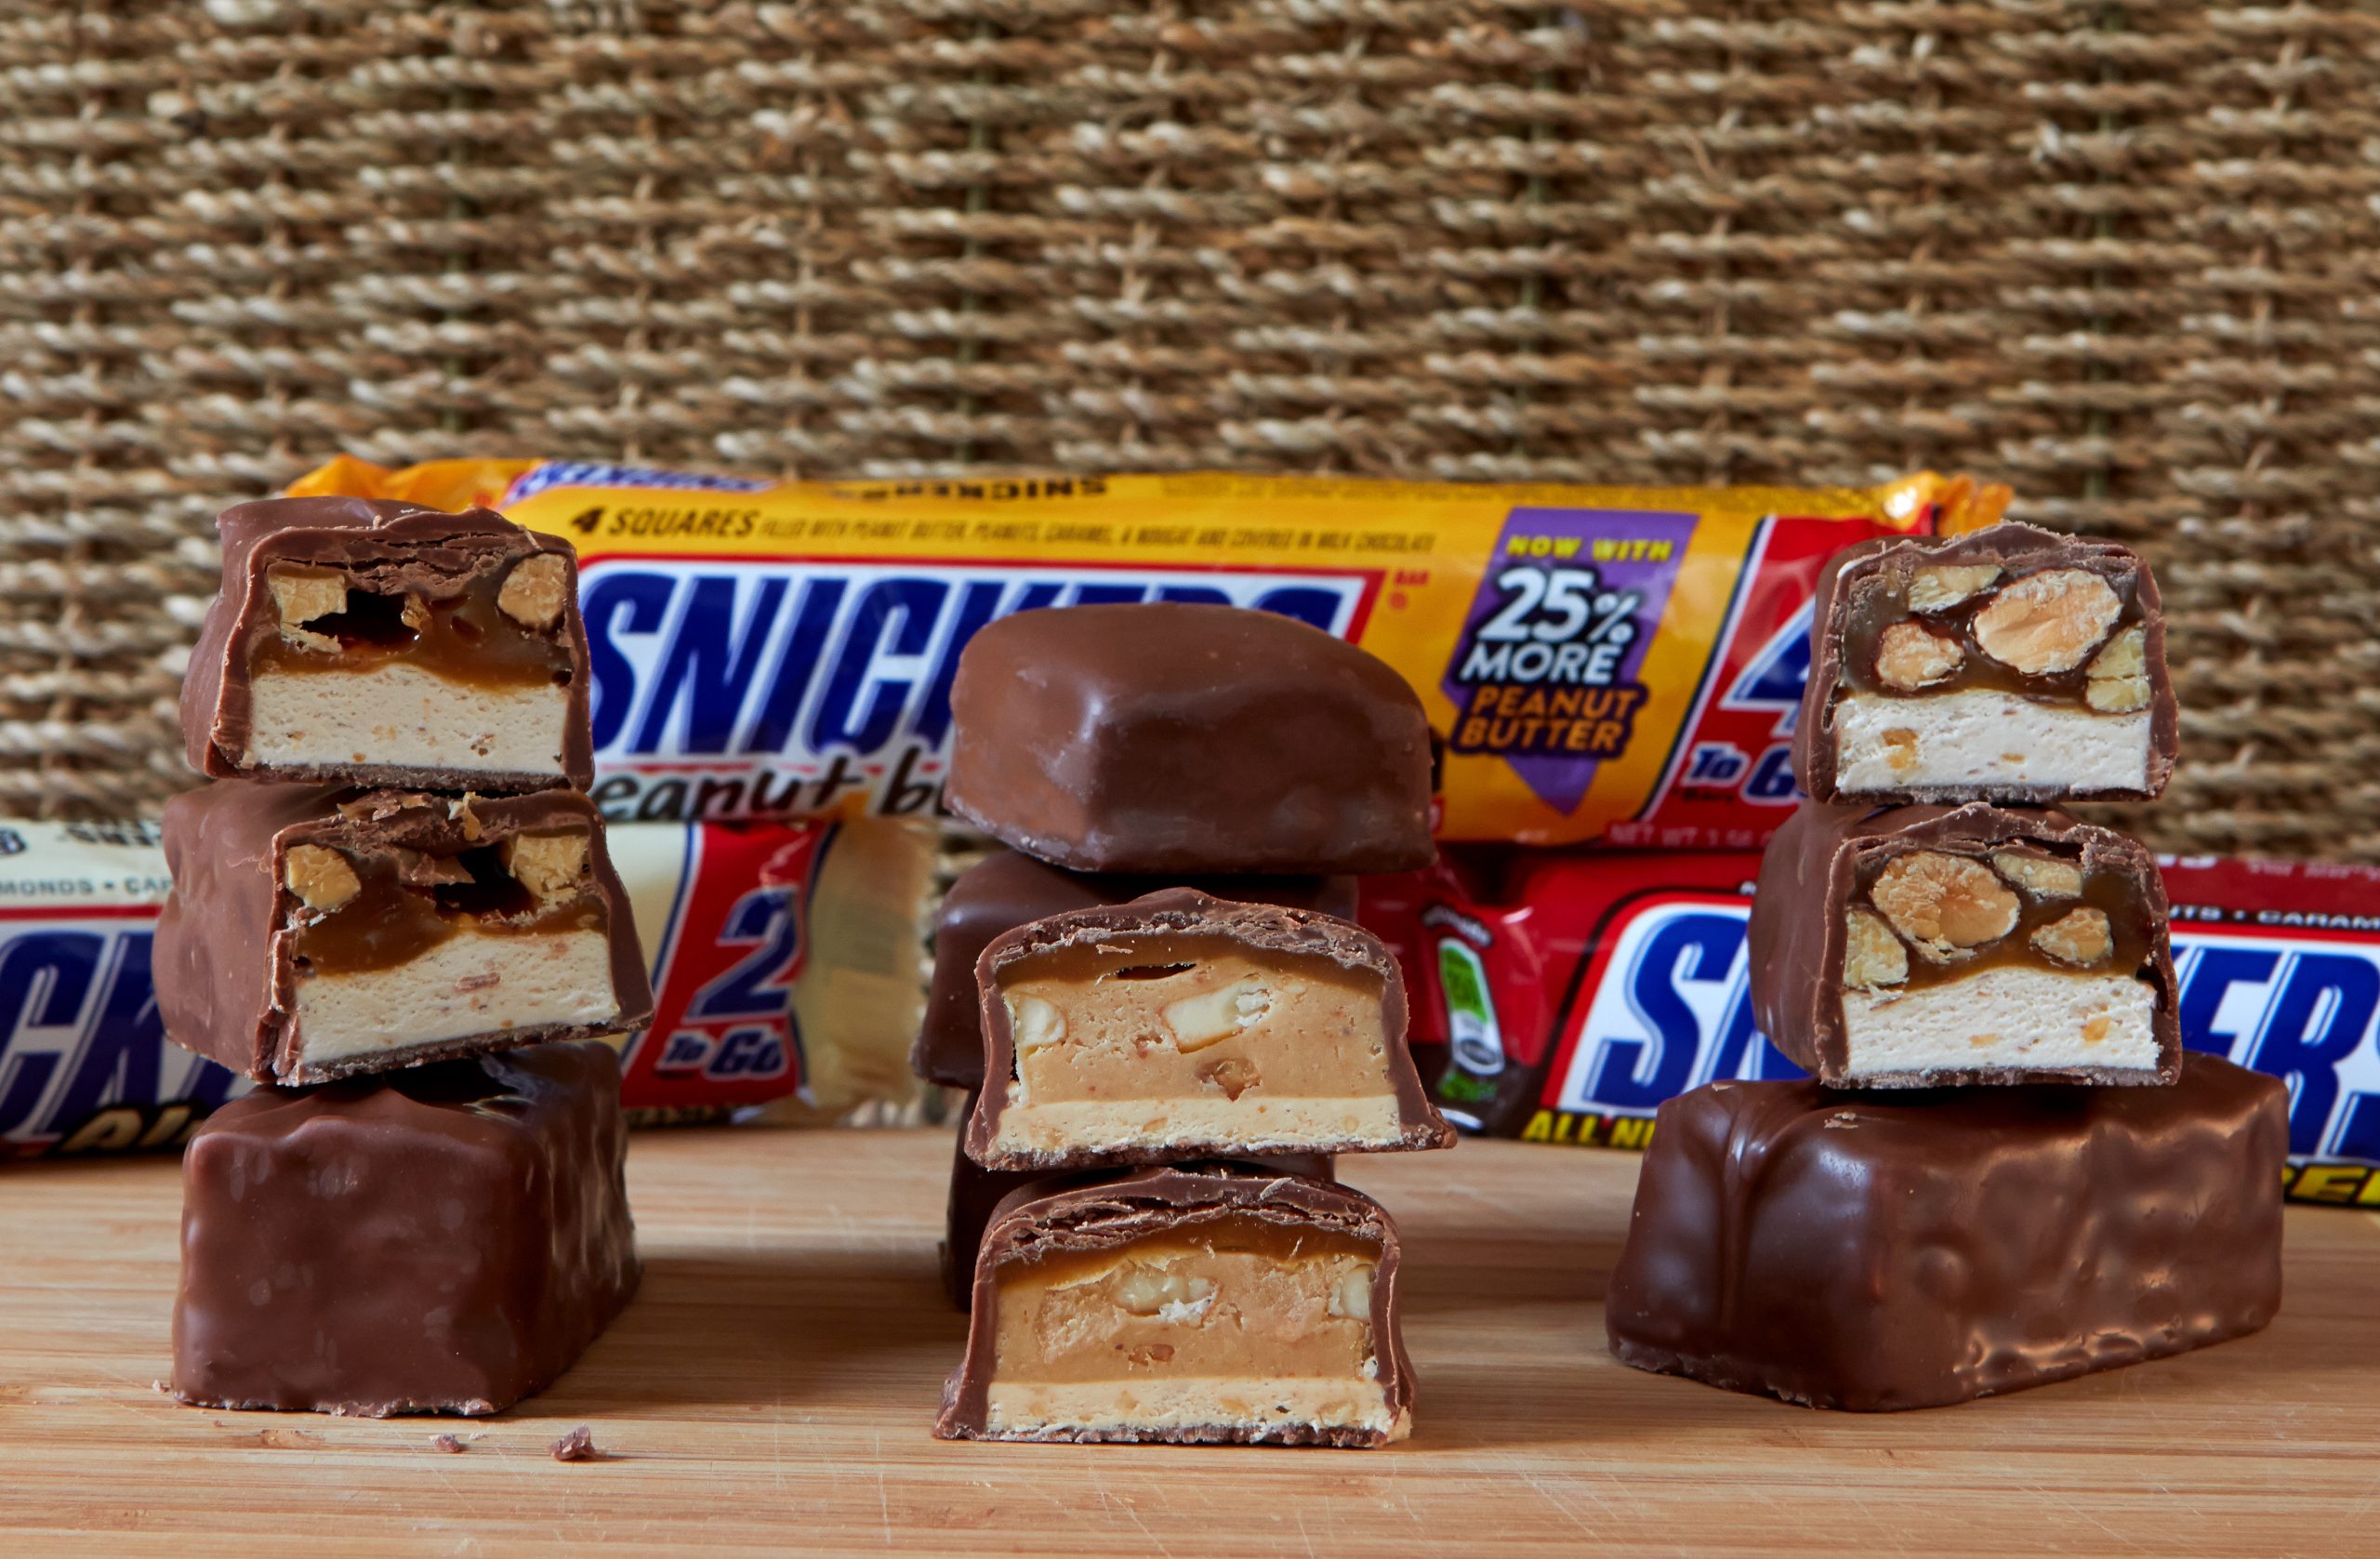
And if you love SNICKERS® go here where you’ll find tons of recipes and fun stories on the SNICKERS® Social Hub! Next time you’re taking a back road trip, may I suggest you throw a few SNICKERS® bars in the car to prevent cranky, jittery, whiny behavior from any travelers, especially in the event that you find yourselves lost or trapped and hungry! I found three great flavors, SNICKERS® Extreme, Peanut Butter Squares and SNICKERS® Almond at Walgreens.
I’ve shared a treasured family story with you, one that we can now laugh about. Share one with me about a time you found yourself in a precarious situation, innocently or not, or tell me about who you are when you’re hungry. Are you okay with that or do you get snappy and cranky like the girls in this story? How do you “fix” being hungry with no restaurant in sight ? Do you travel with snacks in your car, purse or travel bag? Let me know – I’d love to hear your story!
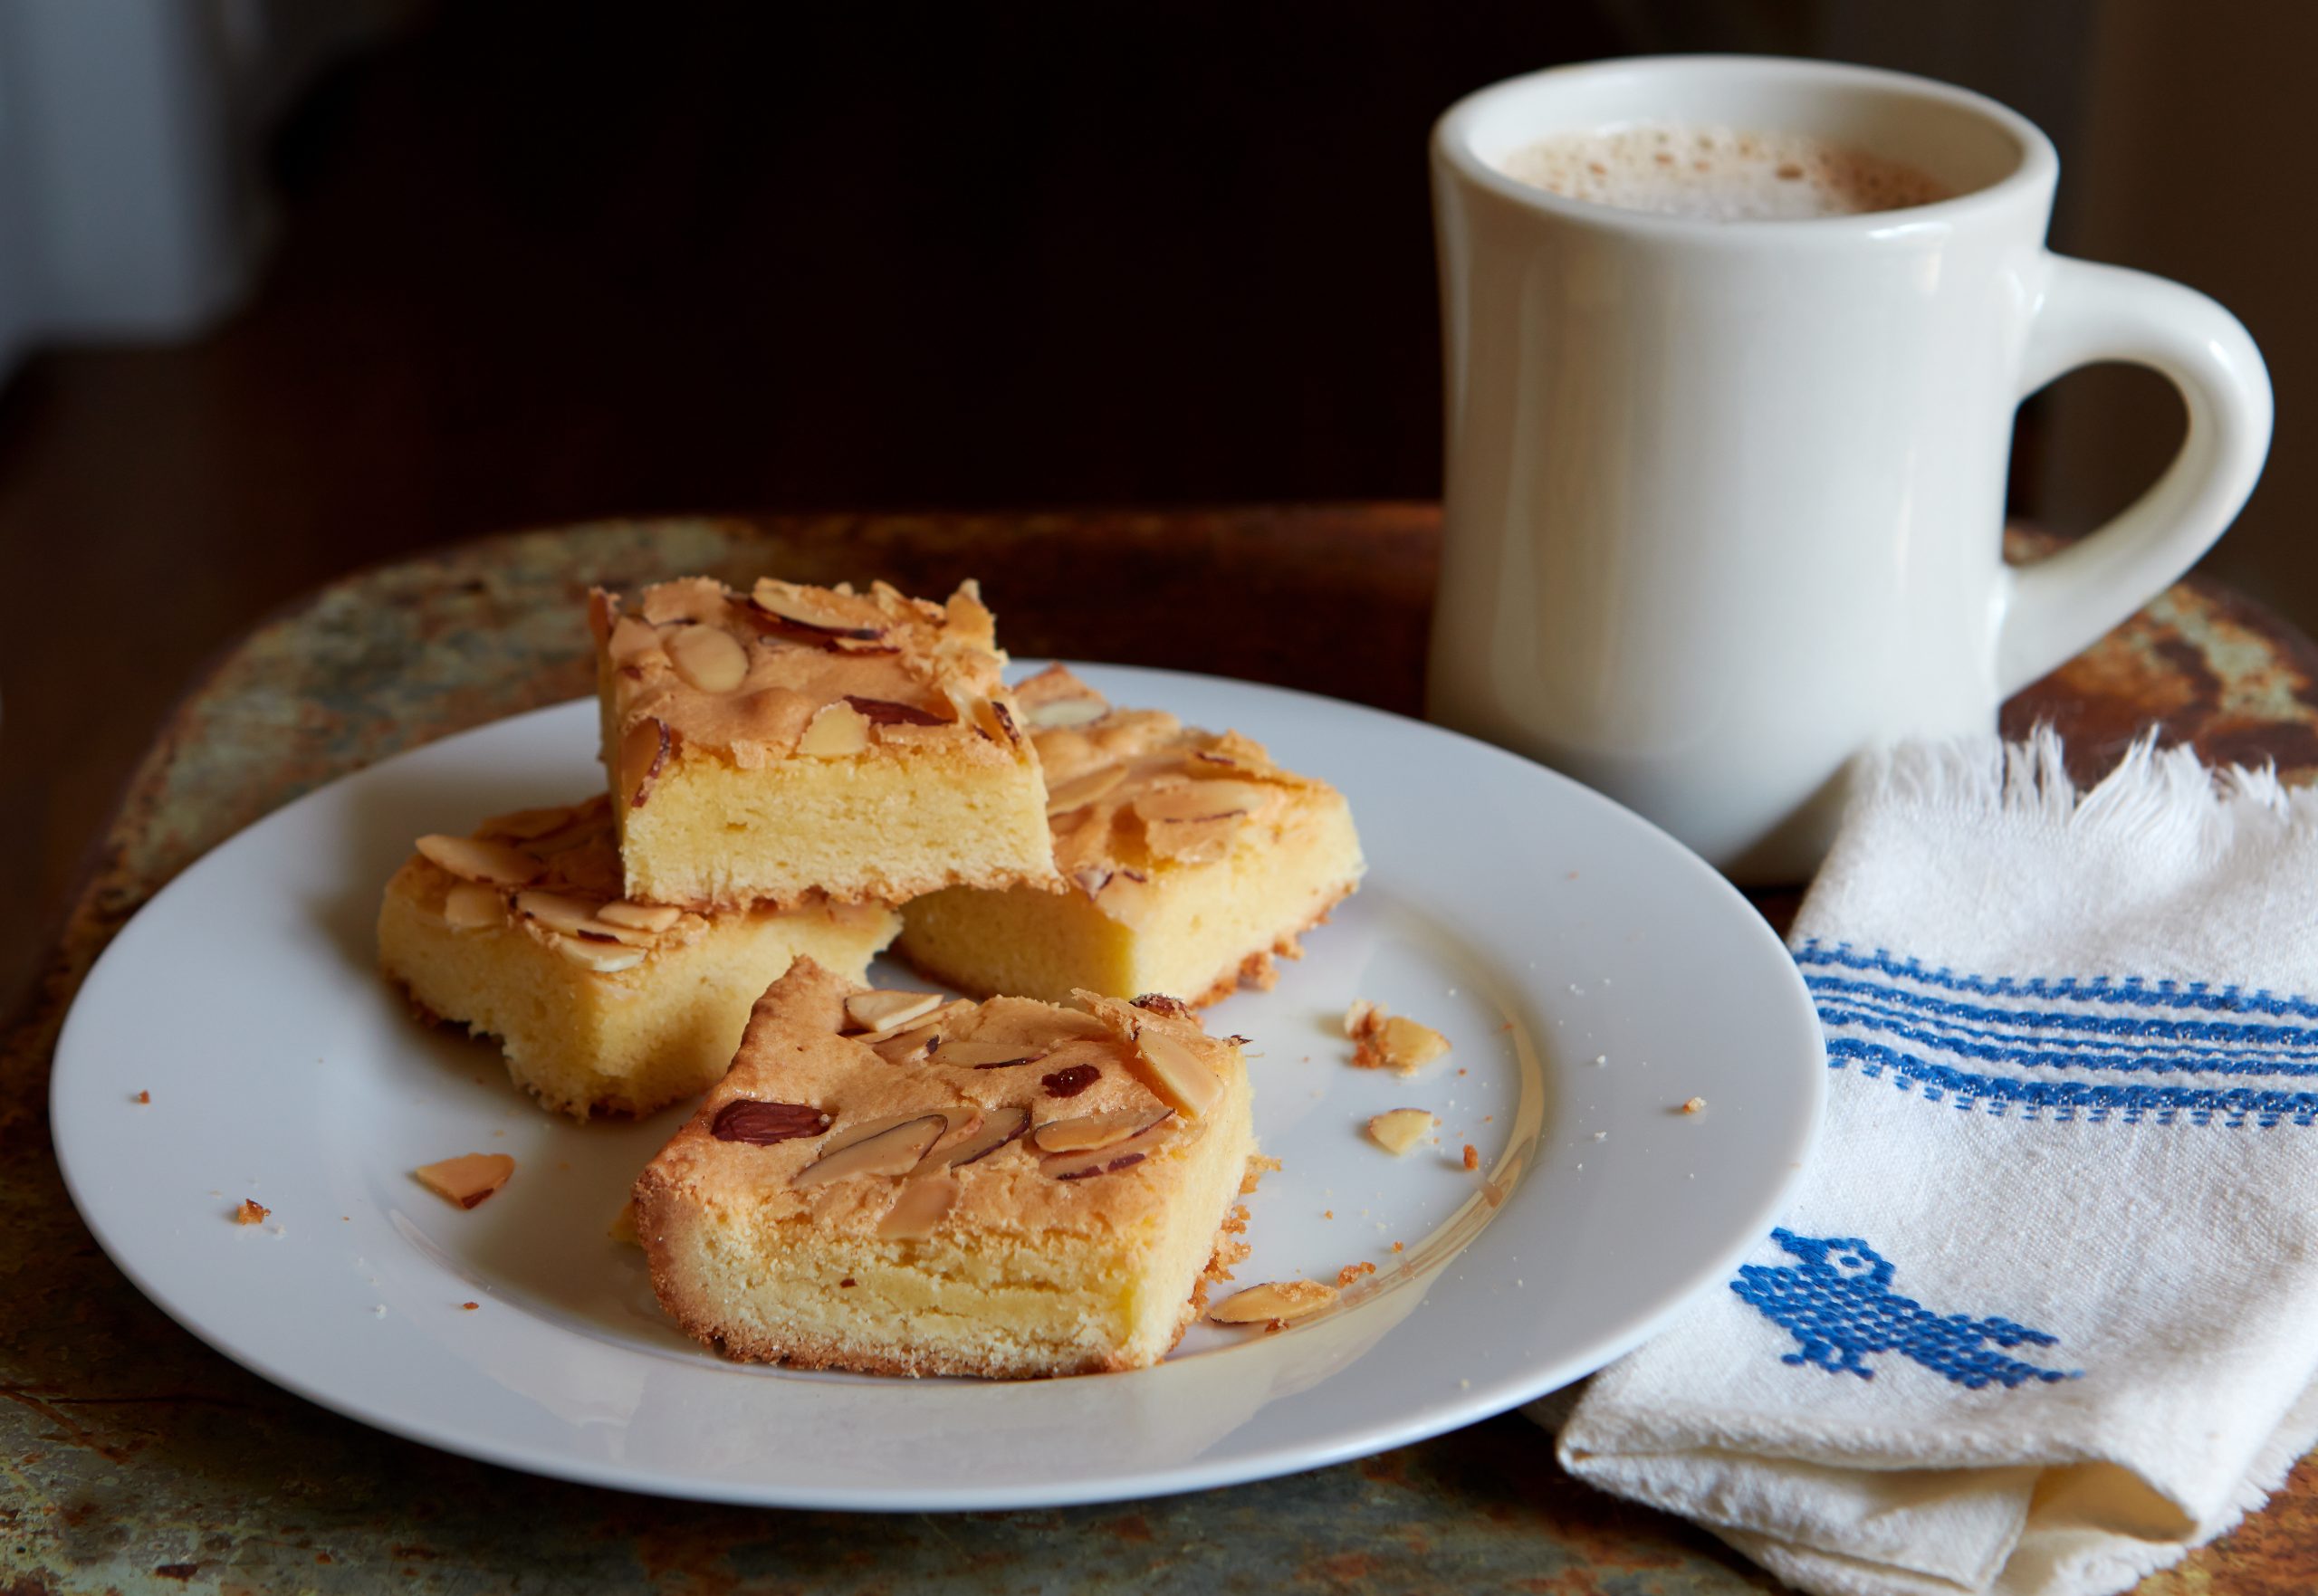
I don’t know about you but I love a cake that is quick and easy to make, but packs a punch of flavor too. Easy Almond Cake is just that – quick, easy and oh so delicious. I have a friend who is superb at throwing together the most simple and yummy desserts; never complicated but always such a wonderful treat. She shared this one with me a couple of weeks ago when we visited Texas. This is one of those recipes you can remember without even needing to pull it out of your recipe box!
Be attentive when purchasing your almond extract as some on the market use “flavoring” not the “natural oil” for the extract. For the best flavor be sure to check the ingredients before you buy. It isn’t hard to find “pure” extracts on the market. The stuff you want uses alcohol, water and oil of bitter almond. The bitter almond is actually poisonous, loaded with cyanide, along with other toxic compounds. Rest assured the poisonous compounds are extracted in the oil making process before it’s put into our extracts. Almond oil is one of my favorite fragrances, I love to just pop open the bottle and sniff.
Did you know that eating a handful of almonds, a few times a week, may help prevent or treat cholesterol problems, high blood pressure and diabetes? The almond tree only grows in warm, temperate climates such as Spain, Italy and our own, California. I saw plenty of almond orchards when I recently visited California. 80% of all the almonds grown in the world come from Cali – about 1.85 billions pounds of almonds a year! The almond is normally thought of as a “nut” but really it’s a seed from the fruit of the almond tree, which in reality makes it a spice. By definition a dried seed is a spice. Newsy – huh?
This almond cake is so quick to put together and one that you can be proud to serve to your dinner guests or carry to a pot luck. It didn’t last long in my kitchen and there are only 2 of us here to eat it. Empty nesters! It won’t last long in your kitchen either – it’s perfect with your morning cup of coffee or as a snack in the afternoon with a cup of hot spiced tea. Put a piece in your kids lunch box or treat them to a slice as an after-school snack.
Quick, easy, delicious, full of that buttery, almond flavor and topped with good for you sliced almonds! You’ve nothing to loose – bake one today!
Easy Almond Cake
Recipe Type: Dessert
Ingredients
1 stick butter, softened
2 eggs
1 cup flour
1 cup sugar
2 teaspoons almond extract
2 Tablespoons sliced almonds
Instructions
Preheat oven to 325*F.
Grease an 8×8 baking pan.
Melt butter in a glass bowl.
Beat eggs a bit and then beat into the melted butter.
Add remaining ingredients and mix well.
Pour into prepared pan and sprinkle sliced almonds on top.
Bake for 45 minutes or until a knife inserted in the center comes out clean.
Let cool and sprinkle with powdered sugar, top with whipped cream or enjoy plain.
This shop has been compensated by Collective Bias, Inc. and its advertiser. All opinions are mine alone. #BigGameSnacks #CollectiveBias
So much basketball this time of year requires some yummy #BigGameSnacks to serve while watching all the games on TV. I came up with an idea for a savory cheesecake, using Cheez-It Grooves for the crust, avocado, spices, sun-dried tomatoes, pine nuts, jalapeño and of course cream cheese. I work up an appetite during some of these games, especially if my Texas or North Carolina teams are playing. You might imagine how it is when teams from those two states are in competition with each other! It’s torture!
Basketball is a really popular sport in my home. When I first met my adoring hubby, many years ago I liked b’ball just fine, but he loved and I mean loved, (as in addicted to) basketball. I enjoy all the excitement, the noise and of course I especially love it when my team wins! Sitting court side at a pro game is exhilarating as is watching a game from a seat in a university center with loud, adrenalized students and all their chants and gestures. I find the entire event perfectly entertaining. However, when I met Mr.Right I didn’t spend countless hours in front of the TV watching basketball from November to March. But I learned to! As long as we have some yummy snacks on hand, a cozy fire if it’s cold and an occasional break I’m good. It’s all good! I’m serious!
When I ran into Walmart to buy dog food I noticed these Cheeze-It Grooves and Crunch’d in the aisles. I started thinking how they would not only be great to snack on during all the games but how I could use them for the savory cheesecake I’ve been thinking about. I don’t know anybody who doesn’t like Cheeze-It’s. Did you know there is a contest you can enter from Feb – April 2015. You vote on your favorite flavors/varieties from six popular Cheez-It flavors and play games for a chance to win $10,000.Who doesn’t want to win $10 Grand? Click on “Most Valuable Cheese” for a chance to play and win. You can thank me later!
I made the cheesecakes with mini springform pans which are so much fun and easy to transport if you’re taking them to a friends for game watching. The crusts came out spicy and crunchy, the filling creamy with sweet bites of sun-dried tomatoes, earthy pine nuts and a bit of heat from fresh chopped jalapeño, plus crunch from the Crunch’d on top. Served with the Grooves, tortilla chips, or any cracker you like, not much else is needed for snacking. Add in a bowl of nuts, perhaps a veggie plate and some refreshing beverages and prepare to cheer for your favorite team! You won’t go hungry!
Savory Avocado Cheesecake
Savory Avocado Cheesecake
Recipe Type: Appetizer
Author: Linda Walbridge
The filling recipe makes enough for 2 mini cheesecakes. Be sure to double the crust amounts if you plan on making two.
Ingredients
Crust:
1/2 cup crushed Cheeze-It Grooves
2 tablespoons melted butter
1/4 teaspoon Ancho chili powder
dash Cayenne powder
Filling:
1 8 oz. package cream cheese – room temperature
1/4 cup shredded sharp cheddar cheese
1/2 ripe avocado
1 egg
1 egg white
1/4 cup plain yogurt
1 tablespoon diced jalapeño
1 tablespoon diced sun-dried tomato
1 tablespoon toasted pine nuts
Instructions
Pre-heat oven to 350*F.
Spray 2 mini spring form pans with cooking spray
Crust:
Place Grooves in a zip loc baggie and crush with a rolling pin or mallet, then stir in spices.
Add melted butter to crushed Grooves and stir with a fork.
Spoon crust mixture into pans and pat down with fingertips, making sure some goes up the sides.
Filling:
Place the cream cheese, avocado, cheddar, yogurt and eggs in a bowl and blend with a hand mixer or stand mixer until creamy and well blended.
Add jalapeño, tomatoes and pine nuts and stir in by hand.
Divide mixture between two pans, place in hot oven and bake for about 20 minutes or until set.
Allow to cool to room temp before removing sides of pan.
Before Pi Day is over I am sharing an old post with one of my favorite pies. Just could’t bear to miss out on this unique day. Also there is an interesting story about bees. It’s just about that time of year when we will see honey bees buzzing about and pollinating all our favorite spring and summer fruits, veggies and nuts. Be kind – don’t use pesticides and plant plenty of bee friendly plants in your garden!
When warm weather finally rolls around I find myself in the mood for cool and refreshing lemon pie. It’s one of my favorite pies – maaaaybe my absolute favorite! In lieu of March being my “green” month I switched the citrus and made a lime pie. Limes are beautiful little fruits, bright and colorful, tart and juicy, and full of healthy vitamin C. (more…)